How Do I Add A Grid In Microsoft Paint Step By Step
Adding a grid in Microsoft Paint is simple and helps you draw with precision. Whether you use the classic Paint app or Paint 3D, you can show grid lines, adjust spacing, and snap your designs to the grid. This guide walks you through every method with clear screenshots and practical tips. You will also learn how to customize grid settings, fix common issues, and use grids for real design projects.
If you have ever tried to draw something neat in Microsoft Paint and felt like your lines were all over the place, you are not alone. A simple grid can change everything. It gives you a built-in guide system that keeps your shapes aligned and your designs looking clean. Whether you are a beginner or someone who just needs a quick visual aid, adding a grid is a game changer.
Many people do not even know that Paint has a grid feature at all. It is hidden in plain sight, and once you find it, you will wonder how you ever worked without it. This guide covers every method, from the classic Paint app to Paint 3D. You will learn how to show the grid, adjust its settings, and use it for real projects. Let us get started.
Key Takeaways
- Grid lines in Paint help you align objects and draw more accurately.
- You can show a grid in both classic Microsoft Paint and Paint 3D.
- Customizing grid size and spacing gives you full control over your design layout.
- Using a grid is great for pixel art, thumbnails, and simple graphic design.
- Common grid issues like invisible lines have easy fixes.
- Paint 3D offers more advanced grid options than the classic Paint app.
- Keyboard shortcuts can speed up your grid workflow significantly.
📑 Table of Contents
- What Is a Grid in Microsoft Paint and Why Use It?
- How to Show a Grid in Classic Microsoft Paint
- How to Add a Grid Using Paint 3D
- Customizing Your Grid Settings for Better Design
- Practical Uses for Grids in Microsoft Paint
- Troubleshooting Grid Issues in Microsoft Paint
- Advanced Tips for Mastering the Grid in Paint
- Final Thoughts on Using Grids in Microsoft Paint
What Is a Grid in Microsoft Paint and Why Use It?
A grid is a network of evenly spaced horizontal and vertical lines that covers your canvas. Think of it like graph paper overlaid on your image. These lines act as reference points that help you place objects, shapes, and pixels exactly where you want them.
There are many reasons why using a grid in Paint is helpful:
- Precision: You can align elements perfectly without guessing.
- Consistency: Your designs look balanced and professional.
- Speed: You spend less time adjusting and redoing work.
- Pixel art: Grids are essential for creating clean pixelated images.
- Layout design: Great for thumbnails, banners, and simple posters.
The grid feature in Paint is basic but effective. It does not overwhelm you with options. Instead, it gives you exactly what you need to improve your drawings. If you have ever used design tools like Photoshop or Canva, you already know the value of a grid. Paint brings that same concept in a lightweight, easy-to-use package.
How to Show a Grid in Classic Microsoft Paint
The classic Paint app comes pre-installed on every Windows computer. It is simple, fast, and surprisingly capable once you know its secrets. Showing a grid in the classic version is straightforward and takes only a few clicks.
Step-by-Step Guide to Displaying the Grid
- Open Microsoft Paint. Click the Start menu, type “Paint,” and press Enter.
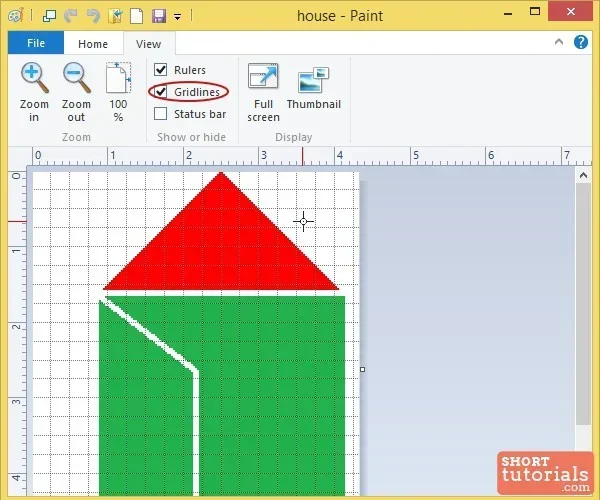
- Look at the toolbar. On the top menu bar, click the “View” tab.
- Find the Grid checkbox. In the Show group, you will see “Gridlines.”
- Click Gridlines. The grid will instantly appear on your canvas.
That is it. Your canvas now has a visible grid overlay. The lines are light and semi-transparent so they do not distract from your drawing. You can toggle them on and off anytime by clicking the same checkbox again.
Understanding the Default Grid Size
The default grid spacing in classic Paint is based on the zoom level of your canvas. When you zoom in closer, the grid squares appear smaller. When you zoom out, the squares get larger. This is helpful because it lets you work at different levels of detail without changing any settings.
For most users, the default grid works perfectly fine. But if you need more control, you can adjust the zoom level to change how the grid looks. A zoom level of 100% gives you one grid square per pixel, which is ideal for pixel art.
Quick Tips for Using the Grid in Classic Paint
- Zoom in to 800% for detailed pixel art work.
- Use the pencil tool for precise line drawing along grid lines.
- Save your canvas with the grid visible so you can continue where you left off.
- Turn off the grid before saving or exporting your final image.
Common Mistakes to Avoid
- Forgetting to zoom in. At default zoom, grid squares can be too large for detailed work.
- Leaving the grid on in exports. Grid lines will appear in your saved image if you do not turn them off first.
- Using the brush instead of the pencil. The brush tool does not snap to grid lines as cleanly.
How to Add a Grid Using Paint 3D
Paint 3D is Microsoft’s newer drawing application. It comes with more features than classic Paint, including better grid options. If you have Windows 10 or 11, you likely have Paint 3D available. It offers a more flexible approach to grids and is worth exploring.
Steps to Enable the Grid in Paint 3D
- Open Paint 3D. Click Start, type “Paint 3D,” and launch the app.
- Create a new canvas. Click the “Menu” button and select “New.”
- Go to the Canvas settings. Look at the right-side panel for canvas options.
- Toggle the grid. Find the grid option and switch it on.
Paint 3D gives you a bit more flexibility with the grid compared to classic Paint. You can adjust the grid type and visibility settings more easily. The interface is more visual, which makes it intuitive to work with.
Paint 3D vs Classic Paint: Grid Comparison
| Feature | Classic Paint | Paint 3D |
|---|---|---|
| Grid visibility toggle | Yes | Yes |
| Custom grid spacing | Limited | More options |
| 3D grid support | No | Yes |
| Grid snapping | Basic | Improved |
| Ease of access | Very easy | Easy |
| Best for | Simple 2D work | Mixed 2D and 3D projects |
As you can see from the comparison, Paint 3D offers a more robust grid drawing experience. But classic Paint still holds its own for quick, simple tasks. Choose the one that fits your project best.
Expert Insight: When to Use Paint 3D Over Classic Paint
If your project involves 3D objects or complex layouts, Paint 3D is the better choice. The grid in Paint 3D extends into the third dimension, giving you spatial reference points. For simple 2D drawings, logos, or pixel art, classic Paint is faster and lighter. Both tools are free and already on your PC.
Customizing Your Grid Settings for Better Design
The default grid in Paint works well for most tasks. But sometimes you need more control. Customizing your grid settings can make a big difference in the quality of your work. Let us look at how you can fine-tune the grid to match your needs.
Adjusting Grid Spacing and Size
In classic Paint, you control the grid appearance mainly through the zoom level. Here is how to get the spacing you want:
- Zoom in for smaller squares: Use the zoom slider at the bottom right to increase detail.
- Zoom out for larger squares: Decrease the zoom for a broader overview.
- Match zoom to pixel count: For a 100×100 pixel canvas, zoom at 100% gives you a 1:1 pixel-to-grid ratio.
In Paint 3D, you have slightly more direct control over the grid size. You can access canvas settings and adjust the grid resolution to fit your project. This is especially useful when you are working on designs that need specific dimensions.
Creating a Custom Grid Template
If you use grids frequently, creating a grid template can save you time. Here is a simple workflow:
- Open Paint and set your canvas size to your desired dimensions.
- Enable the grid using the steps above.
- Adjust the zoom to get the grid spacing you need.
- Save the file as a template with a clear name like “Grid_Template_500x500.”
- Reuse the template whenever you start a new project.
This approach works great for people who create similar designs regularly. Whether you make social media thumbnails or pixel art sprites, having a saved template speeds up your process.
Using Grid Lines for Precise Placement
Grid lines are not just visual guides. They can help you place objects with real precision. Here is how to make the most of them:
- Start at grid intersections. Place your shapes where lines cross for perfect alignment.
- Use the eraser tool along grid lines to create clean edges.
- Draw one section at a time. Focus on one grid square before moving to the next.
- Check your work. Zoom out to see if your design aligns with the overall grid structure.
Expert Insight: The Power of Grid Snapping
While classic Paint does not have a formal “snap to grid” feature like professional tools, the grid lines themselves act as a visual snap guide. By drawing carefully along the lines, you achieve the same result. Paint 3D comes closer to true snapping behavior, making it the better choice for precision work.
Practical Uses for Grids in Microsoft Paint
Now that you know how to show and customize a grid, let us talk about what you can actually do with it. Grids are not just for technical drawings. They have many practical uses that can improve your everyday projects.
Pixel Art Creation
Pixel art is one of the most popular uses for grids in Paint. Each grid square represents one pixel, and by coloring squares carefully, you can create detailed images. The grid ensures your pixels stay aligned and your characters look clean.
To get started with pixel art in Paint:
- Set a small canvas size like 32×32 or 64×64 pixels.
- Zoom in to 800% or higher.
- Enable the grid.
- Use the pencil tool to fill in individual squares.
Thumbnail and Banner Design
Need a YouTube thumbnail or a blog banner? A grid helps you divide the canvas into sections. You can place text, images, and shapes in specific zones for a balanced layout. This is especially useful when you are working with limited space.
Photo Cropping and Alignment
Even though Paint is not a photo editor, the grid can help you crop and align photos more accurately. Turn on the grid, position your crop area along the grid lines, and use the select tool to cut precisely. It is a simple trick that yields professional-looking results.
Creating Graph Paper Effect
Want to make a grid paper background for a worksheet or presentation? Simply enable the grid, set your canvas to a larger size, and fill the background with a light color. Export the image, and you have custom graph paper ready to use.
Troubleshooting Grid Issues in Microsoft Paint
Sometimes things do not work as expected. The grid might not show up, or it might look strange. Here are the most common issues and how to fix them.
Grid Lines Are Not Visible
If you cannot see the grid, the first thing to check is whether the “Gridlines” option is enabled. Go to the View menu and make sure the checkbox is checked. If it is already checked and the grid still does not appear, try the following:
- Zoom in. The grid may be too small to see at low zoom levels.
- Restart Paint. A simple restart often fixes display glitches.
- Check your canvas size. A very large canvas may make the grid lines appear too thin.
Grid Lines Show Up in Saved Images
This is a very common problem. If your exported image has grid lines on it, you forgot to turn off the grid before saving. Always disable the gridlines option before exporting your final image. This one simple step saves a lot of frustration.
Grid Does Not Align Properly
If the grid looks misaligned or uneven, your zoom level is likely off. Reset the zoom to 100% and check if the grid looks correct. You can also try resizing the canvas and re-enabling the grid.
Quick Tips for Smooth Grid Performance
- Keep your canvas size reasonable. Extremely large canvases can slow down grid rendering.
- Use Paint 3D for complex projects. It handles grids more efficiently at larger sizes.
- Save frequently. Grid settings can reset if the app crashes unexpectedly.
- Update Windows. Older versions of Paint may have bugs that affect grid display.
Advanced Tips for Mastering the Grid in Paint
Once you are comfortable with the basics, these advanced tips will take your grid skills to the next level. They are simple to implement but make a noticeable difference in your work quality.
Combine the Grid with Rulers
Paint has rulers that work alongside the grid. When both are visible, you get a powerful alignment system. The rulers show exact pixel positions, while the grid gives you visual reference lines. Together, they make precise placement almost effortless.
To show rulers in classic Paint, go to the View menu and check “Rulers.” You can then use them to measure distances and position elements with accuracy.
Use the Grid for Symmetry
Creating symmetrical designs is much easier with a grid. Here is a simple method:
- Enable the grid.
- Find the center of your canvas.
- Draw one half of your design.
- Mirror it by counting grid squares.
This technique works great for faces, logos, and any design that needs balance. The grid makes it easy to count squares and ensure both sides match perfectly.
Exporting Grid-Based Designs for Other Tools
If you plan to take your design into another tool like GIMP, Canva, or Photoshop, the grid in Paint serves as an excellent starting point. Export your design as a PNG file with a transparent background. The grid structure you built in Paint will translate into a clean layout that is easy to refine in more advanced software.
Here is a quick workflow for this:
- Design in Paint with the grid enabled.
- Turn off the grid before exporting.
- Save as PNG for best quality.
- Import into your preferred design tool.
- Refine and add finishing touches.
Keyboard Shortcuts That Help with Grid Work
Learning a few keyboard shortcuts can speed up your grid workflow in Paint:
- Ctrl + Z: Undo your last action.
- Ctrl + Plus/Minus: Zoom in and out quickly.
- Ctrl + S: Save your work frequently.
- F11: Toggle full-screen view for more canvas space.
These shortcuts do not directly control the grid, but they make the overall experience smoother. When you are working with a grid, zooming in and out constantly is normal. Having quick access to these controls saves valuable time.
Final Thoughts on Using Grids in Microsoft Paint
Adding a grid in Microsoft Paint is one of those small things that makes a huge difference. It is free, it is built right into the app, and it takes just a few seconds to enable. Whether you are a student working on a school project, a hobbyist creating pixel art, or someone designing a quick graphic, the grid is an essential tool.
Remember that both classic Paint and Paint 3D offer grid features. Classic Paint is perfect for simple 2D tasks, while Paint 3D gives you more options for complex projects. The key is to practice with the grid and get comfortable using it. Once it becomes part of your workflow, you will not want to work without it.
Start with the basics covered in this guide. Show the grid, adjust the zoom, and draw along the lines. As you grow more confident, explore the customization options and advanced tips. Before long, you will wonder how you ever created designs without a grid in Microsoft Paint.
The beauty of the Paint app is its simplicity. You do not need to be a graphic designer to use it effectively. With a grid, even the simplest drawings look more organized and polished. So open Paint, enable those gridlines, and start creating. You will be amazed at how much better your designs can look with just a little structure to guide you.
Frequently Asked Questions
Can I add a grid in Microsoft Paint on Windows 11?
Yes, the classic Paint app in Windows 11 still includes the gridlines feature. Simply go to the View menu and check Gridlines to display the grid on your canvas. The process is the same as in earlier Windows versions.
Does Microsoft Paint have a snap-to-grid feature?
Classic Paint does not have a formal snap-to-grid feature. However, the visible grid lines serve as a visual guide that helps you align your drawings. Paint 3D offers better snapping behavior for more precise work.
Can I change the color of the grid lines in Paint?
No, the grid line color in Microsoft Paint is fixed and cannot be customized. The lines are light gray by design so they do not interfere with your drawing. If you need colored grid lines, you may need to use a different drawing tool.
Is there a keyboard shortcut to show the grid in Paint?
There is no dedicated keyboard shortcut for toggling gridlines in classic Paint. You need to go to the View menu and click Gridlines. However, you can use Ctrl+Z to undo if you accidentally draw over the grid area.
Can I use a grid in Paint for creating game sprites?
Absolutely. Many indie game developers use Paint with a grid to create simple sprites and tile-based graphics. Set a small canvas size, enable the grid, zoom in, and draw pixel by pixel for clean sprite designs.
Why are my grid lines not showing up in Paint 3D?
If the grid is not visible in Paint 3D, check the canvas settings on the right panel. Make sure the grid toggle is turned on. Also verify that your canvas size is not set too large, as this can make grid lines hard to see at normal zoom levels.
=== CONCLUSION ===
Adding a grid in Microsoft Paint is a simple yet powerful way to improve your drawings and designs. This guide has shown you how to enable the grid in both classic Paint and Paint 3D, customize grid settings, and use grids for real projects like pixel art, thumbnails, and photo alignment. The key is to start simple, practice regularly, and explore the customization options as you grow more comfortable.
Remember that the grid feature is one of the most underrated tools in Microsoft Paint. It costs nothing, requires no setup, and delivers immediate results. Whether you are a beginner or an experienced user, the grid can elevate the quality of your work in seconds. So the next time you open Paint, do not forget to turn on those gridlines and see the difference for yourself.