Can You Turn Any Router Into An Access Point Guide
Yes, you can turn almost any router into an access point to extend your Wi-Fi range and eliminate dead zones. This guide walks you through every step, from checking compatibility to configuring settings like DHCP and bridge mode. Whether you have an old spare router or want to boost coverage in a large home, this access point setup guide has you covered.
Have you ever walked through your house and noticed the Wi-Fi signal drops in certain rooms? Maybe the bedroom at the end of the hall has no connection, or the backyard is completely dead. You are not alone. Millions of people deal with weak wireless signals every single day.
The good news is that you do not need to buy expensive new equipment to fix this problem. In many cases, you can repurpose an old wireless router and turn it into an access point. This simple trick can double your Wi-Fi coverage without spending a dime. Let us walk through exactly how this works and whether your router can do it.
In this guide, we will cover everything you need to know. We will look at what an access point actually does, which routers work best, and the exact steps to set one up. By the end, you will have all the knowledge you need to improve your network setup and enjoy stronger internet everywhere in your home.
Key Takeaways
- Any router can become an access point: Most wireless routers support access point mode or can be configured manually to work as one.
- You need basic networking knowledge: Understanding LAN ports, DHCP, and IP addresses makes the process much easier.
- Bridge mode vs. access point mode: Both extend your network, but access point mode is simpler and more reliable for most users.
- An Ethernet cable is essential: You need a wired connection between your main router and the access point for the best performance.
- Old routers are perfect candidates: Spare or outdated routers make excellent access points at no extra cost.
- Configuration steps are straightforward: Disabling DHCP, setting a static IP, and connecting via LAN port are the key steps.
- Proper placement matters: Position your access point halfway between your main router and the dead zone for optimal signal strength.
📑 Table of Contents
- What Is an Access Point and Why Do You Need One?
- Can Any Router Be Turned Into an Access Point?
- Step-by-Step Guide to Converting Your Router Into an Access Point
- Access Point Mode vs. Bridge Mode: What Is the Difference?
- Common Mistakes to Avoid When Setting Up an Access Point
- Tips for Getting the Best Performance from Your Access Point
- Benefits of Turning Any Router Into an Access Point
- Frequently Asked Questions
- Conclusion
What Is an Access Point and Why Do You Need One?
An access point is a device that creates a wireless local network. It connects to your main router through a cable and then broadcasts a wireless signal to devices in its range. Think of it like a relay station for your internet connection.
Your main router handles everything. It connects to your modem, assigns IP addresses, and manages traffic. The access point simply takes that connection and extends the wireless coverage. It does not replace your router. It works alongside it.
How an Access Point Differs from a Router
Many people confuse routers and access points. They are different devices with different jobs. A router routes traffic between networks. An access point just broadcasts a wireless signal so devices can connect.
Here is a simple way to think about it:
- Router: The brain of your network. It directs traffic and manages connections.
- Access Point: The voice of your network. It sends the signal out so devices can reach that brain.
When you turn a router into an access point, you are essentially disabling its routing functions. It stops managing traffic and starts just broadcasting signal. This makes it a dedicated wireless extender that works seamlessly with your existing setup.
When Should You Use an Access Point?
There are several situations where adding an access point makes a lot of sense. Let us look at the most common ones.
- Your home is larger than what a single router can cover effectively.
- You have dead zones in certain rooms or floors of your house.
- You want better Wi-Fi performance in areas far from your main router.
- You have an old spare router sitting in a drawer and want to put it to good use.
- You run a small business and need stronger coverage in a workspace.
- Your current wireless signal drops frequently or slows down in certain spots.
If any of these sound familiar, setting up an access point is probably a great idea for you.
Can Any Router Be Turned Into an Access Point?
The short answer is yes, most routers can. The longer answer depends on a few factors. Let us break this down so you know exactly what to expect.
Routers That Support Access Point Mode Natively
Many modern routers come with a built-in access point mode in their settings. This makes the process incredibly easy. You simply log into the router admin panel, find the mode setting, and switch it to access point. The router handles the rest automatically.
Popular brands like Netgear, TP-Link, ASUS, and Linksys often include this feature. If your router has an “Access Point Mode” or “AP Mode” option in the settings menu, you are in luck. You can skip most of the manual configuration steps.
Older Routers That Require Manual Setup
What if your router does not have a dedicated access point mode? No worries. You can still configure it manually. Older routers from the 2000s and early 2010s can absolutely work as access points. You just need to adjust a few settings by hand.
The manual process involves disabling DHCP, setting a static IP address, and connecting the router to your main unit via an Ethernet cable. It sounds technical, but it is actually quite simple once you see the steps laid out. We will cover the full process in the next section.
What to Check Before You Start
Before you begin, there are a few things you should verify. This will save you time and frustration later.
- Check if your router has an Ethernet port: You need at least one LAN port on the router you want to convert. Nearly all routers have these.
- Know your main router settings: You will need your main router IP address, subnet mask, and DHCP range. You can usually find this on a sticker on the back of your main router.
- Have an Ethernet cable ready: You will need a cable to connect your main router to the access point. A standard Cat5e or Cat6 cable works perfectly.
- Back up your router settings: Before making changes, save a backup of your current configuration. This way, you can restore it if anything goes wrong.
Taking these five minutes to prepare will make the entire process much smoother.
Step-by-Step Guide to Converting Your Router Into an Access Point
Now let us get into the actual setup. This is the part where everything comes together. Follow these steps carefully and you will have a working access point in no time.
Step 1: Connect to Your Router
First, connect your computer to the router you want to convert. You can do this either through Wi-Fi or by using an Ethernet cable plugged into one of the LAN ports. A wired connection is more stable and recommended for this process.
Open your web browser and type your router IP address into the address bar. Common addresses are 192.168.0.1 or 192.168.1.1. Check the label on the back of your router if you are unsure. Log in with your admin credentials.
Step 2: Disable DHCP
DHCP stands for Dynamic Host Configuration Protocol. It is the system that assigns IP addresses to devices on your network. Your main router already handles this. So you need to turn DHCP off on the router you are converting.
Look for the DHCP settings in your router admin panel. It is usually under “Network Settings” or “LAN Settings.” Change the setting from “Enabled” to “Disabled.” Save your changes before moving on.
Step 3: Assign a Static IP Address
Next, you need to set a static IP address for your access point. This ensures it has a fixed address on your network that other devices can find.
Choose an IP address within the same range as your main router but outside the DHCP range. For example, if your main router is 192.168.1.1 and your DHCP range goes from 100 to 200, you could set the access point to 192.168.1.2. This keeps things organized and prevents IP conflicts.
Step 4: Connect the Routers with an Ethernet Cable
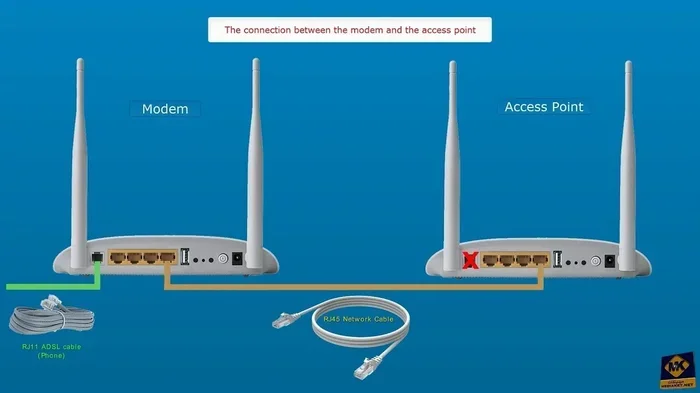
Take your Ethernet cable and plug one end into a LAN port on your main router. Plug the other end into any LAN port on the router you are converting. Do not use the WAN or Internet port on the second router. The LAN port is the one you want.
This wired connection is the backbone of your extended network. It carries the internet signal from your main router to the access point, which then broadcasts it wirelessly.
Step 5: Configure Wireless Settings
Now it is time to set up the wireless side of things. Go to the wireless settings section in your router admin panel. Here are the key things to configure:
- SSID: This is your network name. You can use the same name as your main router for a seamless experience, or create a different one if you prefer.
- Password: Set a strong password to keep your network secure.
- Channel: If you are using the same SSID as your main router, set the wireless channel to auto. This helps avoid interference.
- Security Mode: Use WPA3 if your devices support it. Otherwise, WPA2 is a solid choice.
Step 6: Save and Reboot
Save all your settings and reboot the router. Once it powers back on, it should be working as an access point. Test it by walking to the area where you had weak signal and checking if your connection is stronger now.
Access Point Mode vs. Bridge Mode: What Is the Difference?
You might have heard the term “bridge mode” thrown around when reading about extending networks. While it is related, it is not the same as access point mode. Let us clear up the confusion.
What Is Bridge Mode?
Bridge mode connects two networks together. It bridges the gap between your main network and a secondary one. In bridge mode, the router acts as a transparent bridge, passing traffic between the two networks without creating a new wireless network.
Bridge mode is useful in specific scenarios, like when you are connecting a wired device to a wireless network. But for most home users looking to extend Wi-Fi coverage, access point mode is the better choice.
Which Mode Should You Choose?
Here is a quick comparison to help you decide:
- Access Point Mode: Creates a new wireless network from the secondary router. Easier to set up. Better for most home users.
- Bridge Mode: Connects two separate networks. More complex. Better for advanced setups or business environments.
For the purpose of extending Wi-Fi in your home, access point mode is almost always the right choice. It is simpler, more reliable, and gives you a seamless experience.
Common Mistakes to Avoid When Setting Up an Access Point
Even with a clear guide, mistakes can happen. Here are the most common errors people make when setting up an access point, and how to avoid them.
Using the WAN Port Instead of a LAN Port
This is the number one mistake. The WAN port on a router is meant to connect to the modem or main internet source. When you are using a router as an access point, you must connect the Ethernet cable to a LAN port. Using the WAN port will cause your setup to fail or create a double NAT situation that can cause all kinds of problems.
Forgetting to Disable DHCP
If you leave DHCP enabled on the access point, it will start assigning IP addresses to devices. This conflicts with your main router and can cause connectivity issues. Always double-check that DHCP is disabled before you finish setup.
Choosing the Wrong IP Address
Setting a static IP address outside your main router range can cause problems. Make sure the IP you choose is within the same subnet and does not overlap with any device already on your network.
Placing the Access Point Too Far Away
An access point works best when it is placed within good range of the main router. If you put it too far away, the Ethernet connection will be strong, but the wireless signal it broadcasts will be weak. Aim to place it halfway between your main router and the area with poor coverage.
Skipping the Firmware Update
Before you start configuring your router, check if there is a firmware update available. Updated firmware fixes bugs, improves performance, and patches security vulnerabilities. A quick update can save you from headaches down the road.
Tips for Getting the Best Performance from Your Access Point
Once your access point is set up, there are a few things you can do to get the most out of it. These tips will help you maximize your Wi-Fi coverage and speed.
Position It Strategically
Placement is everything. Put your access point in a central location between your main router and the area with weak signal. Avoid hiding it behind walls, inside closets, or near large metal objects. The more open the space, the better the signal will travel.
Use a Dedicated Channel
If you have multiple access points broadcasting on the same channel, they can interfere with each other. Use different channels for each access point to reduce interference and improve performance. A Wi-Fi analyzer app can help you find the least congested channel.
Keep the Firmware Updated
Regularly check for firmware updates on your access point. Manufacturers release updates that improve stability, fix bugs, and sometimes even add new features. Keeping your firmware current ensures your access point runs smoothly.
Use Quality Ethernet Cable
The cable connecting your main router to the access point matters. Use a Cat5e or Cat6 cable for the best results. Cheap or damaged cables can limit your speeds and cause connection drops.
Monitor Your Network Performance
After setup, test your network in different areas of your home. Use speed test tools to check performance. If you notice issues, try adjusting the channel, moving the access point, or checking for firmware updates.
Benefits of Turning Any Router Into an Access Point
Now that you know how to set it up, let us talk about why you should bother. The benefits of using an old router as an access point are genuinely impressive.
- Cost savings: You do not need to buy a new access point or range extender. Your old router becomes a free solution.
- Better performance: A wired access point delivers faster and more stable speeds than most wireless extenders.
- More control: You get full access to the router settings, giving you more control over your network.
- Less clutter: Repurposing old equipment reduces electronic waste and keeps your home cleaner.
- Improved coverage: You can place the access point exactly where you need it, eliminating dead zones effectively.
- Easy to scale: If you need more coverage in the future, you can add another access point using the same process.
The bottom line is that turning a router into an access point gives you a powerful, flexible, and free way to improve your home network. It is one of the best upgrades you can make without spending anything extra.
Frequently Asked Questions
Do I need a specific brand of router to use it as an access point?
No, you do not need a specific brand. Most routers from any manufacturer can be configured as an access point, whether through a built-in access point mode or manual settings. Brands like TP-Link, Netgear, ASUS, Linksys, and D-Link all support this functionality.
Will turning my router into an access point void the warranty?
Generally, no. Changing settings in your router admin panel does not void the warranty. However, if you physically modify the router or flash custom firmware, that could void it. Stick to the standard settings changes, and you should be fine.
Can I use a Wi-Fi extender instead of turning a router into an access point?
Yes, you can use a Wi-Fi extender, but it will not perform as well as a wired access point. Extenders receive and rebroadcast the signal, which cuts bandwidth in half. An access point connected via Ethernet provides full-speed wireless coverage.
Do I need any special equipment besides the router?
All you need is an Ethernet cable to connect the access point to your main router. A standard Cat5e or Cat6 cable works perfectly. You do not need any special adapters or additional equipment.
Can I use a router as an access point without an Ethernet cable?
Ideally, you should use an Ethernet cable for the best performance and stability. Some routers support wireless bridging or wireless distribution system (WDS), but these methods are slower and less reliable than a wired connection.
How many access points can I add to my network?
You can add multiple access points to your network. Most home setups work well with one or two access points. If you have a very large home or office, you might need three or more. Just make sure each access point is connected to the main router and configured correctly to avoid conflicts.
Conclusion
Can you turn any router into an access point? Absolutely yes. Whether your router has a built-in access point mode or requires manual configuration, the process is straightforward and well worth the effort. You get better Wi-Fi coverage, stronger signals, and a faster network without spending a single extra dollar.
Follow the steps outlined in this guide, avoid the common mistakes, and position your access point thoughtfully. You will be amazed at how much your wireless signal improves. Your dead zones will become a thing of the past, and every corner of your home will have reliable internet access.
Take a few minutes today to set up your access point. Your future self, standing in the backyard with full Wi-Fi, will thank you. It is one of the simplest and most effective upgrades you can make to your home network.