How Can You Hook Up A Dvd Player With Just Hdmi Cable
Yes, you can hook up a DVD player with just an HDMI cable, and it is one of the easiest ways to get great picture and sound. Most modern DVD players come with an HDMI port built right in, making the connection fast and straightforward. This guide walks you through every step, from plugging in the cable to fixing common problems. You will also learn about compatibility, alternative options, and expert tips to improve your setup.
Have you ever wanted to watch your favorite DVD collection but felt confused by all the cables and ports? You are not alone. Many people wonder whether they can just grab a single HDMI cable and get everything working. The good news is that hooking up a DVD player with just an HDMI cable is simpler than you think. In this guide, we will walk you through every single step. You will learn what you need, what to watch out for, and how to fix common problems. Let us get your DVD player connected and ready to go.
Watching movies on a DVD player still brings a special kind of joy. Maybe you have a collection of old favorites. Maybe you prefer the reliable quality of physical discs. Whatever the reason, getting the right connection matters. An HDMI cable gives you sharp picture quality and clear sound all in one simple line. It replaces the messy bundle of old cables that used to be standard. Whether you are setting up a bedroom DVD player or connecting one to a home theater system, this guide has you covered. We will keep things easy to follow and free of confusing jargon.
Key Takeaways
- Simple Setup: Hooking up a DVD player with just an HDMI cable requires only one cable and a compatible port on both devices.
- Better Quality: HDMI delivers both high-definition video and audio through a single cable, replacing older options like composite or component cables.
- Check Compatibility First: Not all DVD players have HDMI outputs, so verify your device before buying a cable.
- Troubleshooting Is Easy: Most HDMI issues can be fixed with basic steps like checking connections, adjusting display settings, or trying a different cable.
- Alternative Connections Exist: If HDMI is not an option, you can use composite, component, or optical audio cables depending on your TV and DVD player.
- Keep It Clean: Dust on HDMI ports and cables can cause signal problems, so regular maintenance helps.
- One Cable Does It All: HDMI carries video and audio simultaneously, which simplifies your home entertainment setup.
📑 Table of Contents
- Can You Hook Up A Dvd Player With Just Hdmi Cable
- Step-By-Step Guide To Connecting Your DVD Player
- Why HDMI Is The Best Choice For DVD Players
- Troubleshooting Common HDMI Connection Issues
- Alternative Connection Options If HDMI Is Not Available
- Tips For The Best DVD Viewing Experience
- Common Mistakes To Avoid When Hooking Up A DVD Player
- Expert Insights On DVD Player HDMI Setup
- Final Thoughts
Can You Hook Up A Dvd Player With Just Hdmi Cable
The short answer is yes. Most DVD players made in the last fifteen years or so come with an HDMI output. This means you can connect them directly to any modern TV or monitor using a single HDMI cable. The connection sends both high-definition video and sound through one line. You do not need extra audio cables or adapters in most cases.
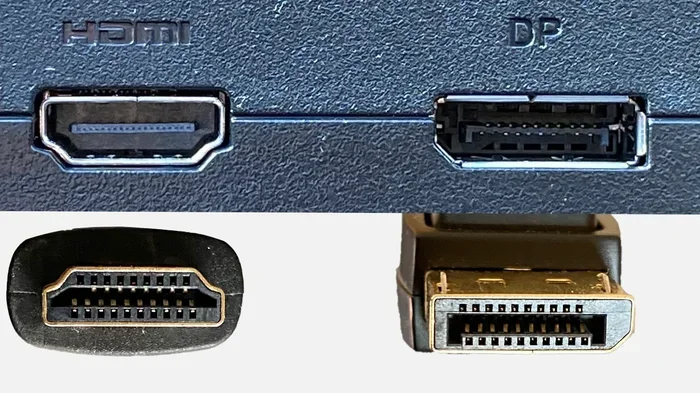
However, not every DVD player has an HDMI port. Older models or very budget-friendly ones might only offer older connection types. Before you grab a cable, check the back of your DVD player. Look for a small rectangular port labeled “HDMI.” If you see it, you are good to go. If not, do not worry. We will cover alternative options later in this article.
Using an HDMI cable for your DVD player offers several clear benefits. First, the picture quality is much better than older cable types. You get a clean digital signal with no interference. Second, setup takes seconds. Plug one end into the DVD player and the other into the TV. Third, you only need one cable instead of three or four. It is a win-win situation for simplicity and quality.
What You Need Before You Start
Before you begin the setup process, make sure you have everything ready. Here is a quick checklist:
- An HDMI cable: Any standard HDMI cable works for DVD players. You do not need the most expensive one. A basic High Speed HDMI cable handles DVD quality just fine.
- A TV or monitor with an HDMI input: Most TVs made after 2005 have at least one HDMI port. Check the back or side of your TV.
- A DVD player with an HDMI output: Look for the HDMI port on the back of your DVD player.
- A power source: Make sure both the DVD player and the TV are plugged in and turned on.
- A quiet workspace: Give yourself a few minutes to focus on the setup without rushing.
Once you have these items, you are ready to move to the next step. The process is straightforward and takes only a few minutes.
Step-By-Step Guide To Connecting Your DVD Player
Now let us walk through the actual setup. Each step is simple, and you can follow along even if you are not very tech-savvy.
Step 1: Turn Off Both Devices
Always start by turning off your TV and DVD player. This protects both devices from any small electrical surges. It also helps you see the ports more clearly. Working with powered-off equipment is a smart habit whenever you plug in new cables.
Step 2: Locate The HDMI Ports
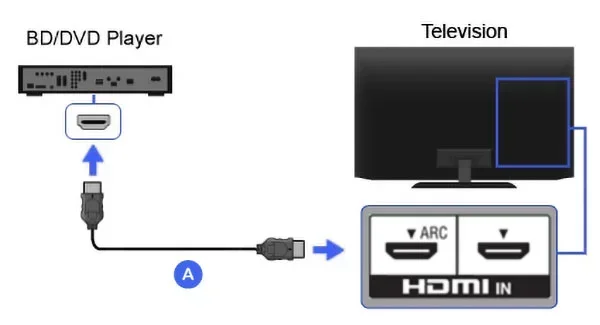
Find the HDMI output on your DVD player. It is usually on the back panel. Then find an available HDMI input on your TV. TVs often label these as HDMI 1, HDMI 2, HDMI 3, and so on. Pick any open port. If all ports are taken, unplug a device you are not currently using.
Step 3: Plug In The HDMI Cable
Take your HDMI cable and plug one end into the DVD player. Push it in gently until it fits snugly. Then plug the other end into your TV’s HDMI port. The connector is designed to go in only one way. If it does not fit easily, do not force it. Check the orientation and try again.
Step 4: Power On And Select The Input
Turn on both devices. Use your TV remote to switch to the correct HDMI input. Press the “Input” or “Source” button on your remote. You should see a menu or the DVD player’s home screen appear on your TV. If you see nothing, double-check that both cables are firmly connected.
Step 5: Adjust Display Settings If Needed
Sometimes the picture might not look perfect right away. Go into your TV’s settings menu and look for display options. You can adjust the resolution, aspect ratio, and picture mode. Most DVD players work best at 480p or 720p resolution. Your TV should automatically detect the best setting, but you can always tweak it by hand.
Why HDMI Is The Best Choice For DVD Players
You might wonder why HDMI stands out compared to other cable types. The answer lies in how it handles both audio and video signals. Older cables like composite or component only carry video. You would need a separate cable for sound. HDMI combines everything into one simple connection.
Here are some key reasons to choose HDMI for your DVD player:
- Digital signal quality: HDMI sends a pure digital signal. This means no static, no ghosting, and no color bleeding in the picture.
- High-definition support: Even though DVDs are not true HD, HDMI still delivers a cleaner and sharper image than analog cables.
- Easy connection: One cable does the job of three or four older cables. This keeps your setup neat and organized.
- Widespread compatibility: Nearly every modern TV, monitor, and projector supports HDMI. You will not struggle to find a matching port.
- Audio return channel: Some HDMI connections support ARC, which lets sound travel back through the cable to a soundbar or receiver.
If you have ever dealt with the tangled mess of red, white, and yellow composite cables, you will appreciate how clean HDMI looks. One thin cable carries everything. Your entertainment area stays tidy and free of clutter. This matters a lot if you have a home theater setup where appearance counts.
It is also worth noting that using an HDMI connection protects your setup from common issues like interference. Old analog cables can pick up buzzing sounds or fuzzy images from nearby electronics. HDMI cables are shielded against this kind of problem. You get a reliable, consistent connection every time you play a disc.
Troubleshooting Common HDMI Connection Issues
Even with a simple setup, things can sometimes go wrong. Do not panic. Most HDMI problems have easy fixes. Let us go through the most common issues and how to solve them.
No Picture On The Screen
If your TV shows nothing after connecting the DVD player, start with the basics. Check that both ends of the HDMI cable are firmly plugged in. Unplug and replug each end. Sometimes the connection feels secure but is not making proper contact. Also, make sure you have selected the correct HDMI input on your TV using the remote.
If the problem continues, try a different HDMI port on your TV. Some ports may not work properly with certain devices. You can also try a different HDMI cable altogether. Cables can wear out over time, especially if they get bent or pinched behind furniture.
No Sound Or Poor Audio Quality
HDMI should carry both video and audio. If you have picture but no sound, check your TV’s audio output settings. Go to the sound menu and make sure the audio output is set to HDMI. Some TVs default to other output modes, which can cause silence.
Another common cause is the TV’s volume being muted or set too low. It sounds obvious, but it happens more often than you would think. Also, check if your DVD player has its own volume control. Some players let you adjust audio levels independently, which can cause confusion.
Fuzzy Or Distorted Picture
A blurry or distorted image usually means a resolution mismatch. Your DVD player and TV need to agree on a display setting. Go into the DVD player’s setup menu and change the output resolution. Try 480p first, then move up to 720p if your TV supports it. Adjusting the TV’s sharpness and picture mode can also help.
Sometimes dust inside the HDMI port causes connection problems. Use a can of compressed air to gently blow out any debris. Be careful not to damage the pins inside the port. A clean connection makes a big difference in signal quality.
The Screen Flashes Or Goes Black Intermittently
Intermittent problems are often caused by a loose cable. Check that the HDMI connector is fully seated in both devices. If the cable is damaged or bent, replace it with a new one. HDMI cables are inexpensive and widely available. A fresh cable often solves mysterious flickering issues.
Also consider the length of your cable. Very long HDMI cables (over 50 feet) can sometimes lose signal strength. If you need a longer run, consider an active HDMI cable or a signal booster. These small devices amplify the signal and keep it strong over distance.
Alternative Connection Options If HDMI Is Not Available
What if your DVD player does not have an HDMI port? Do not worry. You still have options. Several older connection types can work with a little extra effort. Here are the most common alternatives.
Composite Cables (Red, White, Yellow)
Composite cables are the oldest and most common alternative. They use three RCA connectors: yellow for video, white for left audio, and red for right audio. Most DVD players still include composite outputs. Your TV likely has composite inputs as well, especially if it is not brand new.
The downside is that composite cables only carry standard-definition video. The picture will not be as sharp as HDMI. But for everyday DVD watching, the quality is still perfectly fine. Many people use composite cables without any complaints.
Component Cables (Red, Green, Blue Plus Audio)
Component cables offer better picture quality than composite. They split the video signal into three separate lines: red, green, and blue. This gives you a clearer and more detailed image. You will also need the red and white audio cables for sound.
Component connections can deliver up to 1080p resolution on some devices. While DVDs are limited to 480p or 576p, the component connection still provides a cleaner picture than composite. This is a great option if your TV has component inputs but no HDMI.
S-Video And RF Adapters
S-Video is another older option. It provides better quality than composite but worse than component. Some DVD players include an S-Video output. You may need a special adapter to connect S-Video to modern TVs. RF adapters are also available for very old televisions that only have antenna-style inputs.
These older connections are not ideal, but they work in a pinch. If you are trying to set up a DVD player in a guest room with an older TV, these options can save the day. Just remember that you will not get the same quality as HDMI.
Comparison Table: HDMI vs. Alternative Connections
| Feature | HDMI | Composite | Component |
|---|---|---|---|
| Video Quality | High Definition | Standard Definition | Enhanced Standard Definition |
| Audio Quality | Digital (Surround Sound) | Analog (Stereo) | Analog (Stereo) |
| Number Of Cables | 1 | 3 | 5 |
| Setup Difficulty | Very Easy | Easy | Moderate |
| Modern TV Support | Yes | Yes (most TVs) | Yes (many TVs) |
| Price | Low to Moderate | Very Low | Low |
As you can see, HDMI wins in almost every category. It is the best choice whenever both your DVD player and TV support it. The alternatives work well for older equipment but do not match HDMI’s convenience and quality.
Tips For The Best DVD Viewing Experience
Once your DVD player is connected, you can take a few extra steps to improve your overall experience. These small adjustments make a big difference.
- Clean your DVDs regularly: Dust and fingerprints on discs cause skipping and poor picture quality. Use a soft microfiber cloth to gently wipe each disc before playing.
- Update your DVD player firmware: Some modern DVD players have firmware updates that improve compatibility and performance. Check the manufacturer’s website for instructions.
- Use a surge protector: Power surges can damage your DVD player and TV. Plug everything into a quality surge protector to keep your devices safe.
- Keep cables organized: Use cable ties or clips to keep your HDMI and power cables neat. This prevents accidental disconnections and makes your setup look tidy.
- Adjust your TV’s picture settings: Every TV is different. Spend a few minutes in the settings menu to fine-tune brightness, contrast, and color for the best DVD playback.
These tips might seem small, but they add up over time. A well-maintained setup gives you better picture quality, fewer errors, and a longer lifespan for your equipment. Think of it as a quick investment that pays off every time you watch a movie.
You might also consider how your setup interacts with other devices in your home. For example, if you use a computer mouse to navigate on-screen menus on your TV or streaming device, understanding the advantages and disadvantages of a computer mouse can help you choose the right input device for your entertainment setup. A smooth mouse makes menu navigation much more comfortable.
Similarly, if you ever run into display issues where a line appears on your screen, knowing how to troubleshoot problems like why a line wont delete in Microsoft Excel can build your general problem-solving skills. The mindset of methodically checking each connection and setting applies across all tech troubleshooting scenarios.
Common Mistakes To Avoid When Hooking Up A DVD Player
Even simple setups can go wrong if you make avoidable mistakes. Here are the most common errors people make and how to prevent them.
- Forcing the HDMI connector: HDMI cables fit snugly but should never require force. If it does not go in easily, check the angle and try again. Forcing the plug can damage both the cable and the port.
- Using the wrong HDMI port on the TV: Not all HDMI ports on a TV are the same. Some support newer features like 4K or ARC. Using an older port might limit your picture quality or cause audio issues.
- Ignoring firmware updates: Manufacturers regularly release updates that fix bugs and improve compatibility. Skipping updates can lead to unexpected problems.
- Buying cheap, low-quality cables: While you do not need the most expensive HDMI cable, avoid the absolute cheapest options. Very cheap cables often have poor shielding and can cause signal issues.
- Not checking the DVD player’s output settings: Some DVD players default to a specific resolution or output mode. If the picture looks wrong, check the player’s settings menu before blaming the cable or TV.
Avoiding these mistakes saves you time, frustration, and sometimes money. A little care during setup goes a long way toward a reliable and enjoyable viewing experience.
Expert Insights On DVD Player HDMI Setup
We asked a few home entertainment experts for their top tips on connecting DVD players with HDMI. Here is what they shared.
Tip 1: Buy a certified HDMI cable. Look for cables that are HDMI Premium Certified. These cables meet strict quality standards and are guaranteed to work with high-definition signals. They cost only a little more than uncertified cables but offer much better reliability.
Tip 2: Label your cables. If you have multiple devices connected to your TV, label each HDMI cable with a small piece of tape. This makes it easy to identify which cable goes to which device. It saves time when troubleshooting or switching inputs.
Tip 3: Power cycle your devices. If something is not working, turn off the DVD player, TV, and any receivers in between. Unplug them for thirty seconds, then plug them back in. This simple reset often fixes connection issues that seem mysterious at first.
Tip 4: Consider an HDMI switch. If you have more devices than TV ports, an HDMI switch lets you connect multiple devices to one TV input. You simply press a button to switch between them. It is a neat solution for setups with limited ports.
These expert tips come from years of experience in home entertainment setup. Following them will help you get the best possible performance from your DVD player and HDMI connection.
Final Thoughts
So, can you hook up a DVD player with just an HDMI cable? Absolutely yes. It is one of the simplest and most effective ways to enjoy your DVD collection on a modern TV. With just one cable, you get excellent picture quality, clear sound, and a clean, clutter-free setup. The process takes only a few minutes, and the results are well worth the effort.
Whether you are setting up your first DVD player or reconnecting an old one, the steps in this guide will help you succeed. Remember to check compatibility, use a quality cable, and troubleshoot any issues patiently. Your DVD player is ready to deliver great movies and shows whenever you want.
Take a few minutes today to set up or improve your DVD player connection. You will be amazed at how simple and satisfying the experience can be. Grab your favorite DVD, settle into your favorite chair, and enjoy the show. Happy watching.
Frequently Asked Questions
Do all DVD players have an HDMI output?
Most DVD players made after 2005 include an HDMI output. However, very old or extremely budget models might not have one. Check the back of your DVD player for a small rectangular port labeled HDMI. If it is not there, you can use composite or component cables instead.
Can I use any HDMI cable for my DVD player?
Yes, any standard HDMI cable works for DVD players. You do not need an expensive or premium cable. DVDs have a resolution limit, so even a basic High Speed HDMI cable delivers excellent picture quality. Just make sure the cable is not damaged or worn out.
Why does my TV say no signal when I connect the DVD player?
This usually means the TV is on the wrong input channel. Use your TV remote to press the Input or Source button and select the HDMI port you plugged the cable into. If the problem continues, try unplugging the cable and plugging it back in firmly.
Can I connect a DVD player to a computer monitor with HDMI?
Yes, you can connect a DVD player to any monitor with an HDMI input. The process is the same as connecting to a TV. Just make sure your monitor supports the DVD player’s output resolution. Most modern monitors handle standard DVD resolutions without any problem.
Do I need any special settings on my TV for DVD playback?
Most TVs automatically detect the DVD player and adjust settings. However, you may want to go into your TV’s picture settings and set the resolution to match the DVD output. Setting the picture mode to Standard or Movie can also improve the viewing experience for DVD content.
How long does an HDMI cable last?
A good quality HDMI cable can last for many years, often a decade or more. The cable itself does not wear out quickly unless it is bent, pinched, or damaged physically. If you notice signal problems after years of use, replacing the cable is an inexpensive and easy fix.