Can Usb 3 0 Connect To Hdmi Here Is What You Need To Know
Yes, USB 3.0 can connect to HDMI using the right adapter or cable. A USB 3.0 to HDMI adapter lets you mirror or extend your screen to an external display. This guide covers setup steps, adapter types, device compatibility, and common fixes so you can get your USB 3.0 to HDMI connection working fast.
You have a USB 3.0 port on your laptop or desktop. You also have an HDMI cable and a big monitor or TV. But can you just plug one into the other? The short answer is yes, but there is a catch. You need the right adapter or cable to make the USB 3.0 to HDMI connection work. Let us walk through everything you need to know about this setup.
People want to connect their computers to larger screens for many reasons. Maybe you need to give a presentation at work. Perhaps you want to play games on your TV. Or maybe you just need a second monitor for multitasking. Whatever your reason, understanding how USB 3.0 to HDMI works saves you time, money, and frustration.
In this guide, we break down the technical details in plain language. You will learn how the connection works, which adapters to buy, and how to set everything up step by step. We also cover common problems and their fixes. By the end, you will feel confident setting up your own USB 3.0 to HDMI display.
Key Takeaways
- USB 3.0 to HDMI works: You need an active adapter or cable to bridge the two connections.
- Not all adapters are equal: Active adapters add their own processing chip, while passive ones rely on your device.
- Check compatibility first: Not every USB 3.0 port supports video output, especially on older laptops.
- Setup is simple: Plug in the adapter, install drivers if needed, and select the correct display mode.
- Common issues have easy fixes: Driver updates, cable swaps, and port resets solve most problems.
- Resolution matters: USB 3.0 to HDMI supports up to 1080p or 4K depending on your adapter model.
📑 Table of Contents
- Understanding USB 3.0 and HDMI Basics
- How USB 3.0 to HDMI Connections Work
- Types of USB 3.0 to HDMI Adapters
- Devices That Support USB 3.0 to HDMI
- Step-by-Step Setup Guide
- Common Problems and How to Fix Them
- Quick Tips for the Best Experience
- Expert Insights on USB 3.0 to HDMI Connectivity
- Key Takeaways
Understanding USB 3.0 and HDMI Basics
Before you buy any gear, it helps to understand what each port does. USB 3.0 and HDMI serve very different purposes. Knowing the difference makes the whole process clearer.
What Is USB 3.0?
USB 3.0 is a standard for data transfer. It moves files between devices like phones, cameras, and computers. The USB 3.0 port looks like a standard USB port but has a blue insert inside. It offers speeds up to 5 gigabits per second. That is ten times faster than USB 2.0.
But here is the thing. USB 3.0 was not originally designed to carry video signals. It handles data, not display output. So you cannot just plug a USB 3.0 cable directly into an HDMI port. You need a bridge between the two. That bridge comes in the form of an adapter or a specialized cable.
What Is HDMI?
HDMI stands for High-Definition Multimedia Interface. It carries both high-definition video and audio through a single cable. Most TVs, monitors, and projectors use HDMI. It is the go-to standard for home entertainment and office displays.
HDMI ports come in different sizes. The standard HDMI is the full-size port you see on TVs. Mini HDMI and Micro HDMI are smaller versions used on tablets and cameras. Your adapter needs to match the HDMI type you are connecting to.
How USB 3.0 to HDMI Connections Work
Now that you understand the basics, let us look at how the actual connection works. A USB 3.0 to HDMI setup uses a small chip inside the adapter. This chip converts the data signal from USB into a video signal that HDMI can read.
The Role of the Adapter Chip
The adapter chip does the heavy lifting. It takes the digital data from your USB 3.0 port and translates it into a format your HDMI display understands. Think of it like a translator between two languages. Without this chip, the two devices cannot communicate.
Some adapters use a built-in graphics processor. This means the adapter handles the video rendering itself. Others rely on your computer’s graphics card. The type of chip affects performance and compatibility.
Active vs. Passive Adapters
You will hear two terms a lot: active and passive. An active USB 3.0 to HDMI adapter has its own processing chip. It works independently of your computer’s graphics hardware. A passive adapter simply passes signals through without extra processing.
For most users, an active adapter is the better choice. It works with more devices and delivers better performance. Passive adapters are cheaper but have more limitations. They only work on devices that already support video output through USB.
Bandwidth and Resolution Support
USB 3.0 has enough bandwidth to support high-definition video. Most USB 3.0 to HDMI adapters handle 1080p Full HD smoothly. Many can also push 4K resolution, but frame rates may drop. If you need smooth 4K video, check the adapter specifications carefully.
Your cable quality matters too. A cheap HDMI cable can limit your resolution. Always use a high-speed HDMI cable rated for the resolution you want. This small detail often causes confusing display problems.
Types of USB 3.0 to HDMI Adapters
Not all adapters are the same. Different setups need different types of adapters. Here is a breakdown of what is available.
USB-A to HDMI Adapters
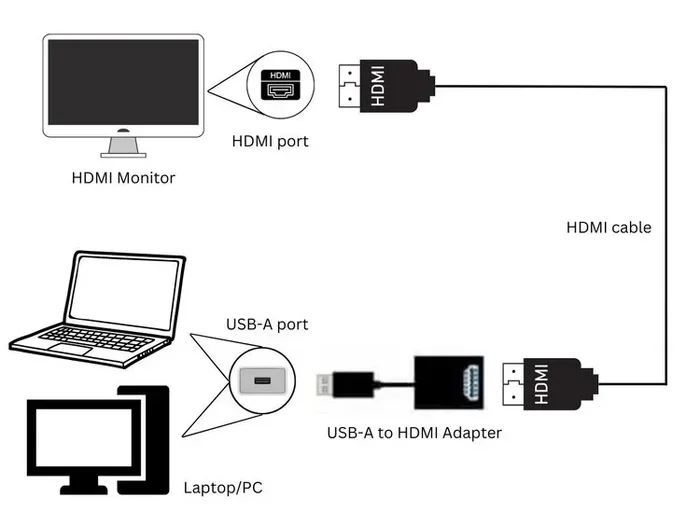
This is the most common type. It plugs into the standard rectangular USB-A port on your laptop or desktop. The other end connects to your monitor or TV via HDMI. These adapters are widely available and affordable. They work great for desktops and older laptops.
USB-C to HDMI Adapters
Many newer laptops use USB-C ports. A USB-C to HDMI adapter connects directly to these slim ports. Some laptops support DisplayPort Alt Mode over USB-C, which makes this connection even smoother. Check if your laptop supports this feature before buying.
If your laptop has USB-C but not USB 3.0, a USB-C to HDMI adapter is your best bet. These adapters tend to be smaller and more portable.
USB 3.0 Hub with HDMI Output
A USB 3.0 hub gives you multiple ports in one device. Many hubs include an HDMI output alongside USB ports for charging and data. This is a great option if you need extra connectivity. You get a docking station feel without the bulk. If you are looking for travel-friendly options, check out this list of 10 Gadgets To Make Moms Life Easier for inspiration on compact tech solutions that work on the go.
Docking Stations with HDMI
Docking stations are the most complete solution. They connect to your laptop and turn it into a desktop workstation. Most docks include HDMI output, USB ports, Ethernet, and charging ports. They are ideal for office setups. Docks cost more than simple adapters but offer far more functionality.
Devices That Support USB 3.0 to HDMI
Not every device plays nice with a USB 3.0 to HDMI adapter. Before you buy, check if your device supports external display output through USB.
Windows Laptops and Desktops
Most Windows computers support USB 3.0 to HDMI output. Windows 10 and 11 include built-in display settings that make setup easy. You may need to install a driver from the adapter manufacturer. Once installed, you can extend or mirror your screen with just a few clicks.
If your Windows PC has a USB 3.0 port with a blue insert, it likely supports video output. However, some budget laptops disable this feature. Check your PC manufacturer’s specifications to be sure.
Mac Computers
Macs are a bit trickier. Most MacBooks use USB-C or Thunderbolt ports, not traditional USB-A. You can still connect to HDMI, but you need the right adapter. Apple provides a USB-C to HDMI adapter that works flawlessly. Third-party adapters also work well with most Mac models.
Older Macs with USB-A ports may have limited support. Always check compatibility before purchasing an adapter for a Mac.
Chromebooks
Chromebooks handle USB 3.0 to HDMI connections well. Most modern Chromebooks have USB-C ports that support external displays. The setup process is similar to Windows. ChromeOS automatically detects the external monitor once you plug in the adapter.
Linux Systems
Linux users can also use USB 3.0 to HDMI adapters. Most adapters work with the open-source display drivers built into Linux. You may need to install additional software packages for full functionality. The setup process varies by distribution.
Step-by-Step Setup Guide
Setting up your USB 3.0 to HDMI connection is straightforward. Follow these steps and you will be up and running in minutes.
Step 1: Gather Your Equipment
You need three things to get started:
- A USB 3.0 to HDMI adapter or cable
- A high-speed HDMI cable
- A display with an HDMI input (monitor, TV, or projector)
Make sure your adapter matches your USB port type. USB-A to HDMI is the most common. USB-C to HDMI works for newer devices.
Step 2: Install Drivers (If Needed)
Plug your adapter into the USB port before connecting the HDMI cable. Windows will usually install drivers automatically. If not, visit the adapter manufacturer’s website and download the latest driver. Mac and Chromebook users typically do not need to install drivers manually.
Step 3: Connect the HDMI Cable
Plug one end of the HDMI cable into the adapter. Plug the other end into your monitor or TV. Make sure the connection is firm. A loose cable causes flickering and no-signal errors.
Step 4: Select the Display Mode
Press the Windows key plus P on Windows. A menu appears with display options. Choose Mirror to show the same screen on both displays. Choose Extend to use the external monitor as a second workspace. On a Mac, go to System Preferences and select Displays.
Step 5: Adjust Resolution and Settings
Go to your display settings and adjust the resolution. Set it to match your monitor’s native resolution for the sharpest image. You can also adjust brightness, color, and audio output. Most adapters pass audio through HDMI as well.
If you use your phone for presentations or quick screen sharing, you might also want to check how to add prefixes to numbers on your iPhone for better organization when managing display names or device labels in your settings.
Common Problems and How to Fix Them
Even with the right adapter, you might run into issues. Here are the most common problems and their solutions.
No Signal on the External Display
This is the most common issue. Try these fixes in order:
- Unplug the adapter and plug it back in.
- Try a different USB port on your computer.
- Check that the HDMI cable is fully inserted on both ends.
- Restart your computer with the adapter already connected.
- Update your graphics drivers through Device Manager on Windows.
Flickering or Distorted Image
A flickering screen usually means a cable or resolution problem. Lower the resolution in your display settings first. If that does not work, try a different HDMI cable. Cheap cables often cause signal interference at higher resolutions.
No Audio Through HDMI
Sometimes video works but audio does not. Go to your sound settings and select the HDMI output as your default audio device. On Windows, right-click the speaker icon and choose Open Sound Settings. On Mac, go to Sound Preferences and select the HDMI output.
Adapter Not Recognized by the Computer
If your computer does not detect the adapter, the driver is likely the issue. Uninstall the current driver and reinstall it from the manufacturer’s website. Also, try a different USB port. USB hubs can sometimes cause power issues that prevent the adapter from working.
Quick Tips for the Best Experience
Follow these simple tips to get the most out of your USB 3.0 to HDMI setup:
- Always use a high-speed HDMI cable rated for your desired resolution.
- Keep your adapter drivers updated for the best performance and compatibility.
- Avoid cheap no-name adapters that lack proper chipsets. They cause more problems than they solve.
- Use a powered USB hub if your laptop port does not provide enough power.
- Check your adapter’s maximum resolution before buying. Not all adapters support 4K.
- Keep your adapter cool. Some adapters run warm during extended use. Give them airflow.
Expert Insights on USB 3.0 to HDMI Connectivity
Technology experts agree that USB 3.0 to HDMI adapters have come a long way. Early models struggled with lag and low resolutions. Today’s adapters handle Full HD and even 4K with ease. The key is choosing the right adapter for your specific needs.
Industry professionals recommend looking for adapters with built-in AMD or NVIDIA chipset support. These deliver smoother performance and better driver compatibility. Brands like StarTech, Sabrent, and Cable Matters consistently receive high marks for reliability.
One thing to keep in mind. USB 3.0 has a maximum bandwidth of 5 Gbps. This is enough for 1080p at 60Hz and even 4K at lower frame rates. If you need 4K at 60Hz, consider a USB 3.1 or Thunderbolt 3 adapter instead. These newer standards offer higher bandwidth for demanding tasks like video editing and gaming.
Key Takeaways
- USB 3.0 to HDMI connections work reliably with the right active adapter or cable.
- Active adapters outperform passive ones because they include their own processing chip.
- Check device compatibility before purchasing. Not all USB 3.0 ports support video output.
- Setup is simple and usually requires just plugging in the adapter and selecting a display mode.
- Most common issues have easy fixes like reseating cables, updating drivers, or changing ports.
- Resolution support varies by adapter so always check specs for 1080p or 4K capability.
- Invest in quality adapters and cables to avoid frustration and ensure a stable connection.
Frequently Asked Questions
Can I connect a USB 3.0 port directly to an HDMI cable without an adapter?
No, you cannot connect USB 3.0 directly to HDMI. USB 3.0 carries data signals, not video signals. You need an active adapter or a specialized cable that includes a built-in conversion chip. Without this chip, the two devices simply cannot communicate.
Does USB 3.0 to HDMI support 4K resolution?
Many USB 3.0 to HDMI adapters support 4K resolution, but not all of them. Check the adapter specifications before buying. Some adapters only handle 4K at 30Hz, which can feel sluggish. For smooth 4K at 60Hz, consider a USB 3.1 or Thunderbolt 3 adapter instead.
Why does my USB 3.0 to HDMI adapter keep disconnecting?
Loose connections are the most common cause. Make sure the adapter is fully seated in the USB port. Try a different USB port, especially one that is directly on the computer rather than through a hub. Outdated drivers can also cause disconnections, so update them through Device Manager or the manufacturer’s website.
Can I use a USB 3.0 to HDMI adapter with a Chromebook?
Yes, most modern Chromebooks support USB 3.0 to HDMI adapters. Chromebooks with USB-C ports work especially well. The setup is automatic in most cases, and ChromeOS detects the external display without needing manual driver installation.
Is a USB 3.0 to HDMI adapter good for gaming?
It depends on the game and your setup. For casual gaming, a USB 3.0 to HDMI adapter works fine. For demanding games, you may experience lag or lower frame rates. The 5 Gbps bandwidth of USB 3.0 is enough for most games at 1080p. For competitive gaming, a direct HDMI connection or a Thunderbolt 3 adapter is a better choice.
What is the difference between USB 3.0 and USB 3.1 for HDMI connections?
USB 3.1 offers higher bandwidth at 10 Gbps compared to USB 3.0’s 5 Gbps. This means USB 3.1 adapters can support higher resolutions and smoother frame rates. If you need 4K at 60Hz or plan to do video editing, a USB 3.1 or Thunderbolt 3 adapter gives you better performance than a standard USB 3.0 option.
=== CONCLUSION ===
The USB 3.0 to HDMI connection is a simple and affordable way to expand your display setup. Whether you need a second monitor for work, a bigger screen for movies, or a projector for presentations, the right adapter gets the job done. The process is straightforward, and most setups take just a few minutes.
Remember to choose an active adapter for the best compatibility. Check your device specifications before buying. And always use a quality HDMI cable to avoid signal issues. With the right gear and a little patience, you will be enjoying your expanded display in no time.
Technology should make your life easier, not harder. The USB 3.0 to HDMI adapter is a perfect example of a small tool that solves a big problem. Now that you know how it all works, you can shop with confidence and set up your external display without any headaches.