Can You Project iPhone Screen to TV with These Easy Steps
You can easily project iPhone screen to TV using AirPlay, HDMI adapters, or wireless streaming devices. This guide walks you through every method with simple, beginner-friendly steps. Whether you own an Apple TV or a basic smart TV, projecting iPhone screen to TV is simpler than you think.
Have you ever wanted to share something on your iPhone with a group of friends on a bigger screen? Maybe you want to watch your favorite shows on the television or display vacation photos during a dinner party. Whatever your reason, projecting iPhone screen to TV is a skill that everyone can learn. It opens up a world of possibilities for entertainment, sharing, and productivity.
The good news is that you do not need to be a tech expert. There are several straightforward methods available today. Some require just a single cable, while others work completely wirelessly. In this article, we will walk you through each option step by step. By the end, you will know exactly which method works best for your setup.
Let us dive into the details and help you get your iPhone content on the big screen. We will cover everything from wireless options to wired connections. You will also find practical tips and common mistakes to avoid along the way.
Key Takeaways
- AirPlay is the easiest wireless method if you have an Apple TV or a compatible smart TV.
- An HDMI adapter offers a reliable wired connection with no lag or signal drops.
- Wireless streaming devices like Roku and Chromecast give you flexible options for TV projection.
- Most modern smart TVs support screen mirroring natively, so no extra hardware is needed.
- Troubleshooting is simple when you know the common causes of connection issues.
- You do not need expensive equipment to get your iPhone content on the big screen.
📑 Table of Contents
What Does It Mean to Project iPhone Screen to TV?
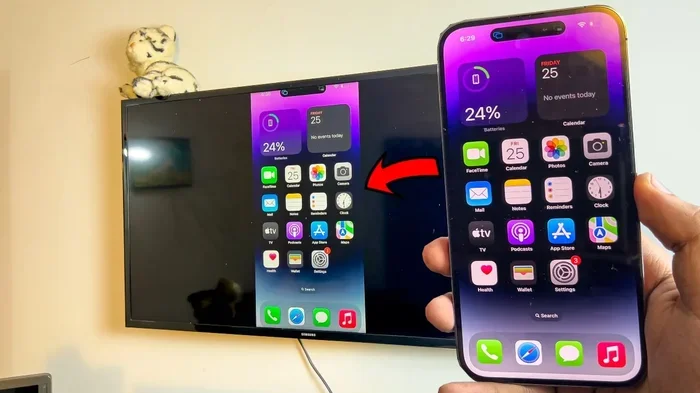
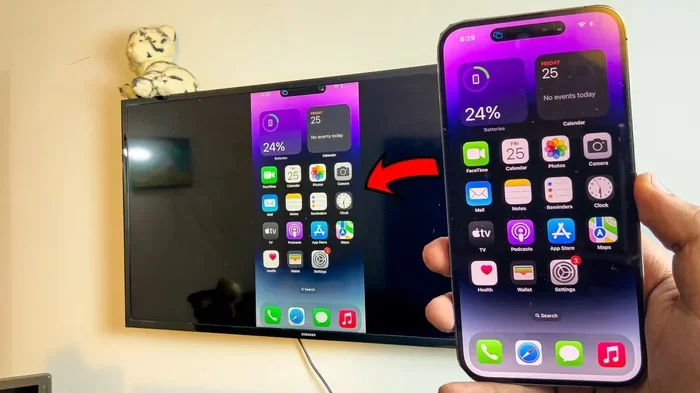
When you project iPhone screen to TV, you are basically showing the same image on both devices. Everything that appears on your iPhone screen will also appear on your television. This includes photos, videos, apps, games, and even notifications.
This process is also called screen mirroring or screen casting. The terms are often used interchangeably, but they can mean slightly different things. Screen mirroring shows an exact copy of your iPhone display. Screen casting may send specific content from an app to the TV while you continue using your phone for other things.
Understanding this difference helps you choose the right method. If you want a full mirror, wireless mirroring is your best bet. If you just want to watch a video, casting within an app might work better. Both approaches are covered in this guide.
Why Would You Want to Project Your iPhone Screen?
There are many reasons to connect your iPhone to your TV. Sharing photos and videos with family is one of the most common uses. Imagine showing off your vacation pictures on a 55-inch screen instead of squinting at a tiny display.
Watching streaming content on a larger screen is another big reason. Services like Netflix, YouTube, and Disney+ look much better on a TV. You can also use screen sharing for presentations at work or school. Gaming on a bigger display is a fun bonus too.
No matter your reason, the methods below will help you get it done. Each approach has its own advantages depending on your equipment and needs.
Method 1: Using AirPlay with Apple TV
AirPlay is Apple’s built-in wireless streaming technology. It is the most popular way to project iPhone screen to TV for Apple users. If you own an Apple TV, this is by far the simplest method.
How AirPlay Works
AirPlay sends your iPhone display wirelessly to your television. It uses your home Wi-Fi network to transmit the signal. The quality is excellent, and the setup takes only a few minutes.
Both devices need to be on the same Wi-Fi network. This is the most important requirement. Once connected, your iPhone and Apple TV communicate directly without needing any cables.
Step-by-Step Guide to Using AirPlay
Follow these simple steps to get started:
- Make sure your Apple TV and iPhone are connected to the same Wi-Fi network.
- Unlock your iPhone and open the Control Center. Swipe down from the top-right corner of your screen.
- Tap the Screen Mirroring icon. It looks like two overlapping rectangles.
- Select your Apple TV from the list of available devices.
- Enter the on-screen code if prompted. This confirms the connection.
- Your iPhone screen should now appear on your TV.
That is it! You are now streaming your iOS device screen to your television. To stop, go back to the Control Center and tap Stop Mirroring.
Tips for the Best AirPlay Experience
- Use a strong Wi-Fi connection for smooth performance. A weak signal causes lag and stuttering.
- Keep your iPhone and Apple TV close to your router for the best signal strength.
- Restart both devices if you experience any issues. A simple reboot often fixes connection problems.
- Update your iPhone and Apple TV software to the latest version for the best compatibility.
AirPlay is a fantastic option for most users. It is free, easy, and does not require any extra cables. However, it does need an Apple TV or a compatible smart TV with AirPlay built in.
Method 2: Using an HDMI Cable and Adapter
If you prefer a wired connection, an HDMI setup is the way to go. This method gives you a stable, lag-free connection. It is also great for situations where Wi-Fi is not available or reliable.
What You Need for a Wired Connection
You will need two things to get started. First, a Lightning to HDMI adapter or a USB-C to HDMI adapter if you have a newer iPhone model. Second, a standard HDMI cable that connects the adapter to your TV.
These adapters are sometimes called dongles. They plug directly into the charging port on your iPhone. The video output then travels through the HDMI cable to your television.
Make sure you buy a certified adapter. Cheap, uncertified adapters can cause display issues or damage your device. Apple sells its own adapters, but third-party options from reputable brands work well too.
Step-by-Step Guide to HDMI Connection
- Plug the Lightning or USB-C adapter into your iPhone.
- Connect one end of the HDMI cable to the adapter.
- Plug the other end of the HDMI cable into your TV.
- Switch your TV to the correct HDMI input channel.
- Your iPhone screen should now display on your TV.
This method works with almost any television that has an HDMI port. It does not require Wi-Fi or any special apps. The connection is instant and very reliable.
If you are comparing this to connecting your iPhone to TV with HDMI, you will find this approach is the most direct one available. Similarly, if you are using a phone rather than an iPhone, connecting your phone to TV with an HDMI cable follows the same basic principle.
Pros and Cons of HDMI Connection
Every method has its strengths and weaknesses. Here is a quick comparison of the wired approach:
- Pros: No lag, no Wi-Fi needed, stable connection, works with any TV that has HDMI, great for gaming.
- Cons: You are tethered to your TV, adapters can be expensive, limited mobility around the room.
The wired method is ideal for presentations or gaming sessions where lag is not acceptable. For casual viewing, wireless options might be more convenient.
Method 3: Wireless Streaming Devices
Not everyone wants to buy an Apple TV or run a cable across the room. Wireless streaming devices offer a flexible middle ground. These small gadgets plug into your TV’s HDMI port and give you wireless streaming capabilities.
Popular Streaming Devices for iPhone Screen Projection
Several devices work well for projecting iPhone screen to TV:
- Roku – Supports screen mirroring through its built-in features. Easy to set up and very affordable.
- Amazon Fire TV Stick – Works with iPhone through third-party apps. Offers good value for the price.
- Google Chromecast – Great for casting content from supported apps. Works best with Chrome browser on iOS.
- Miracast-enabled devices – Some smart TVs and streaming boxes support Miracast for direct wireless mirroring.
Each device has its own setup process. Most follow a similar pattern. You install the device, connect it to your Wi-Fi, and then use your iPhone to cast or mirror the screen.
How to Choose the Right Streaming Device
Consider a few factors before buying. Check if the device supports iPhone screen mirroring natively. Look at the price point and what features matter most to you. Also, make sure the device is compatible with your television.
If you are looking for a budget option, the Roku Streaming Stick is hard to beat. For those already in the Amazon ecosystem, the Fire TV Stick is a solid choice. Google Chromecast works best for people who stream a lot of web content.
These devices also come in handy when you are traveling. You can turn any hotel room TV into a screen for your iPhone display. They are small, portable, and easy to set up.
Method 4: Using a Smart TV’s Built-In Features
Many modern smart TVs come with built-in screen mirroring support. This means you might not need any extra devices at all. Your television may already have the capability to receive your iPhone screen projection.
Checking TV Compatibility
First, check if your smart TV supports AirPlay or screen mirroring. Most major brands do now, including Samsung, LG, Sony, and Vizio. Look for AirPlay or Screen Mirroring in your TV’s settings menu.
If your TV supports AirPlay, you can follow the same steps as Method 1. The process is identical. Your iPhone will find the TV on the same Wi-Fi network and connect automatically.
For TVs that do not support AirPlay natively, look for a built-in screen mirroring option. Some TVs use Miracast or their own proprietary wireless display standard. Check your TV’s user manual for details.
If your TV does not have built-in support, you can still use external streaming devices as described in Method 3. This gives you flexibility regardless of your TV model.
Setting Up Wireless Mirroring on Your Smart TV
Here is a general guide for wireless mirroring:
- Turn on your smart TV and make sure it is connected to Wi-Fi.
- On your iPhone, open the Control Center by swiping down from the top-right corner.
- Tap the Screen Mirroring icon.
- Your TV should appear in the list of available devices.
- Select your TV and wait for the connection to establish.
Some TVs require you to enable screen mirroring in the TV settings first. Check your TV’s input or network settings if you do not see it listed on your iPhone.
For more tips on mirroring without Wi-Fi, you can check our guide on how to mirror your phone to smart TV without WiFi. While that article covers a different scenario, many of the same principles apply.
Troubleshooting Common Projection Issues
Even with the simplest setup, you might run into problems occasionally. Do not worry. Most issues have easy fixes. Here are the most common problems and how to solve them.
iPhone Does Not Find the TV
This is the most common issue. First, make sure both devices are on the same Wi-Fi network. Check that your TV is turned on and not in sleep mode. Sometimes restarting both devices solves the problem instantly.
Also, check that your TV’s screen mirroring feature is turned on. Some TVs hide this setting in a submenu. If you still cannot find it, try resetting your network settings on both devices.
Lag or Stuttering During Projection
Lag usually happens because of a weak Wi-Fi signal. Move closer to your router or reduce the number of devices using the network. Streaming high-resolution video uses a lot of bandwidth.
If you are using a wired HDMI connection and still experience lag, try a different HDMI cable. A damaged cable can cause intermittent issues. Also, make sure your adapter is rated for the resolution you want.
Audio Is Not Working
If your video shows but there is no sound, check your TV’s audio output settings. Sometimes the TV is set to receive audio from a different source. On your iPhone, make sure the volume is not muted and is turned up.
For AirPlay connections, try pausing and resuming the content. This often reroutes the audio to the TV. If the problem persists, restart your iPhone and try again.
Black Screen on TV
A black screen usually means the connection is not fully established. Check all cable connections if you are using a wired setup. Make sure the TV is on the correct HDMI input channel.
For wireless connections, make sure your iPhone has not gone to sleep. Wake it up and try connecting again. Also, check that your adapter is compatible with your iPhone model.
Comparison of Methods
Here is a quick comparison of all the methods we covered:
- AirPlay with Apple TV – Best for Apple users. Wireless, easy, and high quality. Requires an Apple TV.
- HDMI Cable and Adapter – Most reliable wired option. No lag, no Wi-Fi needed. Requires an adapter and cable.
- Wireless Streaming Devices – Flexible and affordable. Works with most TVs. Requires purchasing a device.
- Smart TV Built-In Features – No extra hardware needed. Convenient if your TV supports it. Quality depends on your TV model.
Choose the method that fits your setup and budget. Many people use more than one method depending on the situation. Having options gives you the most flexibility.
For those who also use adapters for other devices, you might find our article on converting USB C to HDMI helpful for understanding adapter compatibility across different devices.
Final Thoughts
Projecting iPhone screen to TV is one of the most useful things you can do with your device. It makes sharing content effortless and turns your television into a powerful display for everything on your phone.
Whether you choose AirPlay, an HDMI cable, a streaming device, or your TV’s built-in features, the process is straightforward. You do not need special skills or expensive equipment. Start with the method that best fits your current setup and experiment from there.
Remember that practice makes perfect. The first time you try any method, you might need a few minutes to get comfortable. After a couple of tries, it becomes second nature. Soon you will be projecting your iPhone display to your TV without even thinking about it.
So go ahead and give it a try tonight. Pick a movie, share some photos, or show off your favorite app on the big screen. Once you experience the convenience of projecting iPhone screen to TV, you will wonder how you ever lived without it.
Frequently Asked Questions
Can I project my iPhone screen to any TV?
Most modern TVs can receive an iPhone screen signal. If your TV has HDMI ports or supports AirPlay, you are good to go. For older TVs, you may need a streaming device or an adapter to make the connection work.
Do I need Wi-Fi to project my iPhone screen to TV?
It depends on the method. AirPlay and wireless streaming devices need Wi-Fi. However, using an HDMI cable and adapter works without any Wi-Fi connection at all. This makes it a great option for situations where wireless is not available.
Is screen mirroring the same as AirPlay?
AirPlay is Apple’s version of screen mirroring. Screen mirroring is a broader term that includes any method of displaying your phone screen on another display. AirPlay is the most seamless option for iPhone users, but other technologies like Miracast also achieve similar results.
Can I project my iPhone screen to a non-smart TV?
Yes, you can. You will need either an HDMI adapter with a cable or a wireless streaming device plugged into your TV. Both options turn any TV with an HDMI port into a display for your iPhone content.
Why does my projected iPhone screen have a delay?
A delay usually happens with wireless connections due to Wi-Fi signal strength or network congestion. Switching to a wired HDMI connection eliminates this delay completely. If you must use wireless, try moving closer to your router for a stronger signal.
Can I use my iPhone while projecting to TV?
Yes, you can. When you mirror your screen, your iPhone continues to function normally. You can open other apps, receive calls, and use your phone while the TV displays the mirrored content. Keep in mind that some apps may block screen mirroring due to copyright restrictions.