How Do I Change A Photoshop Crosshair Cursor Into Brush Tip
Changing a Photoshop crosshair cursor back into a brush tip is simple and takes just a few seconds. Whether you accidentally toggled a setting or inherited a customized workspace, this guide walks you through every method to restore your brush tip cursor. You will learn keyboard shortcuts, menu settings, and advanced cursor options to keep Photoshop working the way you expect.
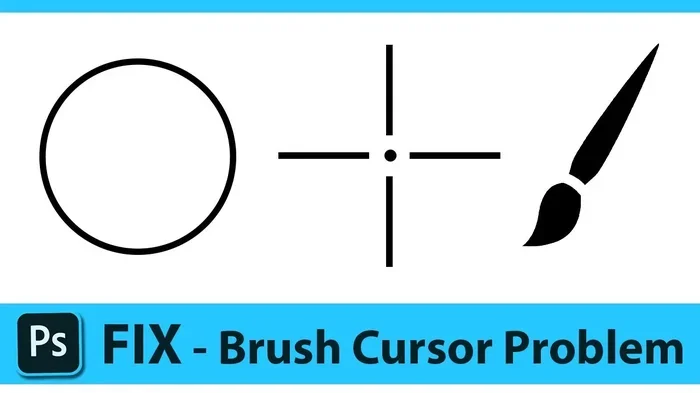
If you have ever sat down to paint or retouch an image in Photoshop only to see a tiny crosshair cursor staring back at you, you know how frustrating it can be. The crosshair cursor is tiny, hard to see, and makes it difficult to judge brush size and placement. Many users search for how to change a Photoshop crosshair cursor into a brush tip because they want their painting experience to feel natural again.
The good news is that fixing this problem is incredibly easy. Whether you hit Caps Lock by accident or your workspace settings got changed, there are multiple ways to bring back the familiar brush tip cursor. In this article, we will walk you through every method step by step. You will also learn about cursor preferences, brush settings, and pro tips that keep your Photoshop workflow smooth and frustration-free.
Let us dive right in and get your brush tip cursor back where it belongs.
Key Takeaways
- Quick Fix: Press the Caps Lock key to toggle between the crosshair cursor and the brush tip cursor instantly.
- Menu Method: You can change the cursor display through Photoshop Preferences under the Cursors section.
- Brush Panel Matters: The brush tip shape and size settings affect how your cursor appears on screen.
- Multiple Cursor Types: Photoshop offers several cursor display options including Standard, Full Brush Tip, and Crosshair.
- Workspace Reset: If your cursor keeps switching, resetting your workspace can solve persistent cursor issues.
- Performance Tip: Adjusting cursor size and hardness settings improves your painting precision and workflow speed.
- Common Culprit: The Caps Lock key is the #1 reason Photoshop switches to a crosshair cursor unexpectedly.
📑 Table of Contents
- Why Does Photoshop Show a Crosshair Cursor Instead of a Brush Tip?
- Method 1: Use the Caps Lock Key (The Quickest Fix)
- Method 2: Change Cursor Settings in Photoshop Preferences
- Method 3: Adjust Brush Tool Settings Directly
- Method 4: Reset Your Workspace
- Method 5: Check for Photoshop Updates and Display Settings
- Comparison Table: Photoshop Cursor Display Options
- Expert Tips for Managing Photoshop Cursors
- Common Mistakes That Cause Cursor Problems
- How to Change A Photoshop Crosshair Cursor Into Brush Tip: Step-by-Step Recap
- Conclusion
Why Does Photoshop Show a Crosshair Cursor Instead of a Brush Tip?
Before we fix the problem, it helps to understand why Photoshop switches to a crosshair cursor in the first place. The crosshair cursor is actually a useful tool in certain situations. It gives you a precise center point for placement, which is great for pixel-perfect work. However, when you are painting, blending, or retouching, the brush tip cursor is much more helpful because it shows you the actual shape and size of your brush.
Several things can cause Photoshop to display the crosshair cursor instead of the brush tip:
- Caps Lock Key: This is the most common reason. Pressing Caps Lock toggles between the crosshair and brush tip cursor.
- Cursor Preferences: Photoshop has built-in cursor display settings that control how your cursor appears.
- Workspace Reset: If you or someone else reset your workspace, cursor preferences may change.
- Tool-Specific Settings: Some tools default to a crosshair cursor, and switching tools can change your cursor appearance.
- Display Scaling: On high-resolution monitors, Photoshop sometimes defaults to the crosshair for better visibility.
Understanding these causes helps you prevent the problem from happening again. Once you know what triggers the crosshair cursor, you can quickly fix it every time.
Method 1: Use the Caps Lock Key (The Quickest Fix)
The fastest way to change a Photoshop crosshair cursor back into a brush tip is by pressing the Caps Lock key on your keyboard. This is a toggle shortcut, which means one press shows the brush tip, and another press brings back the crosshair. It is incredibly simple and works in almost every version of Photoshop.
Here is how to do it:
- Open Photoshop and select the Brush Tool from your toolbar.
- Look at your cursor on the canvas. If it shows a crosshair, simply press the Caps Lock key once.
- Your cursor should immediately change to a brush tip shape.
- If it does not, press Caps Lock again to toggle it back.
This method works for almost all painting and retouching tools in Photoshop. It is a great habit to remember because it saves you time and keeps your workflow moving. If you find yourself accidentally hitting Caps Lock while typing, you might want to consider the other methods below for a more permanent fix.
Why Caps Lock Is the Default Toggle
Adobe designed the Caps Lock toggle as a quick way for artists to switch between precision and visibility. The crosshair gives you a pinpoint center for exact placement, while the brush tip shows you the full area your brush will cover. This design gives you flexibility without needing to dig through menus every time you switch modes.
Method 2: Change Cursor Settings in Photoshop Preferences
If pressing Caps Lock does not solve the problem or if you want a more permanent solution, adjusting the cursor settings in Photoshop Preferences is the way to go. This method gives you full control over how your cursor appears across all tools and workspaces.
Follow these steps to change your cursor display settings:
- Open Photoshop and go to the top menu bar.
- Click on Edit on Windows or Photoshop on Mac.
- Select Preferences from the dropdown menu.
- Click on Cursors in the Preferences window.
- You will see three cursor display options:
- Standard: Shows a simple crosshair cursor for all tools.
- Full Brush Tip: Displays the full brush shape including size and hardness.
- Crosshair: Always shows the crosshair cursor regardless of the tool.
Select Full Brush Tip to restore the brush tip cursor. Click OK to save your changes. Your cursor should now display the brush tip whenever you use painting tools.
Understanding Each Cursor Display Option
Let us take a closer look at each option so you can choose the best setting for your workflow:
- Standard Cursor: This is the basic cursor that works well for general navigation. It does not show brush size or shape, which can be limiting when you are painting.
- Full Brush Tip: This is the best option for painters and retouchers. It shows the exact shape, size, and hardness of your brush in real time.
- Crosshair Cursor: Great for precise alignment and pixel-level work. However, it hides the brush size, making it harder to paint accurately.
Choosing the right cursor display option depends on what kind of work you do most often. Many professionals switch between Standard and Full Brush Tip depending on the task at hand.
Method 3: Adjust Brush Tool Settings Directly
Sometimes the cursor issue is related to your brush settings rather than your global cursor preferences. The Brush Panel in Photoshop controls how your brush tip appears, and adjusting these settings can bring back the brush tip cursor.
Here is how to check your brush settings:
- Select the Brush Tool from the toolbar or press the B key on your keyboard.
- Look at the top options bar and click on the Brush Panel icon.
- Check the Brush Tip Shape section.
- Adjust the Size slider to make sure your brush is visible on screen.
- Check the Hardness slider. A lower hardness creates a softer brush edge.
When your brush size is set very small, the brush tip cursor can appear tiny and hard to see, which might make it look like a crosshair. Increasing the brush size temporarily can help you confirm whether the brush tip cursor is actually displaying.
Quick Tip: Use the Right Square Bracket Keys
You can quickly adjust your brush size using the keyboard shortcuts. Press the [ key to decrease brush size and the ] key to increase it. Hold Shift plus [ or ] to adjust brush hardness. These shortcuts work alongside your cursor settings and help you fine-tune your brush tip display in real time.
Method 4: Reset Your Workspace
If you have tried all the methods above and your Photoshop cursor still shows a crosshair, your workspace settings might be corrupted or misconfigured. Resetting your workspace can restore default settings, including cursor preferences.
Here is how to reset your workspace in Photoshop:
- Go to the Window menu in the top menu bar.
- Hover over Workspace in the dropdown.
- Click on Reset Essentials (or the workspace name you are currently using).
- Confirm the reset when prompted.
Resetting your workspace will restore all default panels, tools, and settings to their original state. This includes cursor preferences, so your brush tip cursor should return after the reset. Keep in mind that this will also reset any custom workspace arrangements you have set up, so use this method as a last resort.
When to Reset Your Workspace
Workspace resets are helpful when you have made many changes and are not sure which setting caused the cursor issue. They are also useful when sharing computers or when someone else has been using your Photoshop setup. However, you should always save your custom workspace before resetting so you can restore your preferred layout afterward.
Method 5: Check for Photoshop Updates and Display Settings
In some cases, cursor display issues are caused by outdated Photoshop software or display scaling settings on your computer. Keeping Photoshop updated ensures you have the latest bug fixes and performance improvements, including cursor rendering fixes.
Here is how to check for updates:
- On Windows: Open the Creative Cloud desktop app, go to the Apps tab, and click Update next to Photoshop if an update is available.
- On Mac: Open the Creative Cloud desktop app and check the Updates section for available Photoshop updates.
You should also check your operating system display settings. On Windows, go to Settings > Display > Scale and Layout and make sure the scaling is set to 100% or a supported percentage. On Mac, go to System Preferences > Displays and check your resolution settings. Incorrect display scaling can cause Photoshop cursors to display incorrectly.
Display Scaling and Cursor Visibility
High-resolution displays like 4K monitors can sometimes cause Photoshop cursors to appear smaller than expected. This can make the brush tip cursor look like a crosshair even when it is not. Adjusting your display scaling settings or changing the Photoshop UI scale can help improve cursor visibility and overall display quality.
Comparison Table: Photoshop Cursor Display Options
| Cursor Type | Best For | Shows Brush Size | Shows Brush Shape | Visibility |
|---|---|---|---|---|
| Standard | General navigation | No | No | Moderate |
| Full Brush Tip | Painting and retouching | Yes | Yes | High |
| Crosshair | Precision placement | No | No | Low (tiny dot) |
As you can see from the table, the Full Brush Tip option is the best choice for most Photoshop users. It provides the highest visibility and shows both brush size and shape, making it ideal for painting, retouching, and detailed editing work.
Expert Tips for Managing Photoshop Cursors
Here are some expert tips that will help you manage your Photoshop cursor more effectively and avoid crosshair cursor surprises in the future:
- Use the Paint Tool Cursor Setting: In the Cursors Preferences, you can set the Paint Tool cursor to display either the full brush tip or a simple crosshair. Choose Full Brush Tip for the best painting experience.
- Check Your Active Tool: Different tools in Photoshop have different cursor defaults. The Brush Tool shows the brush tip, while the Marquee Tool shows a selection outline. Always check which tool you have selected when your cursor looks unexpected.
- Customize Cursor Size: In the Cursors Preferences, you can also adjust the cursor size slider. Increasing the cursor size makes the brush tip easier to see on large monitors.
- Use Full Screen Mode: Pressing F cycles through screen modes, and working in Full Screen Mode can sometimes improve cursor visibility and reduce distractions.
- Calibrate Your Display: If your cursor appears blurry or misaligned, calibrating your monitor display settings can improve overall cursor accuracy and rendering.
These tips may seem small, but they make a big difference in your daily Photoshop workflow. Taking a few minutes to set up your cursor preferences correctly can save you hours of frustration over time.
Common Mistakes That Cause Cursor Problems
Even experienced Photoshop users can run into cursor issues from time to time. Here are some common mistakes that cause cursor problems and how to avoid them:
- Not Checking Caps Lock: Many users press Caps Lock without realizing it and then wonder why their cursor changed. Make it a habit to check Caps Lock first when your cursor looks wrong.
- Ignoring Brush Settings: A very small brush size can make the brush tip cursor hard to see. Always check your brush size before assuming something is wrong.
- Using the Wrong Workspace: Switching between workspaces can change your cursor preferences. Stick to one workspace that is optimized for your workflow.
- Skipping Updates: Outdated Photoshop versions may have bugs that affect cursor display. Keep your software up to date to avoid these issues.
- Not Saving Custom Workspaces: If you customize your workspace, always save it before making any changes. This way, you can always go back to your preferred setup.
Avoiding these common mistakes will help you maintain a smooth and consistent Photoshop experience. Your cursor should always be where you expect it to be, showing you exactly what you need to see.
How to Change A Photoshop Crosshair Cursor Into Brush Tip: Step-by-Step Recap
Let us recap the main methods for changing your Photoshop crosshair cursor back into a brush tip cursor. Here is a quick reference guide you can come back to anytime:
- Press Caps Lock: The fastest way to toggle between crosshair and brush tip cursor.
- Go to Edit > Preferences > Cursors: Select Full Brush Tip for a permanent cursor display setting.
- Check Brush Tool Settings: Adjust brush size and hardness in the Brush Panel to ensure proper cursor display.
- Reset Your Workspace: Use Reset Essentials to restore default cursor and workspace settings.
- Update Photoshop: Make sure you are running the latest version of Photoshop for the best cursor performance.
With these five methods, you should be able to fix any crosshair cursor issue in Photoshop quickly and easily. Bookmark this article for future reference, and you will never have to struggle with an unwanted crosshair cursor again.
Conclusion
Changing a Photoshop crosshair cursor back into a brush tip is one of those small fixes that makes a huge difference in your daily workflow. Whether you use the Caps Lock shortcut, adjust your Preferences, or reset your workspace, the solution is always within reach. The key is knowing which method to use and when to use it. Now that you have all the tools and techniques at your fingertips, you can spend less time troubleshooting and more time creating. Your Photoshop brush tip cursor is ready to go, and your painting and retouching workflow should feel smooth and natural again.
Remember, the Caps Lock key is your best friend for quick cursor toggling, and the Full Brush Tip setting in Preferences gives you a permanent solution. Keep your Photoshop updated, save your custom workspaces, and enjoy a cursor experience that works for you. Happy editing!
Frequently Asked Questions
Why does my Photoshop cursor keep changing to a crosshair?
The most common reason is that you are accidentally pressing the Caps Lock key while working. Photoshop uses Caps Lock as a toggle between the crosshair cursor and the brush tip cursor. Check your Cursors Preferences in Edit > Preferences to set your default cursor display to Full Brush Tip, which helps prevent this from happening unexpectedly.
How do I make my Photoshop brush cursor bigger?
You can make your Photoshop brush cursor bigger by going to Edit > Preferences > Cursors and adjusting the cursor size slider. You can also increase the brush size itself by pressing the right square bracket key on your keyboard. A larger cursor size makes the brush tip easier to see, especially on high-resolution monitors.
Does the crosshair cursor affect my brush size or painting accuracy?
No, the crosshair cursor does not affect your brush size or painting accuracy. It simply changes the visual appearance of the cursor on screen. Your brush will paint at the same size and hardness regardless of whether you see a crosshair or a brush tip. The crosshair only shows the center point of your brush, while the brush tip shows the full shape and size.
Can I set Photoshop to always show the brush tip cursor?
Yes, you can set Photoshop to always show the brush tip cursor by going to Edit > Preferences > Cursors and selecting Full Brush Tip from the cursor display options. This setting ensures that your brush tip cursor appears every time you use a painting or retouching tool, regardless of other settings or accidental keypresses.
What is the difference between the crosshair cursor and the brush tip cursor in Photoshop?
The crosshair cursor is a small plus sign that shows the exact center point of your brush. It is useful for precise placement but does not show brush size or shape. The brush tip cursor displays the full shape, size, and hardness of your brush, making it much easier to see how your strokes will look on the canvas. Most painters and retouchers prefer the brush tip cursor for everyday work.
Will resetting my Photoshop workspace delete my brushes or custom settings?
No, resetting your workspace will not delete your brushes or custom settings. Workspace resets only affect panel layouts, tool arrangements, and interface preferences. Your brushes, presets, patterns, and other creative assets remain safe. However, you should always save your custom workspace before resetting so you can restore it if needed.