How Do I Create Tally Marks In A Word Document Easily
Creating tally marks in a Word document is simpler than most people think. Whether you are tracking votes, counting survey responses, or organizing data, tally marks in a Word document can save you time and keep your work looking clean. This guide walks you through every method you need to know. You will learn how to insert tally marks using symbols, keyboard shortcuts, shapes, and tables. By the end, you will be able to add tally marks in a Word document like a pro.
Have you ever needed to count something quickly and thought, “There has to be an easier way”? Maybe you are tallying votes for a team election. Perhaps you are tracking survey responses for a school project. Or maybe you just need a simple counting system for your personal notes. Whatever the reason, tally marks in a Word document are one of the most practical tools you can use. They are fast, visual, and universally understood.
But here is the thing. Many people do not know how to actually create tally marks inside Microsoft Word. They end up typing dashes or drawing them by hand on paper. That takes extra time and looks messy. The good news is that Word gives you several easy ways to make tally marks. Some methods take seconds. Others give you more control over how they look. In this guide, we will walk through every method step by step.
By the time you finish reading, you will know exactly how to add tally marks in a Word document for any purpose. You will also learn helpful tips, common mistakes to avoid, and expert tricks that make your documents look polished. Let us get started.
Key Takeaways
- Multiple Methods Available: You can create tally marks in a Word document using the symbol menu, keyboard shortcuts, AutoCorrect, shapes, text boxes, and tables.
- AutoCorrect Saves Time: Setting up AutoCorrect lets you type tally marks instantly without navigating menus every time.
- Tables Keep Things Organized: Using Word tables gives you a structured way to track and display tally counts neatly.
- Shapes Offer Full Customization: Drawing tally marks with shapes lets you control size, color, and style for professional-looking documents.
- Avoid Common Mistakes: Skipping grouping by fives and ignoring font compatibility are the top errors people make.
- Works on All Platforms: These methods work on both Windows and Mac versions of Microsoft Word.
📑 Table of Contents
- Understanding Tally Marks and Why They Matter in Word
- Method 1: Insert Tally Marks Using the Symbol Menu
- Method 2: Use Keyboard Shortcuts and AutoCorrect
- Method 3: Create Tally Marks with Shapes and Text Boxes
- Method 4: Use Tables for Organized Tally Counting
- Comparing the Four Methods
- Common Mistakes to Avoid When Making Tally Marks
- Expert Tips for Polished Tally Marks in Word
- Conclusion
Understanding Tally Marks and Why They Matter in Word
What Are Tally Marks?
Tally marks are a simple counting system used around the world. They involve drawing short lines or strokes to represent numbers. Every fifth mark is drawn diagonally across the previous four. This creates a group of five, which makes counting large numbers much easier. For example, the number seven would look like this: |||| / ||. The first group of five is complete, and two more marks show the remaining count.
This system has been used for thousands of years. Ancient civilizations used tally marks on bones and stones to keep records. Today, they remain one of the simplest ways to track counts in real time. Whether you are in a classroom, a boardroom, or at home, tally marks get the job done without any fancy tools.
Why Use Tally Marks in Word Documents?
You might wonder why anyone would need tally marks inside a Word document. The answer is simple. Digital documents are more shareable, editable, and professional than handwritten notes. When you put tally marks in a Word document, you can:
- Share counts electronically with teammates or classmates
- Edit counts easily without erasing or redrawing
- Print clean copies for presentations or reports
- Combine tally marks with other data like charts or tables
- Keep a digital record that never gets lost or damaged
Word processing tools like Microsoft Word are designed to handle all kinds of content. Tally marks in a Word document fit right in. They work in reports, spreadsheets, forms, and even creative projects. Once you learn how to insert them, you will find yourself using them more often than you expect.
Method 1: Insert Tally Marks Using the Symbol Menu
Step-by-Step Guide
The symbol menu in Word is the most straightforward way to add tally marks in a Word document. Word includes a built-in collection of symbols, and some of them look like tally marks. Here is how to do it:
- Open your Word document and place your cursor where you want the tally marks.
- Click on the “Insert” tab in the top ribbon menu.
- Click “Symbol” in the far-right section of the ribbon.
- Choose “More Symbols” from the dropdown menu.
- Change the font to “Windings” or “Wingdings 2” using the font dropdown.
- Scroll through the symbols to find characters that look like tally marks or counting strokes.
- Click “Insert” to add the symbol to your document.
Keep in mind that Word does not have a dedicated “tally mark” symbol built in. So you may need to use vertical line characters (|) or find a close match in the symbol library. This method works well for occasional use but can be slow if you need many tally marks.
Quick Tips for Symbol Insertion
- Use the vertical bar key on your keyboard (usually above the Enter key) as a quick alternative to searching for symbols.
- Copy and paste a set of five tally marks once you create them, then reuse them throughout the document.
- Change the font size after inserting to make the marks larger or smaller as needed.
Method 2: Use Keyboard Shortcuts and AutoCorrect
Setting Up AutoCorrect for Tally Marks
If you use tally marks often, AutoCorrect is a game changer. It lets you type a short code and have Word automatically replace it with a tally mark symbol. Here is how to set it up:
- Go to “File” and click “Options.”
- Select “Proofing” from the left menu.
- Click the “AutoCorrect Options” button.
- In the “Replace” field, type a short code like “tmark” or “tally”.
- In the “With” field, paste or type the tally mark character you want to use.
- Click “Add” and then “OK.”
Now every time you type “tmark” and press the spacebar, Word will replace it with your chosen tally mark symbol. This method is perfect for people who work with tally marks in a Word document regularly. It saves a ton of time and keeps your workflow smooth.
Keyboard Shortcut Methods
You can also use keyboard shortcuts to speed up your tally mark creation. The vertical line character (|) is your best friend here. Simply press Shift and the backslash key (\) to type a single vertical line. For a group of five, type four vertical lines and then a forward slash (/) diagonally across them.
Another trick is to use the Alt code method. Hold down the Alt key and type a numeric code on the keypad to insert special characters. However, Alt codes for tally marks specifically are limited, so the AutoCorrect method is usually faster and more reliable.
Expert Insight
Pro tip: Create a custom AutoCorrect entry for a full group of five tally marks (||||/). This way, you only need to type a two-letter code to insert an entire counting group. It cuts your work time in half.
Method 3: Create Tally Marks with Shapes and Text Boxes
Drawing Tally Marks with Shapes
If you want full control over how your tally marks in a Word document look, shapes are the way to go. Word’s built-in shape tools let you draw lines, adjust thickness, change colors, and position everything exactly where you want it.
Here is how to do it:
- Click on the “Insert” tab.
- Click “Shapes” in the Illustrations group.
- Select the “Line” shape.
- Click and drag on your document to draw a vertical line.
- Repeat to draw four vertical lines.
- Draw a diagonal line across the fourth vertical line to complete the group of five.
This method gives you the most flexibility. You can make the lines thick or thin, change their color to match your document theme, and even add shadows or effects. It is especially useful for tally marks in a Word document that need to look professional or match a specific style.
Using Text Boxes for Flexible Placement
Text boxes add another layer of flexibility. You can insert a text box, type your tally marks inside it, and then move the box anywhere on the page. This is great for creating tally charts or visual displays within a document. To insert a text box, go to Insert > Text Box > Simple Text Box, and then type or paste your marks inside.
Method 4: Use Tables for Organized Tally Counting
Setting Up a Tally Mark Table
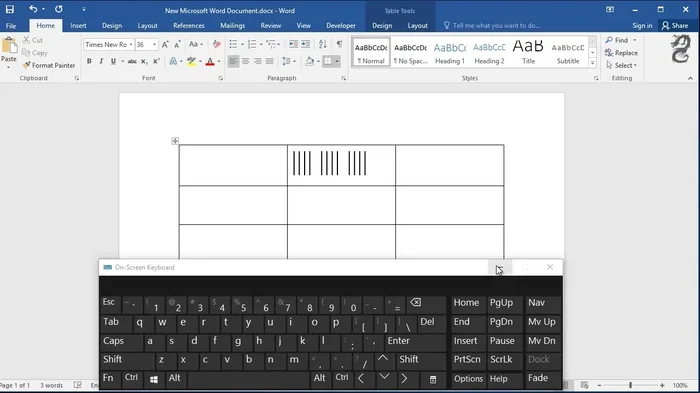
If you are tracking multiple items or categories, a table works beautifully. Tables keep your tally marks in a Word document neat and easy to read. Here is how to set one up:
- Click on the “Insert” tab.
- Click “Table” and choose the number of rows and columns you need.
- Type your categories in the first column.
- Use the vertical line character (|) or shapes to create tally marks in the second column.
- Add a totals column on the right to display the final count for each category.
This approach is perfect for surveys, voting results, or any situation where you need to track multiple items side by side. The table keeps everything aligned and makes your data easy to scan at a glance.
Adding Formulas for Automatic Counting
Word tables can do more than just display data. You can use simple formulas to count the number of tally marks automatically. Click inside the cell where you want the total, go to Table Tools > Layout > Formula, and use a basic count formula. This feature turns your tally marks in a Word document into a mini data tracking tool.
Comparing the Four Methods
With so many methods available, it helps to compare them side by side. Use the table below to decide which approach fits your needs best.
| Method | Ease of Use | Speed | Customization | Best For |
|---|---|---|---|---|
| Symbol Menu | Very Easy | Slow | Low | Occasional use, quick insertion |
| Keyboard Shortcuts / AutoCorrect | Easy | Very Fast | Medium | Frequent use, repetitive counting |
| Shapes and Text Boxes | Moderate | Medium | Very High | Professional documents, visual displays |
| Tables | Easy | Medium | High | Organized tracking, surveys, reports |
As you can see, each method has its strengths. For quick, one-time use, the symbol menu works fine. For regular use, AutoCorrect is the clear winner. When appearance matters, shapes and text boxes give you the most control. And for organized data, tables are unmatched.
Common Mistakes to Avoid When Making Tally Marks
Even though tally marks in a Word document are simple to create, there are a few mistakes that trip people up. Avoiding these errors will save you time and keep your documents looking clean.
Skipping the Group of Five
The whole point of tally marks is to group by fives. If you just draw individual lines without the diagonal slash, counting becomes tedious and error-prone. Always draw four vertical lines and then a diagonal line across them. This group-of-five format is what makes tally marks so efficient for quick counting.
Using the Wrong Font
Some fonts do not display vertical line characters or symbol-based tally marks correctly. If your marks look blurry or misaligned, try switching to a different font like Arial, Calibri, or Windings. Font compatibility is an often-overlooked issue that can ruin the appearance of your document.
Forgetting to Save Custom AutoCorrect Entries
If you set up AutoCorrect for tally marks, make sure to save the entry before closing the dialog box. It is also a good idea to write down your custom codes somewhere so you do not forget them. Losing an AutoCorrect entry means recreating it from scratch.
Not Aligning Marks Properly
When using shapes or text boxes, misaligned marks can make your document look unprofessional. Use Word’s alignment tools to ensure your tally marks line up neatly. Select the marks, right-click, choose “Align,” and pick the alignment option that works best.
Expert Tips for Polished Tally Marks in Word
Use Color Coding for Visual Clarity
One of the easiest ways to make your tally marks in a Word document stand out is to use color. Red marks for one category and blue marks for another instantly makes your data easier to read. To change the color, select the lines or text and use the font color picker in the Home tab.
Create a Reusable Tally Mark Template
If you work with tally marks regularly, consider creating a template document. Set up your preferred method, save it as a Word template (.dotx), and reuse it for every new project. This saves setup time and ensures consistency across all your documents.
Combine Tally Marks with Charts
For a more polished look, pair your tally marks with a simple bar chart or pie chart in Word. Insert the chart using Insert > Chart, and then reference your tally mark counts as the data source. This combination makes your tally marks in a Word document more impactful and easier to understand for your audience.
Use Section Breaks for Large Documents
If your document contains many tally sections, use section breaks to organize the content. Go to Layout > Breaks > Section Break. This lets you format each tally section independently, which is helpful when you have different categories or groups of data.
Conclusion
Creating tally marks in a Word document does not have to be complicated. As you have seen, Word offers multiple methods to suit different needs and skill levels. Whether you prefer the quick symbol menu, the efficiency of AutoCorrect, the customization of shapes, or the organization of tables, there is a method that works for you.
The key is to practice. Try each method a few times until you find the one that feels most natural. Once you have a system in place, you will wonder how you ever managed without it. Tally marks in a Word document are a small but powerful tool that can make your data tracking faster, cleaner, and more professional.
Start today. Open a blank Word document, pick your favorite method, and give it a try. You will be surprised how quickly you can create a neat and organized tally system right from your keyboard. The more you use these techniques, the more confident you will become. Happy counting.
Frequently Asked Questions
Can I use tally marks for data tracking in Word?
Yes, absolutely. Tally marks in a Word document are excellent for tracking data like survey results, vote counts, or inventory tallies. You can use tables, shapes, or simple text characters to create a clear and organized tracking system.
What is the easiest way to insert tally marks in Word?
The easiest way is to use the vertical bar character (|) on your keyboard. Simply type four vertical lines and a forward slash (/) to create a group of five. For a faster long-term solution, set up an AutoCorrect entry that replaces a short code with a full tally mark group.
Can I customize the look of tally marks in Word?
Yes. You can change the font size, color, and style of your tally marks. Using shapes gives you even more control, allowing you to adjust line thickness, color, and position. For a polished look, match your tally marks to your document’s theme.
Are there keyboard shortcuts for tally marks in Word?
While there is no dedicated shortcut, you can use Shift + Backslash to type the vertical line character quickly. Setting up AutoCorrect is the closest thing to a keyboard shortcut for tally marks. It lets you insert a full group of five marks with just a few keystrokes.
Can I use tally marks in Word for voting or surveys?
Definitely. Tally marks work great for recording votes and survey responses. Use a table to list each option in a row, add tally marks in the next column, and include a totals column on the right. This format is clear, professional, and easy for anyone to understand.
How do I make tally marks in Word on a Mac?
The process is almost identical on a Mac. Use the Insert > Symbol menu, type the vertical bar using the key above the Enter key, or set up AutoCorrect through Word > Preferences > AutoCorrect. All the methods described in this guide work on both Windows and Mac versions of Word.