Homemade 75 Ohm FM Antenna The Complete Build Guide
Building a homemade 75 ohm FM antenna is one of the easiest and most affordable ways to improve your FM radio reception. This complete build guide walks you through every step, from gathering materials to tuning your antenna for the best signal. Whether you are a beginner or a DIY enthusiast, you will find practical tips and clear instructions that make the process simple and fun.
Have you ever struggled with weak FM radio signals in your home or car? Maybe you live in a rural area or your building blocks the broadcast towers. A homemade 75 ohm FM antenna can change everything. This guide gives you a full walkthrough to build one yourself using everyday items. You do not need expensive equipment or technical expertise. Just follow along, and you will be listening to crystal-clear FM stations in no time.
The beauty of a homemade FM antenna lies in its simplicity. The 75 ohm design matches the impedance of most FM receivers and coaxial cables. This match is critical because it reduces signal loss and maximizes the power reaching your radio. When your antenna impedance aligns with your receiver, you get stronger stations, less static, and better overall performance. Let us dive into the details and get you building.
Key Takeaways
- Easy to Build: You only need a few common materials and basic tools to create a working 75 ohm FM antenna at home.
- Cost Effective: A homemade antenna costs just a few dollars compared to commercial options.
- Improved Reception: A properly built 75 ohm antenna significantly boosts FM signal strength and clarity.
- Customizable Design: You can adjust the length and placement to match your local FM frequency range.
- Great Learning Experience: Building this antenna teaches you core principles of radio frequency and signal reception.
- No Special Skills Required: The build is beginner-friendly with clear step-by-step instructions.
📑 Table of Contents
What Is a Homemade 75 Ohm FM Antenna?
A 75 ohm FM antenna is a simple radio antenna designed to match the 75-ohm impedance standard used in many FM receivers and coaxial cables. The term “ohm” refers to electrical resistance, and matching this resistance ensures the radio signal flows efficiently from the antenna to your tuner. A homemade version uses basic wire, connectors, and sometimes a balun transformer to achieve this match.
The most common design for a homemade 75 ohm antenna is a half-wave dipole or a modified folded dipole. These designs use specific wire lengths calculated based on the FM frequency band you want to receive. The FM band typically ranges from 87.5 MHz to 108 MHz in most countries. Each frequency corresponds to a different optimal wire length. We will cover how to calculate this in the build section.
How Does Impedance Matching Work?
Think of impedance matching like fitting a key into a lock. If the key does not fit, the door will not open. Similarly, if your antenna impedance does not match your receiver, the signal will not transfer efficiently. A 75 ohm antenna pairs perfectly with 75-ohm coaxial cables and many FM tuners. This match minimizes signal reflection and loss, giving you the strongest possible reception.
Some receivers use 50-ohm systems instead. In those cases, you may need a matching transformer. But for most standard FM radios and receivers, the 75-ohm design works great. If you are unsure about your setup, check the label on your device or manual. You can also learn more about how FM transmitters work in phones to better understand signal flow.
Why Build Your Own FM Antenna?
There are several compelling reasons to build a homemade 75 ohm FM antenna instead of buying one. Let us look at the biggest advantages.
- Cost Savings: A store-bought FM antenna can cost anywhere from $20 to $100 or more. A homemade version costs under $5 in most cases.
- Customization: You can adjust the wire length and placement to target specific local FM stations and frequencies.
- Learning Value: Building this antenna teaches you about radio frequency, impedance, and signal propagation.
- Emergency Preparedness: During power outages or when commercial antennas fail, knowing how to build one from scratch is invaluable.
- No Special Tools Needed: Most builds require only wire cutters, a screwdriver, and basic household items.
Beyond the practical benefits, there is a deep satisfaction in building something that works. Many DIY enthusiasts find that the homemade antenna actually outperforms cheap commercial alternatives. The key lies in the precision of the build and the quality of the materials you choose.
How Does a Homemade Antenna Compare to Commercial Ones?
Commercial FM antennas often come with amplifiers and fancy housing. But the core element is still a wire or element tuned to a specific FM frequency. A well-built homemade 75 ohm antenna can match or even exceed the performance of a $50 store-bought model. The difference usually comes down to placement and orientation rather than the antenna itself. A properly positioned homemade antenna often beats a poorly placed expensive one.
Materials You Will Need
Gathering your materials is the first step. The good news is that you probably already have most of these items at home. Here is what you need for a basic 75 ohm FM antenna build.
Core Materials
- 14 AWG or 16 AWG copper wire: This is the main antenna element. Copper conducts electricity efficiently and is easy to work with.
- 75-ohm coaxial cable: RG-6 or RG-59 coax works perfectly. This connects your antenna to the FM receiver.
- F-type connector or RCA adapter: This attaches the coaxial cable to your FM radio or tuner.
- Wooden dowel or PVC pipe (optional): This serves as the antenna boom or mast to hold the wire elements in place.
- Wire strippers and cutters: For preparing the wire and cable ends.
- Electrical tape or heat shrink tubing: For insulating connections and protecting the build.
Optional but Helpful Items
- Balun transformer (75-ohm to 50-ohm): Use this if your receiver uses 50-ohm impedance instead of 75 ohm.
- Mounting brackets or clips: These help secure the antenna to a window, wall, or outdoor pole.
- Soldering iron and solder: For creating strong, permanent connections.
- SWR meter or signal strength meter: These tools help you fine-tune the antenna length for optimal performance.
Before you start building, make sure you have a clear workspace and good lighting. Working with wire and cable is much easier when you can see what you are doing. If you are new to this, you might also want to understand more about how antennas function in wireless modules to get a broader picture of antenna design principles.
Step-by-Step Build Instructions
Now comes the fun part. Follow these steps carefully to build your very own homemade 75 ohm FM antenna. Each step is designed to be simple and straightforward.
Step 1: Calculate the Wire Length
The length of your antenna elements depends on the FM frequency you want to receive. For a half-wave dipole, the formula is:
Length (feet) = 246 / Frequency (MHz)
For example, if you want to tune to 100 MHz:
246 / 100 = 2.46 feet (about 29.5 inches)
Cut two equal lengths of copper wire for a dipole design. Each element should be this calculated length. If you want broader FM reception across the entire band, you can build a wider antenna with multiple elements or use a slightly different design like a folded dipole.
Step 2: Prepare the Coaxial Cable
Take your 75-ohm coaxial cable and strip about 1 inch of the outer jacket at one end. Be careful not to damage the inner conductor or the shield. Peel back the shield braid and foil, leaving the dielectric insulator intact. This exposes the center conductor for connection to the antenna element.
At the other end of the cable, attach your F-type connector or RCA adapter depending on your receiver input. Solder or crimp the connector securely. A clean connection here is essential for good signal transfer.
Step 3: Connect the Elements
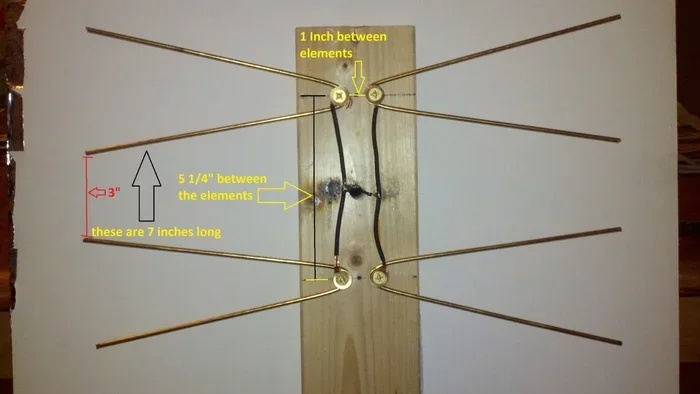
Take the two copper wire elements you cut in Step 1. Attach one wire to the center conductor of the coaxial cable and the other wire to the shield. This creates the dipole configuration.
Solder the connections firmly. Use heat shrink tubing or electrical tape to insulate each joint. Make sure there are no bare wire touches between the center conductor and the shield, as this causes a short circuit.
Step 4: Assemble the Antenna
If you are using a wooden dowel or PVC pipe, attach the two wire elements perpendicular to each other, forming a T-shape or cross pattern. The coaxial cable connects at the center point. This perpendicular arrangement helps the antenna receive signals from multiple directions.
Mount the antenna in a high location for the best results. A window sill, attic, or outdoor pole works great. The higher and more exposed the antenna, the stronger your FM reception will be. Avoid placing the antenna near metal objects or electronics that might cause interference.
Step 5: Test and Tune
Connect the coaxial cable to your FM receiver and scan for stations. Listen for clear audio and check for static or distortion. If the signal is weak, try adjusting the wire lengths slightly. Even small changes of half an inch can make a noticeable difference.
For the best results, experiment with antenna placement and orientation. Sometimes simply rotating the antenna by 90 degrees dramatically improves reception. This tuning process is part of the fun and helps you understand how antenna design affects signal quality.
Tips for Better FM Reception
Building the antenna is only half the battle. Placement and technique matter just as much. Here are proven tips to maximize your FM reception with your new homemade 75 ohm antenna.
- Get it high: Elevate your antenna as much as possible. Height reduces obstructions and improves line-of-sight to broadcast towers.
- Point toward the transmitter: Find the direction of your nearest FM broadcast tower and orient the antenna accordingly.
- Keep it away from interference: Stay away from Wi-Fi routers, microwaves, and power lines that can cause electromagnetic noise.
- Use longer cable sparingly: Longer coaxial cables introduce signal loss. Keep the cable run as short as possible.
- Try outdoor placement: An outdoor mount almost always outperforms an indoor setup for FM signal strength.
- Experiment with wire length: Slightly trimming or extending the elements can help you find the sweet spot for your local stations.
Quick Tips for Beginners
- Start with the center of the FM band (around 100 MHz) for your initial wire length calculation.
- Use a compass app on your phone to find the direction of broadcast towers near you.
- Keep a notebook of your wire lengths and reception results to track what works best.
- Do not worry about perfection on the first try. Small adjustments make big improvements.
Common Mistakes to Avoid
Even simple builds can go wrong if you overlook a few details. Here are common mistakes people make when building a homemade 75 ohm FM antenna and how to avoid them.
- Wrong wire length: Cutting the elements too short or too long drastically reduces performance. Always calculate your length based on the target frequency.
- Poor connections: Loose or dirty connections introduce resistance and signal loss. Solder your joints and insulate them properly.
- Ignoring impedance mismatch: Using 50-ohm cable with a 75-ohm design (or vice versa) causes signal loss. Stick with 75-ohm coaxial cable for this build.
- Placing near metal: Metal surfaces reflect and absorb radio waves. Keep your antenna away from metal frames, gutters, and appliances.
- Skipping the balun when needed: If your receiver expects 50 ohm impedance, skipping the matching transformer leads to poor performance.
- Not testing in different positions: Many builders give up too quickly. Always test multiple placements before concluding the antenna does not work.
Avoiding these pitfalls ensures your homemade FM antenna delivers reliable performance. Take your time with each step, and do not rush the build. Patience pays off with better reception.
Understanding the Science Behind Your Antenna
Building a homemade 75 ohm FM antenna is not just a fun project. It also teaches you real principles of radio frequency engineering. Understanding these concepts helps you troubleshoot issues and improve future builds.
What Is FM Frequency and How Does It Travel?
FM stands for Frequency Modulation. FM radio stations broadcast audio signals by varying the frequency of a carrier wave. These waves travel through the air at the speed of light and are captured by any antenna tuned to the right frequency range. The FM frequency band sits between 87.5 MHz and 108 MHz in most regions of the world.
When an FM wave hits your antenna, it induces a small electrical current in the wire. This current travels through the coaxial cable to your receiver, where it is decoded into audio. The stronger the induced current, the clearer and louder the sound. This is why antenna design and placement are so important for FM reception quality.
The Role of the Dipole Design
The dipole is the most fundamental antenna design in radio. It consists of two conductive elements arranged end to end. Each element is typically one-quarter of the target wavelength long, making the total length one-half wavelength. This design naturally resonates at the target frequency, producing the strongest signal output.
Your 75 ohm FM antenna uses this principle. The wire length you cut determines the resonant frequency. When the antenna resonates, it efficiently captures energy from passing radio waves. This is why precise wire cutting is so important for a successful antenna build.
Why 75 Ohms?
The 75-ohm impedance standard comes from the characteristic impedance of common coaxial cables like RG-6. This impedance represents the optimal balance between signal power handling and cable loss at FM frequencies. Matching your antenna impedance to this standard ensures maximum power transfer from the antenna to the receiver.
When impedance is mismatched, some of the signal reflects back toward the antenna instead of reaching the receiver. This reflection causes signal loss and can introduce standing waves that degrade performance. Keeping everything at 75 ohms keeps your FM signal path clean and efficient.
Conclusion
Building a homemade 75 ohm FM antenna is a rewarding project that anyone can do. You do not need expensive tools, advanced technical knowledge, or a professional workshop. With a few pieces of wire, a length of coaxial cable, and some basic connectors, you can create a powerful FM antenna that rivals commercial products. The key is precision in your wire lengths, quality in your connections, and patience in testing and tuning.
This guide has walked you through everything from understanding the basics to completing your build. You now know how to calculate wire length, assemble the dipole elements, connect the coaxial cable, and optimize placement for the best FM reception. Apply these steps, experiment with your setup, and enjoy clearer, stronger FM stations. Whether you are an avid radio listener, a DIY hobbyist, or someone looking for a practical solution to poor reception, this homemade antenna delivers real results.
Start your build today and experience the satisfaction of listening to your favorite FM stations through an antenna you created with your own hands. The 75 ohm FM antenna is simple, effective, and endlessly customizable. Happy building!
Frequently Asked Questions
What is the best wire for a homemade 75 ohm FM antenna?
14 AWG or 16 AWG copper wire works best for a homemade 75 ohm FM antenna. Copper is highly conductive and easy to cut and shape. Avoid coated or galvanized wire because the coating adds resistance and weakens the signal.
Can I use this antenna to receive AM stations too?
No, this design is specifically tuned for the FM frequency band between 87.5 MHz and 108 MHz. AM stations operate at much lower frequencies and require a completely different antenna design and length.
How far can a homemade 75 ohm FM antenna reach?
The range depends on your local transmitter power, terrain, and antenna placement. A well-built homemade FM antenna can typically receive stations 50 to 100 miles away when placed outdoors and properly tuned. Indoor placement reduces range significantly.
Do I need a balun transformer for this build?
Not always. If your FM receiver uses 75-ohm impedance, you do not need a balun. However, if your receiver uses 50 ohm, a 75-to-50 ohm balun transformer ensures proper impedance matching and prevents signal loss.
Can I connect this antenna directly to my car stereo?
Yes, if your car stereo has an FM antenna input or you use an appropriate adapter. The 75 ohm coaxial cable connects to the stereo’s antenna input. Some cars use a different connector, so check your vehicle’s manual or use an adapter cable.
Will building this antenna interfere with my Wi-Fi or other devices?
No. A passive FM antenna operates at a completely different frequency range than Wi-Fi and other wireless devices. It simply captures FM radio waves and passes the signal to your receiver. There is no interference risk.
=== CONCLUSION ===
Building a homemade 75 ohm FM antenna is one of the most satisfying and practical DIY projects you can tackle. It costs almost nothing, requires minimal tools, and delivers noticeably better FM reception. Follow the steps in this guide, avoid the common mistakes, and experiment with placement to find the perfect setup for your space. You will walk away with a working antenna and a deeper understanding of how radio signals work. Start building today and enjoy your favorite stations with crystal clarity.