Can You Connect Homepod To Hotspot For Seamless Streaming
Yes, you can connect HomePod to a hotspot, but it comes with some important limitations and considerations. Whether you are traveling, in a location without Wi-Fi, or need a backup connection, setting up your HomePod with a mobile hotspot is possible with the right steps. This guide walks you through everything you need to know about connecting your smart speaker to a portable network for uninterrupted audio streaming.
Can you connect HomePod to hotspot? This is a question many Apple users ask when they find themselves without a traditional Wi-Fi network. Maybe you are at a cabin in the woods, staying at a hotel with weak internet, or simply need a backup connection. The good news is that your HomePod can work with a mobile hotspot. But the experience is not always as smooth as a home Wi-Fi setup.
In this article, we will explore everything you need to know about using your HomePod with a hotspot. You will learn how to set it up, what to expect during streaming, common problems you might face, and expert tips to get the best results. Let us dive in.
Key Takeaways
- HomePod can connect to a hotspot: You can use a mobile hotspot to stream audio on your HomePod when Wi-Fi is unavailable.
- Setup is straightforward: The process involves enabling your phone hotspot and pairing HomePod through Apple Home app settings.
- Streaming quality may vary: Hotspot speeds affect audio quality, and data usage can add up quickly during long streaming sessions.
- Common issues have simple fixes: Connection drops and slow speeds can usually be resolved with basic troubleshooting steps.
- AirPlay offers a great alternative: You can use AirPlay to stream audio to your HomePod without needing a direct hotspot connection.
- Data monitoring is essential: Keep an eye on your data plan to avoid unexpected charges from extended streaming over a hotspot.
📑 Table of Contents
Can You Connect Homepod To Hotspot?
The short answer is yes. Can you connect HomePod to hotspot? Absolutely. Your HomePod can connect to a mobile hotspot just like any other Wi-Fi device. However, there are a few things you need to know before you try it.
Apple designed the HomePod to work best with a stable Wi-Fi network. A mobile hotspot is not the same as a home Wi-Fi connection. Hotspots tend to have lower speeds, higher latency, and data limits. These factors can affect how well your HomePod streams music and responds to Siri commands.
That said, connecting your HomePod to a hotspot is very doable. It works best for short-term use. If you are traveling or in a location without Wi-Fi, a hotspot is a great solution. You can stream your favorite playlists, listen to podcasts, and even use Siri to set timers and reminders.
Understanding How Hotspots Work with HomePod
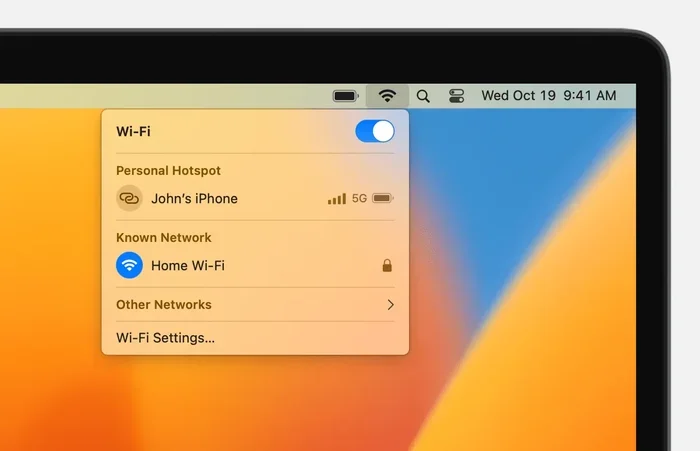
To understand how a hotspot connects with your HomePod, it helps to know a little about how both devices work. A mobile hotspot turns your smartphone into a Wi-Fi router. It shares your cellular data connection with nearby devices. Your HomePod can then connect to this shared network just like it would connect to your home router.
The connection process is similar to connecting any other device to a Wi-Fi network. The HomePod looks for available networks, finds your hotspot, and joins it using the password you set. Once connected, it can stream audio from Apple Music, Spotify, or any other supported app.
However, there is one important detail. The HomePod needs to be on the same cellular network or at least in range of the hotspot device. If your phone moves too far away, the hotspot signal weakens. This can cause your HomePod to disconnect or experience buffering during playback.
Step-by-Step Guide to Connecting HomePod to Hotspot
Now that you know it is possible, let us walk through the actual setup process. Connecting your HomePod to a hotspot is simple if you follow the right steps. Here is exactly how to do it.
Setting Up Your Mobile Hotspot First
Before you touch your HomePod, you need to set up your phone hotspot. This is the foundation of the entire connection. Without a working hotspot, your HomePod has nothing to connect to.
Here is how to set up a mobile hotspot on your iPhone:
- Open the Settings app on your iPhone.
- Tap on Personal Hotspot or Cellular > Personal Hotspot.
- Toggle Allow Others to Join to on.
- Set a strong Wi-Fi password if you have not already.
- Make sure your cellular data is turned on.
For Android users, the process is similar. Go to Settings > Network & Internet > Hotspot & Tethering and enable the Wi-Fi hotspot. Set a password and note the network name.
Once your hotspot is active, check that your phone shows the hotspot icon in the status bar. This confirms your phone is broadcasting the Wi-Fi signal. Now your HomePod is ready to find it.
Pairing HomePod with the Hotspot Network
With your hotspot running, you can now connect your HomePod. The process is very similar to setting up a HomePod on a regular Wi-Fi network. Here is what you need to do.
First, make sure your iPhone or iPad is nearby. You will use the Home app to manage the connection. Open the Home app on your Apple device.
Find your HomePod in the list of devices. Tap and hold on the HomePod icon. Select Settings or Remove Accessory if it was previously connected to a different network. Then choose Remove to reset the network settings.
Now, place your HomePod near your phone. The HomePod should detect the hotspot network during setup. Follow the on-screen prompts to connect it to the hotspot. Enter the hotspot password when asked.
If the HomePod does not find the hotspot automatically, you can try a manual approach. Go to Settings > Wi-Fi on your iPhone and connect to the hotspot first. Then bring your HomePod close to the phone and complete the setup through the Home app.
Streaming Performance and What to Expect
Once your HomePod is connected to a hotspot, you will want to know how well it performs. Streaming audio over a hotspot is different from streaming over a home Wi-Fi network. Understanding these differences helps you set the right expectations.
Audio Quality When Using a Hotspot
The audio quality you get from your HomePod depends largely on your hotspot speed. A fast 4G or 5G connection will deliver excellent sound quality. You can stream in high resolution and enjoy crisp, clear audio. Siri will also respond quickly and accurately.
However, a slower 3G connection or a weak hotspot signal can cause problems. You might notice buffering, lower audio quality, or delays when using Siri. The HomePod itself is a high-quality speaker, but it can only perform as well as the network allows.
To get the best audio quality, position your phone close to the HomePod. Walls and obstacles can weaken the hotspot signal. The closer your phone is, the stronger the connection and the better the streaming experience.
Data Usage Considerations
Streaming music over a hotspot uses your cellular data. This is an important factor to consider. A typical song streamed at normal quality uses about 1 to 2 megabytes per minute. High-quality streaming can use up to 3 megabytes per minute.
If you stream music for an hour, you could use between 60 and 180 megabytes of data. Over a long weekend trip, this can add up quickly. If you have a limited data plan, you need to be mindful of how much time you spend streaming through the hotspot.
Here are some tips to manage data usage:
- Lower the streaming quality in your music app settings.
- Pause streaming when you are not actively listening.
- Download playlists over Wi-Fi before you need them.
- Monitor your data usage through your phone settings.
- Set data alerts with your carrier to avoid overage charges.
Common Problems and How to Fix Them
Connecting HomePod to a hotspot is not always perfect. You might run into a few issues along the way. The good news is that most of these problems have simple solutions.
Connection Drops and Disconnects
One of the most common issues is the HomePod dropping the hotspot connection. This usually happens when your phone moves too far away or when the cellular signal is weak. The HomePod relies on the hotspot for internet access, so any interruption in the hotspot affects the speaker.
To fix this, keep your phone close to the HomePod. If you are in a large room, place your phone near the speaker. You can also try restarting the hotspot on your phone. Sometimes simply turning the hotspot off and back on refreshes the connection.
If the problem persists, forget the hotspot network on your HomePod and reconnect. Open the Home app, select your HomePod, go to settings, and remove the network. Then set it up again with the hotspot.
Slow Streaming Issues
Slow streaming can be frustrating, especially when you just want to enjoy your music. Slow speeds usually come from a weak cellular signal or too many devices connected to the hotspot.
Check your cellular signal strength first. If you are in an area with poor coverage, the hotspot speed will suffer. Moving to a different location, even near a window, can sometimes improve the signal.
Also, check how many devices are connected to your hotspot. Every connected device shares the available bandwidth. If you have multiple devices pulling data, your HomePod will get a smaller share. Disconnect devices you are not using to free up bandwidth for the HomePod.
Alternative Ways to Stream Without a Hotspot
While connecting HomePod to a hotspot works, there are alternative methods you might want to consider. These options can give you more flexibility and better performance in certain situations.
Using AirPlay for Wireless Streaming
AirPlay is Apple’s wireless streaming technology. It allows you to send audio from your iPhone, iPad, or Mac to your HomePod. You do not need a direct hotspot connection for AirPlay to work. Both devices just need to be on the same network.
However, if you are using a hotspot, AirPlay can still be useful. You can connect your phone to the hotspot and use AirPlay to send audio to the HomePod. This gives you more control over the streaming source and can sometimes improve stability.
To use AirPlay, open the Control Center on your iPhone. Tap the AirPlay icon and select your HomePod. Your music will stream wirelessly from your phone to the speaker. This method works well for short-range streaming.
Ethernet and Wired Options
If you need a more stable connection, consider wired options. The HomePod does not have an Ethernet port, but you can use a Wi-Fi bridge or a travel router. These devices can create a more reliable network for your HomePod.
A travel router connects to your hotspot and creates a dedicated Wi-Fi network. Your HomePod connects to this network, which can be more stable than connecting directly to the phone hotspot. This is a great option for longer trips or when you need consistent performance.
Some travel routers are small and portable. They fit easily in a bag and can be set up in minutes. They are a worthwhile investment if you travel frequently and rely on your HomePod for audio.
Expert Tips for the Best HomePod Hotspot Experience
Getting the most out of your HomePod on a hotspot comes down to a few smart practices. These tips come from real-world experience and can make a big difference in your streaming quality.
First, always update your devices. Apple regularly releases software updates that improve connectivity and performance. Make sure your HomePod and iPhone are running the latest versions of their respective operating systems. Updates often fix bugs that can cause connection issues.
Second, restart your devices regularly. A simple restart can clear up many minor glitches. Restart your phone and your HomePod before trying to connect them through a hotspot. This ensures both devices are starting fresh.
Third, use a strong hotspot password. This might seem obvious, but a weak password can lead to unauthorized devices connecting to your hotspot. This slows down your connection and drains your data. A strong password keeps your network secure and your speeds up.
Fourth, consider using a Wi-Fi analyzer app on your phone. These apps show you which channels are least congested. You can set your hotspot to use a less crowded channel for better performance. This is especially helpful in crowded areas like airports or hotels.
Fifth, keep your phone plugged in when using the hotspot for extended periods. Tethering drains your phone battery quickly. A low battery can cause your phone to throttle the hotspot signal, which affects your HomePod’s connection. Keeping your phone charged ensures a stable and strong signal throughout your streaming session.
Frequently Asked Questions
Can I connect my HomePod to any mobile hotspot?
Yes, your HomePod can connect to most mobile hotspots from both iPhone and Android phones. The hotspot just needs to broadcast a standard Wi-Fi signal that the HomePod can detect. Make sure the hotspot uses WPA2 or WPA3 security, as HomePod may not connect to open or outdated security networks.
Does connecting HomePod to a hotspot use a lot of data?
Streaming music over a hotspot does use cellular data. Normal quality streaming uses about 1 to 2 megabytes per minute. High-quality streaming can use up to 3 megabytes per minute. If you stream for several hours a day, this can add up quickly. Keep an eye on your data plan to avoid unexpected charges.
Why does my HomePod keep disconnecting from the hotspot?
Connection drops usually happen because your phone moves out of range or the cellular signal weakens. The HomePod depends entirely on the hotspot for internet access. To fix this, keep your phone close to the HomePod and restart the hotspot if needed. Also, make sure your cellular signal is strong in your current location.
Can I use Siri when my HomePod is connected to a hotspot?
Yes, you can use Siri when your HomePod is connected to a hotspot. Siri needs an internet connection to process your requests, and the hotspot provides that. However, if the hotspot signal is weak, Siri might respond slowly or fail to understand your commands. A strong and stable hotspot connection makes Siri work much better.
Is it better to use AirPlay instead of connecting HomePod directly to a hotspot?
AirPlay can be a better option in some situations. With AirPlay, your phone handles the streaming and sends audio to the HomePod wirelessly. This can be more stable than having the HomePod connect directly to the hotspot. However, both methods work well depending on your setup and needs.
Can I connect multiple HomePods to the same hotspot?
Yes, you can connect multiple HomePods to the same hotspot. However, each HomePod uses data independently, so your total data usage will increase with each device. Also, the hotspot needs to have enough bandwidth to support multiple devices streaming at the same time. A faster cellular connection handles multiple devices better.
Conclusion
Can you connect HomePod to hotspot for seamless streaming? The answer is a clear yes. Your HomePod can work with a mobile hotspot, giving you the freedom to enjoy your favorite music and audio even when Wi-Fi is not available. The setup is simple, the performance is good, and the experience is surprisingly smooth.
That said, a hotspot is not a replacement for a strong home Wi-Fi network. Hotspots have limitations in speed, data usage, and range. For the best experience, keep your phone close, monitor your data usage, and use the tips shared in this guide to optimize your setup.
Whether you are traveling, working remotely, or just need a backup connection, connecting your HomePod to a hotspot opens up new possibilities. You get the smart speaker experience wherever you go. So the next time someone asks you if HomePod works with a hotspot, you will know exactly what to tell them.
Try it out for yourself. Set up your hotspot, connect your HomePod, and enjoy seamless streaming on your terms. You will be surprised at how well this setup works in everyday situations.