Can I Hang A Projector Screen From The Ceiling At Home
Hanging a projector screen from the ceiling is one of the best ways to elevate your home entertainment setup. This guide covers everything you need to know about mounting a projector screen on your ceiling, from choosing the right screen type to the full installation process. You will learn about different mount options, weight limits, and how to achieve the perfect viewing angle for your room. Whether you have a drop ceiling or a standard drywall ceiling, there is a reliable solution that fits your space and budget.
So you have been thinking about hanging a projector screen from the ceiling in your living room or basement. Maybe you have been watching movies on a plain white wall and dreaming of something bigger and better. The good news is that ceiling mounting a projector screen is easier than most people think.
Whether you are building a full home theater setup or just want a better movie night experience, a ceiling-mounted screen can transform your space. It creates a clean, theater-like feel and frees up valuable wall space. In this guide, we will walk you through everything you need to know. We will cover the different screen types, the tools you need, and the exact steps to get it done right.
By the end of this article, you will feel confident about tackling this project yourself. You will know how to choose the best screen, pick the right mount, and avoid the most common pitfalls. Let us get started.
Key Takeaways
- Ceiling mounting saves floor space: It keeps your room clean and creates a professional theater look.
- Choose the right screen type: Fixed frame, retractable, and motorized screens each offer different benefits.
- Check your ceiling structure first: You must anchor into joists or use a drop ceiling mount for safety.
- Screen height is critical: The ideal position depends on your seating arrangement and room size.
- Plan your wiring early: Run HDMI and power cables before you mount the screen for a clean setup.
- DIY installation is achievable: With the right tools and a helper, most people finish in under two hours.
📑 Table of Contents
Why Hang Your Projector Screen From the Ceiling?
There are many reasons why people choose to mount their projector screen on the ceiling. The biggest advantage is that it saves floor space. A floor-standing screen or a wall-mounted screen takes up room that could be used for furniture or walking space. When you mount it from above, the screen disappears when not in use and keeps your room looking neat.
Another big benefit is the viewing experience. A ceiling-mounted screen sits at the perfect height for most seating arrangements. You do not have to worry about the screen being too low or blocking furniture. It also gives your room a clean, built-in look that makes your home theater setup feel professional.
Better Room Aesthetics
Nobody wants a bulky screen taking up wall space in their living room. A ceiling-mounted setup keeps the focus on the movie or game you are watching. The room looks cleaner and more organized. This is especially important if you have a multi-purpose room where the projector screen needs to blend in with the rest of the decor. A wall mount projector screen works too, but a ceiling mount gives you a more seamless and immersive feel.
Improved Projector Placement
When your screen is on the ceiling, you have more flexibility with projector placement. You can position the projector on a shelf, a ceiling mount, or even on a table at the back of the room. This flexibility helps you achieve the ideal projector throw distance without worrying about the projector casting shadows on the screen or on people sitting in front of it.
Quick Tip: Before you buy any equipment, measure your room dimensions. Note the distance from your seating area to the wall where the projector will sit. This helps you choose the right projector screen size and ensures the image fills the screen properly.
Types of Projector Screens for Ceiling Mounting
Not all projector screens are the same. Different types work better for different rooms and setups. Here is a look at the most popular options for ceiling mounting.
| Screen Type | Best For | Pros | Cons |
|---|---|---|---|
| Fixed Frame Screen | Dedicated home theater rooms | Flat surface, no wrinkles, great image quality | Permanent installation, cannot roll up |
| Retractable Screen | Multi-purpose rooms | Rolls up when not in use, saves space | Can have slight wrinkles, more complex install |
| Motorized Screen | Premium setups | Remote controlled, smooth operation, sleek look | Higher cost, needs power outlet nearby |
| Tripod Floor Screen | Temporary setups | Portable, easy to set up | Not ideal for ceiling mounting, unstable |
As you can see, each type has its strengths. The fixed frame screen gives you the best image quality because the surface stays perfectly taut. The retractable and motorized options are great if you need to hide the screen when it is not in use. The tripod screen is not really designed for ceiling mounting, so we will focus on the first three types for the rest of this guide.
Fixed Frame Projector Screens
A fixed frame screen is the gold standard for projector screen installation. It is a flat, rigid screen that stretches across a frame, much like a large picture frame. The surface stays perfectly flat, which means no wrinkles and no waves in the image. This gives you the sharpest picture possible.
These screens are great for dedicated home theater rooms where the screen stays up all the time. They come in different sizes and materials. Some have high screen gain, which means they reflect more light back to the viewer. This is helpful if your home cinema projector is not extremely bright or if your room gets some ambient light during the day.
Retractable and Motorized Screens
Retractable screens roll up into a case when you are not using them. You can either pull them down manually or use a remote control with a motorized version. These are perfect for rooms that serve multiple purposes, like a living room or a bedroom.
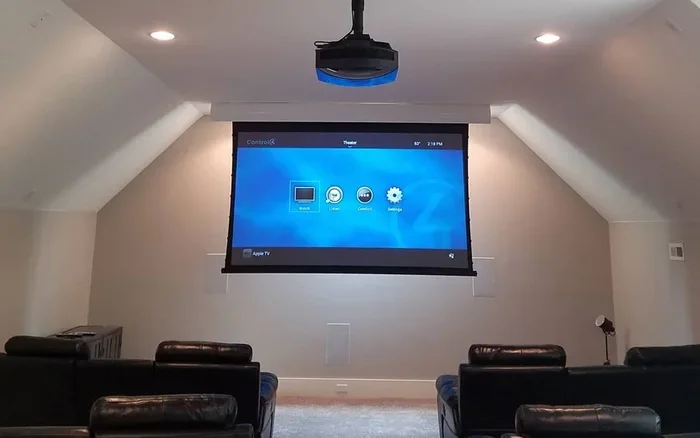
Motorized screens are the most convenient option. You simply press a button and the screen drops down from the ceiling. When you are done watching, it rolls back up and disappears. Some models even come with built-in speakers and ambient light rejection technology, which helps the picture stay clear even when the lights are on.
Screen Gain and Material
When choosing a screen, pay attention to screen gain. This number tells you how much light the screen reflects back to the viewer. A screen with a gain of 1.0 reflects light evenly in all directions. A higher gain, like 1.3 or 1.5, focuses more light toward the viewing area. This can make the image brighter but might narrow the viewing angle.
For most home theater setups, a gain between 1.0 and 1.3 works well. If you have a lot of ambient light in your room, consider a screen with ambient light rejection. These screens are designed to reject light from above and below while reflecting projector light directly to the viewers. The result is a much clearer picture even in bright rooms.
Expert Insight: The material of your screen matters more than most people realize. A matte white surface works well in dark rooms. For rooms with windows or bright overhead lights, a gray or high-contrast screen material can dramatically improve picture quality by absorbing ambient light and boosting contrast.
Tools and Materials You Will Need
Before you start drilling holes in your ceiling, make sure you have everything you need. Having the right tools makes the installation process much smoother and safer.
- Drill with appropriate bits – You will need a masonry bit for concrete ceilings or a wood bit for ceiling joists.
- Stud finder – This tool helps you locate the ceiling joists so you can anchor the mount securely.
- Measuring tape – Accurate measurements are essential for proper projector screen height and centering.
- Level – A bubble level or laser level ensures your screen hangs straight.
- Screwdriver set – Both Phillips and flathead screwdrivers for assembling the mount.
- Ladder or scaffolding – You will be working at height, so use a sturdy and stable ladder.
- Cable management tools – Cable ties, raceways, or in-wall conduit for hiding projector screen wiring.
- Helper – A second person makes the installation much easier and safer.
In addition to tools, you will need the actual mounting hardware. Most projector ceiling mount kits come with all the necessary brackets, screws, and anchors. Make sure the kit you buy is rated for the weight of your specific screen. Check the projector screen size and weight specifications before purchasing your mount.
Quick Tip: Buy a projector ceiling mount kit that is rated for at least 20% more weight than your screen. This gives you a safety margin and ensures the mount holds up over time without sagging or loosening.
Step-by-Step Installation Guide
Now for the fun part. Here is how to hang a projector screen from the ceiling, step by step. Follow these instructions carefully and you will have a professional-looking setup in no time.
Step 1: Plan Your Screen Placement
Before you do anything, decide where the screen will go. The center of the screen should be directly in front of your main seating area. Use a measuring tape to find the right spot on the ceiling. Mark the location with a pencil.
Consider the projector throw distance as well. This is the distance between the projector and the screen. If your projector is mounted on the ceiling too, make sure there is enough space between the projector and the screen. A common mistake is mounting the screen too close to the projector, which causes the image to be cut off or blurry. Use a projector throw distance calculator if you are unsure about the right distance.
Step 2: Locate the Ceiling Joists
Use a stud finder to locate the ceiling joists. These are the wooden or metal beams that support your ceiling. You want to anchor your mount into these joists for a secure hold. If you cannot find joists in the right spot, you may need to use heavy-duty toggle bolts or consider a drop ceiling projector mount instead.
A drop ceiling is a great option if your room has one. These suspended ceilings have a grid of tiles that you can remove to access the structure above. You can install a mount directly into the ceiling framework above the tiles without damaging the ceiling surface. This is one of the easiest ways to do a drop ceiling projector mount without making a mess.
Step 3: Attach the Mounting Bracket
Hold the mounting bracket against the ceiling at your marked location. Use a level to make sure it is perfectly straight. Mark the screw holes with a pencil. Drill pilot holes into the joists, then attach the bracket using the screws and anchors provided in your projector ceiling mount kit.
Make sure the bracket is tight and secure. Give it a firm tug to test it. If it moves at all, tighten the screws further or use additional anchors. This bracket is what will hold the weight of your entire screen, so do not skip this step.
Step 4: Attach the Screen to the Bracket
Now it is time to connect the screen to the mount. Different screens have different attachment methods, so follow the manufacturer’s instructions carefully. Most fixed frame screens have brackets on the back that bolt directly to the ceiling mount. Retractable screens usually hang from a bar or rail that attaches to the bracket.
If you have a motorized screen, make sure you connect the power cable before you fully secure the screen. You will want to test the motor to make sure it works before the screen is in its final position. This is also a good time to run your projector screen wiring through the ceiling if you have not done so already. Proper projector screen wiring keeps your setup clean and prevents tripping hazards.
Step 5: Test and Adjust
Once the screen is mounted, turn on your projector and test the image. Check that the picture is centered on the screen and that the edges are not cut off. Adjust the projector angle or position if needed. Use the keystone correction or lens shift features on your projector to fine-tune the image.
Step back and look at the screen from your main seating position. Is it at eye level? Does it feel comfortable to watch? Make any final adjustments to the screen height or projector position. A little tweaking goes a long way toward the perfect viewing experience.
Quick Tip: Have a friend sit in your main viewing spot while you make adjustments. What looks good from the ladder may not look right from the couch. Getting a second perspective saves time and frustration.
Common Mistakes to Avoid
Even with a good guide, people make mistakes during projector screen installation. Here are the most common ones and how to avoid them.
- Skipping the joist search: Mounting into drywall alone will not hold the weight of the screen over time. Always anchor into joists or use proper toggle bolts rated for the screen weight. A loose screen is a safety hazard.
- Ignoring projector throw distance: Measure the distance from the projector to the screen before you mount anything. A wrong distance means a blurry or incomplete image. Take the time to get this right.
- Forgetting about cable management: Exposed cables look messy and can be a safety hazard. Plan your projector screen wiring route before you start drilling. Use cable raceways or in-wall conduits for a clean look.
- Choosing the wrong screen size: A screen that is too large for your room causes eye strain. A screen that is too small looks underwhelming. Measure your room and consider the projector screen size that fits your space comfortably.
- Not testing before final installation: Always test the screen and projector before you fully tighten everything. It is much easier to make adjustments at this stage than after everything is bolted in place.
- Overlooking ambient light: If your room has windows or bright overhead lights, a standard white screen will wash out. Consider an ambient light rejection screen or add blackout curtains to improve contrast.
Expert Insight: One mistake many beginners make is not accounting for projector screen tensioning. Over time, some screen materials can sag or wrinkle, especially in humid environments. If you notice wrinkles after installation, check if your screen has adjustable tensioning rods or if you need to replace the screen material. A properly tensioned screen makes a huge difference in image quality.
Expert Tips for the Best Viewing Experience
You have your screen mounted. Now let us make sure you get the most out of it. These expert tips will help you fine-tune your setup for the best possible picture quality.
Get the Screen Height Right
The top of the screen should be at least a few inches above the tallest viewer’s head height when seated. This prevents anyone from having to look up too far, which causes neck strain during long movie sessions. A good rule of thumb is to mount the screen so the center is about 42 inches from the floor for seated viewers. This projector screen height works well for most living rooms and basements.
Consider a Black Masking Border
Many premium projector screens come with a black border around the viewing area. This border absorbs stray light and improves contrast. It also makes the image look more like a real cinema screen. If your screen does not have one, you can add black felt or fabric around the edges for a similar effect. This small detail can make a big difference in how professional your setup looks.
Balance Your Room Lighting
For the best picture quality, control the light in your room. Use blackout curtains or blinds to block outside light. Dim the overhead lights or use indirect lighting that does not shine directly on the screen. A projector with good ambient light rejection works best when the room is as dark as possible. Even small changes like turning off a table lamp can improve contrast significantly.
Keep Your Projector Clean and Maintained
A clean projector lens makes a big difference in image quality. Dust and fingerprints can blur the picture and reduce brightness. Clean the lens gently with a microfiber cloth before each use. Also, make sure your projector’s filter is clean and that the device has enough ventilation to prevent overheating. A well-maintained projector lasts longer and performs better.
Use Quality Cables for Signal Transmission
Do not cheap out on your HDMI cables. A high-quality cable ensures a clean signal from your projector to your media source. For longer runs, consider an active HDMI cable or an HDMI extender to prevent signal loss. Proper projector screen wiring also keeps your setup neat and reduces the risk of connection issues. Look for cables rated for high-speed 4K or 8K transmission if your projector supports it.
Think About Ceiling Height
Not all ceilings are the same. Standard residential ceilings are about 8 feet high, but some rooms have vaulted or cathedral ceilings. If your ceiling is very high, you may need a longer projection distance or a more powerful projector to fill the screen. Conversely, low ceilings can cause the screen to feel too close. Measure your ceiling height before choosing a screen size to make sure everything fits comfortably.
Conclusion
Hanging a projector screen from the ceiling is one of the best upgrades you can make to your home entertainment space. It saves room, looks great, and delivers a truly immersive viewing experience. With the right screen type, a solid mount, and a little patience, you can create a setup that rivals a commercial movie theater.
Remember to plan your layout carefully, choose quality materials, and take your time during installation. Follow the steps in this guide, avoid the common mistakes, and do not be afraid to ask a friend for help. Once your projector screen from the ceiling is up and running, you will wonder why you did not do it sooner.
Now that you have all the information you need, it is time to take action. Pick the right screen for your room, gather your tools, and start your installation. Your home theater setup is going to look amazing. Enjoy the show.
Frequently Asked Questions
Can I hang a projector screen from a drop ceiling?
Yes, you can. A drop ceiling projector mount is specifically designed for suspended ceilings. You simply remove a tile, access the framework above, and attach your mount directly to the ceiling structure. This method avoids damaging your ceiling tiles and makes installation much easier.
What is the best projector screen size for ceiling mounting?
The right size depends on your room dimensions and seating distance. A general rule is that the screen width should be about one-third to one-half the distance from the screen to your main seating position. Measure your room first, then choose a projector screen size that fits comfortably within that space.
Do I need special tools to hang a projector screen from the ceiling?
You need a few basic tools like a drill, stud finder, measuring tape, and a level. Most projector ceiling mount kits include all the necessary hardware. If your ceiling is concrete, you may need a masonry bit. For drywall ceilings, a stud finder and appropriate anchors are essential for a secure hold.
How high should I mount a projector screen from the floor?
The ideal projector screen height depends on your seating arrangement. A good guideline is to mount the screen so the center is about 42 inches from the floor for seated viewers. The top of the screen should be well above the tallest person’s head height when sitting down. This prevents neck strain and ensures everyone has a clear view of the entire image.
Is it hard to install a projector screen on the ceiling by myself?
Not at all. Most people can complete a DIY projector screen installation in one to two hours. The key is to have the right tools, a sturdy ladder, and a helper to hold the screen in place while you attach it. Follow the manufacturer’s instructions carefully, and do not rush the process. Taking your time ensures a safe and professional-looking result.
Can I use a motorized projector screen with a ceiling mount?
Absolutely. Motorized screens are one of the most popular choices for ceiling mounting. They come with a built-in motor that lets you raise and lower the screen with a remote control. Just make sure you have a power outlet nearby or plan to run an electrical cable through the ceiling. The convenience of a motorized setup is hard to beat for everyday use.