Do Projectors Use Vesa Mounts Everything You Need To Know
Yes, many projectors use VESA mounts, but the pattern, weight capacity, and bracket type vary by model. This guide covers everything from finding your projector’s VESA pattern to choosing the right mount and installing it safely. You will learn how to check your projector’s specs, avoid common mounting mistakes, and set up a clean, professional-looking display.
So you just bought a new projector and you are wondering if it uses a VESA mount. Maybe you have been mounting TVs for years and assumed projectors work the same way. Or perhaps you are setting up a home theater and want everything to look clean and professional. Either way, you are in the right place.
The short answer is yes, many projectors do use VESA mounts, but not all of them. The details matter a lot. Your projector might have a specific VESA pattern, a weight limit, or special mounting requirements that you need to know about before you buy a bracket. In this guide, we will walk you through everything you need to know about projector VESA mounts. You will learn how to check if your projector supports one, how to pick the right mount, and how to install it like a pro.
Whether you are mounting a home theater projector on your ceiling or setting up a portable setup for movie nights in the backyard, understanding VESA mounting is essential. A proper mount keeps your projector stable, aligned, and safe. It also frees up desk space and gives you a much cleaner look. Let us dive in and break it all down for you.
Key Takeaways
- Most projectors support VESA mounting: Check your manual or the back of the unit for mounting holes and the VESA pattern number.
- Match the VESA pattern exactly: Using the wrong pattern can damage your projector or make mounting impossible.
- Weight capacity matters: Always choose a mount rated for your projector’s weight, plus a safety margin.
- Cable management is key: Plan your cables before mounting to keep things clean and avoid strain on ports.
- Alignment affects image quality: A poorly mounted projector can cause keystone distortion and blurry images.
- Professional installation is optional: With the right tools and a helper, most people can mount a projector themselves in under an hour.
📑 Table of Contents
- What Is a VESA Mount and Why Do Projectors Use One
- How to Check if Your Projector Has VESA Mounting Points
- Choosing the Right VESA Mount for Your Projector
- Step-by-Step Guide to Mounting Your Projector with a VESA Bracket
- Common Mistakes When Mounting a Projector with VESA Hardware
- Benefits of Using a VESA Mount for Your Projector
- Quick Tips for a Perfect Projector Setup
- Conclusion
What Is a VESA Mount and Why Do Projectors Use One
The VESA mount standard was created by the Video Electronics Standards Association. It defines the spacing and size of mounting holes on the back of displays. This includes TVs, monitors, and yes, many projectors too. The standard makes it easy to find compatible brackets and mounts from different manufacturers.
When we talk about a VESA mount for a projector, we are referring to the mounting pattern on the bottom or back of the unit. This pattern consists of four screw holes arranged in a square or rectangle. The distance between these holes determines the VESA pattern, measured in millimeters.
Not every projector uses a VESA mount. Some smaller or ultra-portable models skip mounting holes entirely. They are designed to sit on a table or shelf. But most mid-size and large projectors do include VESA-compatible mounting points. These are especially common in home theater setups where ceiling or wall mounting is preferred.
Understanding the VESA Standard
The VESA standard uses a simple numbering system. A VESA pattern is written as two numbers, like 100×100 or 200×200. These numbers represent the distance between the mounting holes in millimeters. For example, a 100×100 pattern means the holes form a square that is 100 millimeters wide and 100 millimeters tall.
Common VESA patterns for projectors include:
- 75x75mm – Found on smaller portable projectors
- 100x100mm – The most common pattern for mid-size projectors
- 160x160mm – Used on larger home theater projectors
- 200x200mm – Found on big-screen and ultra-short throw models
Some projectors use non-square patterns, like 100x200mm. Always check your specific model before buying a mount. Using the wrong pattern will not work and could damage your equipment.
Why VESA Mounts Matter for Projectors
There are several reasons why projector mounting with a VESA bracket is so popular. First, it gives you a clean, clutter-free look. No cords sitting on a table. No projector sitting awkwardly on a shelf. A wall or ceiling mount keeps everything out of the way.
Second, proper projector positioning is much easier with a VESA mount. You can adjust the angle precisely. You can fine-tune the height and tilt. This leads to a much better image quality on your screen. A projector sitting on a flat surface can sometimes produce a skewed image that requires digital correction.
Third, a VESA mount improves airflow around the projector. Projectors generate heat, and they need good ventilation to work properly. Mounting them on a wall or ceiling allows air to circulate freely. This can extend the life of your projector’s lamp or laser light source.
How to Check if Your Projector Has VESA Mounting Points
Before you buy any mount, you need to confirm that your projector supports VESA mounting. The good news is this is usually very easy to check. There are a few simple steps you can follow right now.
Locating the Mounting Holes on Your Projector
Flip your projector over or look at the bottom panel. You are looking for four screw holes arranged in a square or rectangle pattern. They are usually threaded and may be covered with small rubber plugs or plastic caps.
Use a ruler or measuring tape to measure the distance between the holes. Measure horizontally and vertically. If the horizontal distance equals the vertical distance, you have a square pattern. If they differ, you have a rectangular pattern. Write down these measurements in millimeters.
Here are a few quick tips for measuring accurately:
- Measure from the center of one hole to the center of the opposite hole
- Use millimeters, not inches, for the most accurate results
- Double-check your measurements before ordering a mount
- If your projector has more than four holes, identify which four are the mounting points
Checking Your Projector Manual and Specifications
If measuring the holes feels tricky, your projector manual is your best friend. Most manuals list the VESA pattern in the specifications section. Look for terms like “VESA mounting,” “mounting pattern,” or “VESA compatible.”
You can also check the manufacturer’s website. Search for your projector model number and look at the specs page. Many brands list the VESA pattern clearly in their product details. If you still cannot find it, try contacting the manufacturer’s customer support. They can confirm the mounting pattern for you quickly.
Some projectors also list their mounting points on the packaging box. Check the box if you still have it. The specifications sticker often includes VESA compatibility information.
Choosing the Right VESA Mount for Your Projector
Now that you know your projector’s VESA pattern, it is time to pick the right mount. This is where many people make mistakes. Not all mounts are created equal, and choosing the wrong one can cause serious problems.
Matching the VESA Pattern to Your Projector
The first thing to check is that the mount supports your projector’s VESA pattern. If your projector uses a 100×100 pattern, make sure the mount explicitly lists that pattern as compatible. Many universal mounts support multiple patterns, which gives you more flexibility.
Here are the most common VESA patterns and the types of projectors that use them:
- 75x75mm – Mini projectors and portable business projectors
- 100x100mm – Standard home theater projectors and most mid-size models
- 160x160mm – Higher-end home theater projectors with larger housings
- 200x200mm – Large venue projectors and ultra-short throw models
Always check the mount’s maximum VESA compatibility. Some mounts only support up to 100×100 and will not work with a 200×200 projector. Read the product specifications carefully before purchasing.
Considering Weight Capacity and Projection Distance
Every projector has a specific weight, and every mount has a maximum weight capacity. You need to make sure the mount can handle your projector. As a general rule, choose a mount rated for at least 20% more weight than your projector. This gives you a safety margin and ensures long-term stability.
Projection distance is another important factor. Where you place the projector affects the image size and focus. If you are mounting on the ceiling, make sure the throw distance works for your room size. Some mounts allow for forward and backward adjustment, which gives you more flexibility in positioning.
If you are planning to use your projector in different ways, such as for gaming or outdoor movie nights, consider a versatile mount that allows for easy repositioning. For more ideas on how to use your projector in different settings, check out this guide on Can I Use A Projector As A Tv.
Types of VESA Mounts for Projectors
There are several types of mounts available. Here is a quick comparison to help you decide:
- Fixed mounts: Keep the projector in one position. Best for permanent installations where the angle does not need adjustment.
- Tilt mounts: Allow vertical angle adjustment. Great for ceiling mounts where you need to point the projector slightly downward.
- Full-motion mounts: Offer tilt, pan, and swivel adjustments. These are ideal for projectors that need frequent repositioning.
- Ceiling mounts: Designed specifically for overhead installation. They often include a swivel arm for easy angle adjustment.
- Universal mounts: Support multiple VESA patterns and projector sizes. A great option if you are not sure about your exact setup.
For most home theater setups, a tilt mount or fixed mount works perfectly. If you have a projector that you move around often, a full-motion or universal mount gives you the most flexibility.
Step-by-Step Guide to Mounting Your Projector with a VESA Bracket
Mounting a projector with a VESA bracket is easier than most people think. With the right tools and a little patience, you can have your projector securely mounted in under an hour. Here is how to do it step by step.
Tools You Will Need
Before you start, gather these tools and materials:
- A drill with appropriate drill bits for your wall or ceiling type
- A stud finder to locate wall joists or ceiling beams
- A level to ensure your mount is straight
- A screwdriver set (Phillips and flathead)
- Measuring tape
- A pencil for marking drill holes
- The VESA mount bracket and all included hardware
- A helper to hold the projector during installation
Having everything ready before you start makes the process much smoother. It also prevents frustrating pauses in the middle of installation.
Installing the Mounting Plate
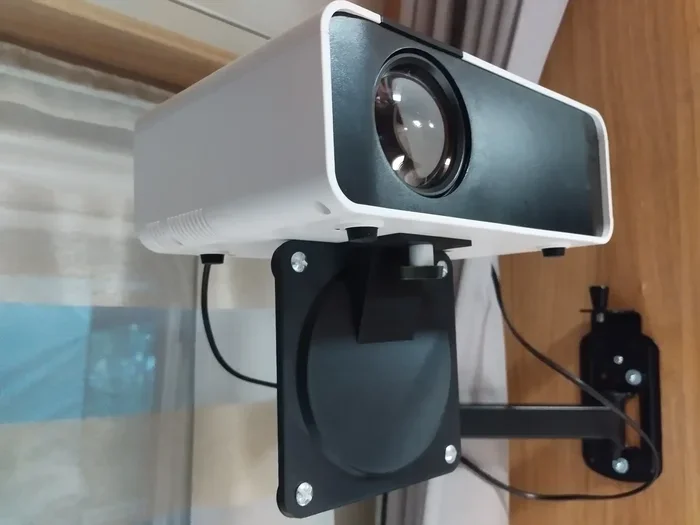
Start by attaching the mounting plate to the back of your projector. Most VESA brackets come with screws that match the projector’s mounting holes. Place the plate over the holes and tighten each screw firmly. Do not overtighten, as this can strip the threads.
Next, mark the wall or ceiling where you want to install the bracket. Use a stud finder to locate solid support points. Mark the drill holes with a pencil. Make sure the marks are level and evenly spaced.
Drill the pilot holes and insert any anchors if needed. Then attach the bracket to the wall or ceiling using the provided screws. Give it a firm tug to make sure it is secure before moving on.
Attaching the Projector and Adjusting the Angle
With the bracket securely mounted, it is time to attach the projector. Carefully lift the projector and hook or slide it onto the bracket. Have your helper support the weight while you secure any locking mechanisms.
Once the projector is attached, adjust the angle to achieve the best image on your screen. Use the tilt feature if your mount has one. Turn on the projector and check the image for any keystone distortion or blurriness.
If you plan to connect streaming devices like a fire stick, now is a good time to organize your cables. For tips on setting up accessories with your mounted projector, check out this guide on Can I Use A Fire Stick On A Projector.
Final Adjustments and Safety Checks
Walk back and check the image from your viewing position. Make any final angle adjustments needed. Ensure all screws are tight and the projector feels secure. Give it a gentle shake to test stability.
Plug in all cables and test the projector with actual content. Check that the image is sharp, focused, and properly aligned. If everything looks good, you are all set! If not, make small adjustments until the image quality meets your expectations.
Common Mistakes When Mounting a Projector with VESA Hardware
Even with the best intentions, people make mistakes when mounting projectors. Knowing what to avoid can save you time, money, and frustration. Here are the most common errors and how to prevent them.
Ignoring Weight Limits
This is the number one mistake people make. Every mount has a maximum weight capacity, and exceeding it can lead to the projector falling or the mount failing over time. Always check your projector’s weight and compare it to the mount’s rating. Choose a mount with a higher capacity than you think you need for safety.
Wrong VESA Pattern Selection
Buying a mount that does not match your projector’s VESA pattern is a costly error. The holes will not line up, and you will either need to return the mount or find an adapter. Always confirm the pattern before you order. Double-check your measurements and the mount’s compatibility list.
Poor Cable Management
Once your projector is mounted, messy cables can ruin the clean look you worked so hard for. Plan your cable routing before you mount the projector. Use cable ties, raceways, or in-wall conduits to keep wires organized and out of sight.
For tips on creating a clean projector screen setup, you might want to check out this article on Can I Use A Black Sheet For Projector Screen. It covers simple and affordable screen solutions that pair well with mounted projectors.
Skipping the Level Check
Mounting a projector slightly off-level can cause image distortion and make the picture look uneven. Always use a level when marking your drill holes and when attaching the bracket. A small mistake in leveling can be very noticeable on a large projected image.
Not Considering Room Layout and Throw Distance
Before you mount anything, think about where the projector will be relative to the screen. Measure the throw distance to make sure the image size will work for your room. A projector mounted too close or too far from the screen will not produce the best results.
Benefits of Using a VESA Mount for Your Projector
Now that you understand the basics, let us talk about why using a VESA mount is such a great idea. The benefits go far beyond just hanging your projector on the wall.
First, a VESA mount frees up valuable space. Instead of taking up a shelf or table, your projector hangs neatly above the room. This is especially helpful in smaller rooms where every square foot counts.
Second, ceiling or wall mounting improves the projection angle. When a projector sits on a table, it often points upward at the screen, which can cause image distortion. A properly mounted projector projects straight onto the screen for a crisp, distortion-free image.
Third, mounting your projector protects it from accidental damage. A projector sitting on a high shelf can be knocked over by pets or kids. A wall or ceiling mount keeps it safely out of the way while still giving you easy access for maintenance and bulb changes.
Fourth, a clean setup enhances your viewing experience. There is nothing worse than a tangle of cables and a bulky projector sitting in the middle of your living room. A VESA mount gives your setup a professional, polished look that makes movie nights feel more immersive.
Finally, VESA mounts are reusable. If you upgrade your projector in the future, you can often use the same mount with your new model, as long as the VESA pattern and weight are compatible. This saves you money and reduces waste.
Quick Tips for a Perfect Projector Setup
Here are some expert tips to help you get the best results from your mounted projector:
- Use a laser level for the most accurate mounting alignment
- Mount the projector at eye level when seated to avoid neck strain during long viewing sessions
- Leave space behind the projector for ventilation and cable routing
- Test the image before drilling permanent holes by holding the projector in position temporarily
- Label your cables so you can troubleshoot issues quickly later
- Clean the projector lens regularly to maintain sharp image quality
- Consider ambient light when choosing your projection surface and screen placement
These small steps make a big difference in the long run. They help you get the best image quality and keep your setup running smoothly for years to come.
If you are setting up a projector in a unique location, such as for outdoor events or a backyard cinema, the mounting approach may vary slightly. For more creative projector setup ideas, check out this guide on Can I Use A Regular Projector For A Golf Simulator. It covers unconventional projector placement scenarios that can inspire your own setup.
Conclusion
So do projectors use VESA mounts? The answer is yes, most projectors do, but the details depend on your specific model. You now know how to check for VESA mounting points, how to choose the right bracket, and how to install everything safely. You also know the common mistakes to avoid and the benefits of a proper mount.
A VESA mount transforms your projector setup. It gives you a clean, professional look and a better viewing experience. It protects your investment and makes repositioning easy when needed. Whether you are building a home theater or setting up a conference room, a VESA mount is one of the best upgrades you can make.
Take your time, measure carefully, and choose the right mount for your projector. The effort you put into mounting will pay off every time you turn on your projector and see a stunning, distortion-free image on the screen. Happy mounting!
Frequently Asked Questions
Can I use a VESA mount with any projector?
Not every projector uses a VESA mount. Smaller portable models and some ultra-compact projectors may not have mounting holes. Always check your projector’s specifications or look for the four screw holes on the bottom before purchasing a VESA mount.
What if my projector’s VESA pattern is not listed on the mount?
Some universal mounts support multiple VESA patterns. If your pattern is not supported, you can use a VESA adapter plate to bridge the gap. Just make sure the adapter is rated for your projector’s weight and that the final pattern matches your mount.
Can I mount a projector on a drywall ceiling?
Yes, but you must use the right anchors and locate the ceiling joists whenever possible. Drywall alone cannot support the weight of a projector long-term. Use heavy-duty anchors or mount directly into the joists for a safe and secure installation.
How far should my projector be from the screen?
The distance depends on your projector’s throw ratio and the image size you want. Check your projector’s manual for the recommended throw distance. Most projectors work best when placed several feet away from the screen, but ultra-short throw models can project a large image from just a few feet away.
Do I need professional help to mount a projector with a VESA bracket?
Most people can mount a projector themselves with basic tools and a helper. The process involves drilling holes, attaching a bracket, and securing the projector. If you are uncomfortable with drilling into walls or ceilings, hiring a professional is a smart choice.
What is the difference between a VESA mount and a projector-specific mount?
A VESA mount uses the standard four-hole pattern found on most projectors and displays. A projector-specific mount is designed for a particular model and may include custom features like built-in cable management or brand-specific brackets. VESA mounts offer more flexibility across different projector brands and models.