How To Enable Developer Options And Usb Debugging On Android
Enabling developer options and USB debugging on your Android phone is simple and only takes a few taps. This guide walks you through every step, from finding the hidden Build number to turning on USB debugging safely. You will learn what these tools do, how to use them, and how to keep your phone secure while doing so.
Have you ever wanted to unlock hidden features on your Android phone? Maybe you need to debug an app, test software, or just explore what your device can really do. The secret lies in two powerful tools: developer options and USB debugging. These features are hidden by default, but they are easy to turn on once you know how. In this guide, we will walk you through every step to enable developer options and USB debugging on Android. You will learn exactly where to find the settings, what each option does, and how to stay safe while using them. Let us get started.
Whether you are a developer, a tech enthusiast, or just curious about your phone, knowing how to access these tools is incredibly useful. Developer options give you control over advanced settings that most users never see. USB debugging lets your phone communicate with a computer for deeper control. Together, they open up a whole new world of possibilities. Keep reading to find out how to turn them on in just a few taps.
Key Takeaways
- Developer options are hidden by default: You must tap the Build number seven times to unlock them on any Android device.
- USB debugging lets your phone talk to a computer: It enables deeper control, file management, and app testing through ADB commands.
- The process is the same across all brands: Samsung, Google Pixel, OnePlus, Xiaomi, and Motorola all use the same universal method.
- Safety matters: Always turn off USB debugging when you are done and only connect to trusted computers.
- Troubleshooting is straightforward: Most issues with developer options or USB debugging can be fixed with simple steps like restarting your phone or changing the USB cable.
- You do not need to be a developer: Regular users can benefit from these tools for backups, file transfers, and performance tweaks.
📑 Table of Contents
What Are Developer Options and USB Debugging
Understanding Developer Options on Android
Developer options are a hidden menu inside every Android device. They contain settings that help developers test apps, monitor performance, and control system behavior. Google keeps this menu tucked away so that regular users do not accidentally change something important. But once you know the trick, you can access it on any Android phone.
The developer options menu includes things like animation speed controls, background process limits, and CPU profiling tools. You can also find settings for USB debugging, mock locations, and OEM unlocking. These tools are incredibly powerful, but they are designed for people who understand what they are doing. That is why Google hides them behind a simple secret code.
Think of developer options as a backstage pass at a concert. Most people see the show from the audience. But with this pass, you get access to the controls behind the scenes. You can adjust the lighting, change the sound, and tweak every detail of the performance. Your Android device works the same way. The default settings are great for everyday use, but developer options let you fine-tune things that are normally out of reach.
What Is USB Debugging and Why Does It Matter
USB debugging is a mode that allows your Android device to communicate with a computer through a USB cable. When enabled, your phone can send and receive data at a deeper level than normal. This is essential for tasks like installing apps via command line, reading logs, and running ADB commands (Android Debug Bridge).
Think of USB debugging as opening a back door to your phone. It gives a computer direct access to your device’s software layer. Developers use it every day to test and fix apps. But regular users can also benefit from it in many ways. For example, you can use it to transfer files more efficiently, back up your phone, or even recover a stuck device.
USB debugging is part of the broader Android debugging ecosystem. It works hand in hand with tools like ADB and other mobile developer tools. Together, these tools form a powerful suite that gives you control over your Android device at a level that is simply not possible through the normal user interface.
How to Enable Developer Options on Your Android Phone
The Universal Method That Works on Most Devices
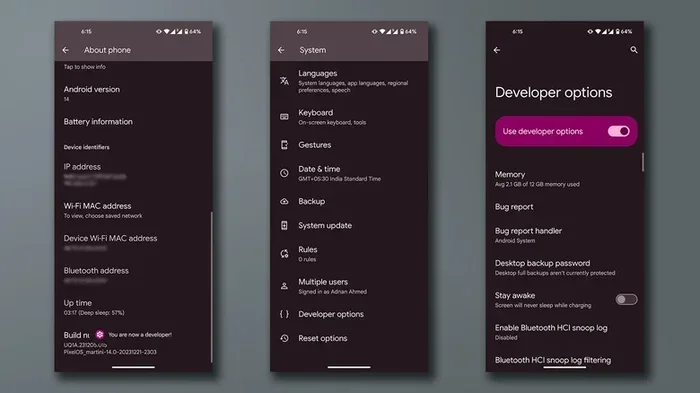
Enabling developer options is the same process on almost every Android phone. It does not matter if you use Samsung, Google Pixel, OnePlus, or any other brand. The steps are nearly identical. Here is how to do it:
- Open the Settings app on your Android device.
- Scroll down and tap on About phone or About device.
- Find the entry called Build number. On some phones, you may need to tap Software information first.
- Tap the Build number seven times quickly.
- You will see a message that says you are now a developer. Enter your PIN or password if prompted.
That is it! You have just unlocked the developer options menu. The build number trick is the universal method that works on virtually all Android phones. It is a simple but clever way for Google to keep these advanced settings hidden from casual users.
Quick tip: If you are having trouble finding the Build number, try using the search bar inside the Settings app. Just type “build number” and your phone will point you to the right place. This works on most Android device settings menus and saves a lot of scrolling.
Android phone tips: Some phones hide the Build number deeper inside the settings. For example, on older Samsung devices, you might need to go to Settings > About device > Status information > Build number. Always look carefully and do not give up if you do not see it right away.
Steps for Popular Android Brands
While the basic process is the same, some brands put the Build number in slightly different places. Here are quick instructions for the most popular brands:
- Samsung: Go to Settings > About phone > Software information > Build number. Tap it seven times.
- Google Pixel: Go to Settings > About phone > Build number. Tap it seven times.
- OnePlus: Go to Settings > About device > Version > Build number. Tap it seven times.
- Xiaomi: Go to Settings > My device > All specs > MIUI version. Tap it seven times.
- Motorola: Go to Settings > About phone > Build number. Tap it seven times.
As you can see, the path varies a little depending on your brand. But the core action is always the same: find the build number and tap it seven times. Once you do, the developer options will appear in your main Settings menu.
Common mistake: Many people tap the Build number too slowly or too fast. You need to tap it at a normal pace. If you tap too quickly, the phone may not register the taps properly. Just tap steadily seven times and you will see a countdown timer appear on screen. That countdown is your confirmation that you are on the right track.
How to Turn On USB Debugging on Android
Finding USB Debugging in Developer Options
Now that you have enabled developer options, turning on USB debugging is very simple. Follow these steps:
- Open the Settings app on your Android phone.
- Scroll down and tap on System (on Samsung, it may be under Additional settings).
- Tap on Developer options. You should now see it in the list.
- Scroll down until you find USB debugging.
- Toggle the switch next to USB debugging to turn it on.
- A popup will appear asking if you want to allow USB debugging. Read the warning and tap OK.
That is all you need to do. Your USB debugging is now active. You can connect your phone to a computer and start using ADB commands right away.
Quick tip: If you plan to connect your phone to multiple computers, consider enabling the Always allow from this computer option when the prompt appears. This saves you from having to approve the connection every time you plug in your device. However, only do this on computers you fully trust.
Confirming USB Debugging Is Active
After turning on USB debugging, you should verify that it is working correctly. Connect your phone to your computer using a USB cable. If you see a prompt on your phone asking you to authorize the connection, tap Allow.
On your computer, open a terminal or command prompt. Type adb devices and press Enter. If USB debugging is active, your phone will appear in the list with a device ID. This confirms that your Android device is properly connected and ready for debugging.
You can also check on your phone by going to Settings > System > Developer options. The USB debugging toggle should be in the on position. Some phones also show a notification in the status bar when USB debugging is active. This is a handy visual cue that reminds you the feature is turned on.
Android phone settings can vary slightly, so if you do not see the notification, do not worry. The toggle in the Developer options menu is the definitive indicator. As long as it is switched on, USB debugging is active and your phone is ready to communicate with a computer.
What You Can Do With Developer Options and USB Debugging
Useful Features for Power Users
Once you have enabled developer options and USB debugging, you can access a wide range of powerful features. Here are some of the most useful ones:
- Animation speed controls: You can speed up or slow down window animations, transition animations, and animator duration scales. This makes your phone feel faster or slower depending on your preference.
- Background process limits: You can restrict how many apps run in the background. This can help save battery life and improve overall performance.
- Mock location: You can fake your GPS location for testing apps or games that require location data. This is a fun trick for exploring location-based features.
- CPU profiling: Developers can use this to monitor how much processing power their apps are using. It helps identify performance bottlenecks.
- OEM unlocking: This allows you to unlock your phone’s bootloader, which is necessary for installing custom ROMs or rooting your device.
- Show touch interactions: This visualizes every tap and swipe on your screen, which is helpful for debugging apps or creating tutorials.
- Debug GPU overdraw: This highlights areas of your screen where the GPU is drawing too many layers, helping you optimize graphics performance.
These are just a few examples of what developer options can do. The menu contains many more settings that cater to different needs and skill levels. Even if you are not a developer, you can use several of these features to make your phone faster, more efficient, and more customized to your needs.
Common Use Cases for USB Debugging
USB debugging is not just for developers. Here are some common ways regular users can benefit from it:
- Advanced file management: You can use tools like Android File Transfer or command-line utilities to move files more efficiently between your phone and computer.
- App installation via ADB: You can install APK files directly from your computer without using the phone’s app store. This is great for sideloading apps or testing beta versions.
- Phone backup and recovery: Tools like ADB allow you to create full backups of your device or recover data from a damaged phone.
- Screen mirroring and casting: Some advanced screen mirroring tools require USB debugging to work properly, especially for low-latency streaming.
- Battery and performance monitoring: You can use ADB commands to check battery health, monitor CPU usage, and identify apps that are draining your battery.
- Custom ROM installation: If you want to install a custom ROM, you will need USB debugging enabled to flash the new software onto your device.
As you can see, USB debugging opens up many possibilities beyond just app development. It is a valuable tool for anyone who wants more control over their Android device. Whether you are troubleshooting a problem, backing up your data, or just exploring, USB debugging gives you the flexibility to do things the normal interface simply cannot handle.
Is USB Debugging Safe to Use
Understanding the Security Implications
This is one of the most important questions people ask about USB debugging. The short answer is: it is safe when used correctly, but it does come with some risks. When USB debugging is enabled, your phone is more vulnerable to unauthorized access through a connected computer.
If you plug your phone into a public or untrusted computer, someone could potentially access your data through the USB debugging connection. This is why it is important to be cautious about when and where you enable this feature. Think of it like leaving a door unlocked in your house. It is fine when you are at home, but you would not leave it open in a public place.
Google has built in several safety features to protect you. When you connect your phone to a new computer, you must explicitly authorize the connection. Your phone will show a prompt asking if you trust the computer. You should only approve computers that you personally own and trust. This authorization step is your first line of defense against unauthorized access.
USB debugging safety also depends on your habits. If you always turn off USB debugging when you are done, keep your phone updated, and only connect to trusted devices, your risk is very low. The key is to be mindful and intentional about when you enable this feature.
Best Practices for Keeping Your Phone Secure
Here are some simple steps you can follow to stay safe while using USB debugging:
- Turn it off when you are not using it. This is the single most important safety habit. Go back to Developer options and toggle USB debugging off when you are done.
- Only connect to trusted computers. Never plug your phone into a public or shared computer if USB debugging is enabled.
- Revoke USB debugging authorizations regularly. In the Developer options menu, you can tap “Revoke USB debugging authorizations” to remove access from all previously trusted computers. This is a great habit to build.
- Keep your phone’s software up to date. Android updates often include security patches that protect against vulnerabilities related to USB debugging.
- Use a USB data blocker when charging in public. These small devices prevent data transfer while still allowing your phone to charge safely. They are inexpensive and very effective.
By following these simple practices, you can enjoy the benefits of USB debugging without putting your Android device at risk. The key is to be mindful and intentional about when you enable it. Treat USB debugging like a tool that you use when needed and put away when you are done.
Troubleshooting Common Issues
Developer Options Not Showing Up
If you have tapped the Build number seven times but the developer options menu does not appear, do not worry. This is a common issue and it is usually easy to fix. Here are some things to try:
- Restart your phone. Sometimes the system needs a reboot to register the change. Simply power off your device and turn it back on.
- Check your path. On some phones, the Build number is located under a different menu. Double-check that you tapped the right entry.
- Make sure you are not using a work profile. Some company-managed phones restrict access to developer options. If your phone is managed by an employer, you may need IT approval.
- Try searching in Settings. Use the search bar in the Settings app and type “developer” to see if the option appears.
- Check for system updates. Some older Android versions have bugs that prevent developer options from appearing. Updating your Android device settings and software can resolve this.
If none of these steps work, your phone may have a custom ROM or manufacturer restriction that hides the developer options menu. In that case, you may need to look up specific instructions for your device model. Online forums and the manufacturer’s support site are great resources for Android troubleshooting.
USB Debugging Not Working After Enabling
Sometimes you can turn on USB debugging but still have trouble connecting your phone to a computer. Here are the most common causes and fixes:
- Check your USB cable. Some cables are charge-only and do not support data transfer. Try a different cable to see if that resolves the issue.
- Install the correct drivers. On Windows, you may need to install Android USB drivers so your computer can recognize your phone. You can usually find these on the manufacturer’s website.
- Change the USB connection mode. When you connect your phone, swipe down the notification panel and make sure the USB mode is set to “File Transfer” or “MTP,” not just “Charging.”
- Revoke and re-authorize the connection. Go to Developer options and tap “Revoke USB debugging authorizations.” Then unplug and replug your phone and approve the new connection.
- Restart both devices. A simple restart of your phone and computer can often fix connection issues.
- Try a different USB port. Some ports on your computer may not support data transfer. Switch to a different port and try again.
Most USB debugging problems can be solved with these basic troubleshooting steps. If the issue persists, try searching online for your specific phone model and the error message you are seeing. The Android community is very active and helpful when it comes to Android troubleshooting tips.
Conclusion
Enabling developer options and USB debugging on your Android phone is a straightforward process that opens up a world of possibilities. Whether you want to test apps, customize your device, or simply explore advanced settings, these tools give you the power to take full control of your Android device.
Remember to always use USB debugging responsibly. Turn it off when you are not using it, only connect to trusted computers, and keep your phone’s software updated. With these habits in place, you can enjoy all the benefits of developer options without compromising your security.
Now that you know how to enable developer options and USB debugging on Android, you are ready to explore your phone’s full potential. Try out some of the features we discussed, experiment with ADB commands, and see what your device can do. The power is in your hands. Start exploring today and discover just how much your Android phone can do when you unlock its hidden capabilities.
Frequently Asked Questions
Can I enable developer options on a locked or stolen phone?
No, you need full access to the phone’s settings to enable developer options. If your phone is locked or lost, you cannot access these features. Always make sure you own the device and have the proper credentials before attempting to enable any advanced settings.
Will enabling developer options void my phone’s warranty?
Simply enabling developer options does not void your warranty. However, some options within the menu, like OEM unlocking or rooting, can void your warranty. Always be careful about which settings you change and research the implications before proceeding with advanced modifications.
Do I need a computer to use USB debugging?
Yes, USB debugging is designed to let your phone communicate with a computer. Without a computer, you cannot use this feature. However, you can leave USB debugging enabled in the background and connect your phone to a computer whenever you need it.
Is it safe to leave USB debugging turned on all the time?
It is not recommended to leave USB debugging on all the time. While it is convenient, keeping it enabled increases your phone’s exposure to potential security risks. The safest approach is to turn it on only when you need it and turn it off immediately after.
Can I enable developer options on a Samsung phone?
Yes, absolutely. Samsung phones follow the same process as other Android devices. Go to Settings > About phone > Software information > Build number and tap it seven times. The developer options menu will then appear in your Settings.
What should I do if my phone asks for a PIN when enabling developer options?
This is normal security behavior. When you tap the Build number seven times, your phone will ask for your PIN, password, or pattern to confirm your identity. Enter your credentials and the developer options will be unlocked. If you do not know your PIN, you will need to unlock your phone first using your existing method.