How Do I Copy Files From Dos Without Losing Any Data
Learning how to copy files from DOS doesn’t have to be scary or complicated. Whether you’re working with an old computer or a virtual machine, this guide walks you through every step. You’ll discover the best DOS commands, avoid common data loss mistakes, and keep your files safe. Copying files from a DOS environment is easier than you think once you know the right methods.
Have you ever needed to copy files from DOS and worried about losing something important? Maybe you’re helping a family member rescue old documents from a vintage computer. Or perhaps you’re working on a project that still relies on legacy software. Either way, file copying in DOS is a skill that comes in handy more often than you’d think.
The good news is that copying files from a DOS environment is straightforward once you know the basics. The DOS command line gives you powerful tools to move, duplicate, and back up files with precision. And with the right approach, you won’t lose a single byte of data. In this guide, we’ll walk through every method step by step.
We’ll cover everything from the basic COPY command to advanced techniques like XCOPY and DISKCOPY. You’ll also learn how to avoid the most common pitfalls that cause data loss. By the end, you’ll feel confident handling file management in DOS like a pro. Let’s get started.
Key Takeaways
- The COPY command is your go-to tool: It’s the simplest way to move files within DOS.
- XCOPY handles folders and subfolders: Use it when you need to copy entire directory structures.
- Always verify your files after copying: This ensures zero data loss and peace of mind.
- Use a boot disk or DOSBox for modern systems: These tools make legacy file copying accessible today.
- Check file attributes before copying: Hidden and read-only files need special attention.
- Back up first, always: A quick backup before any file transfer protects your data.
- Understand the destination path: Getting the destination wrong is the most common mistake.
📑 Table of Contents
- Understanding the DOS Environment
- The Basic COPY Command
- Using XCOPY for Folders and Subfolders
- Copying Entire Disks with DISKCOPY
- Best Practices to Avoid Data Loss
- Copying Files from DOS on Modern Systems
- Troubleshooting Common Copy Errors
- Expert Insights on Legacy File Management
- Key Takeaways
- Conclusion
Understanding the DOS Environment
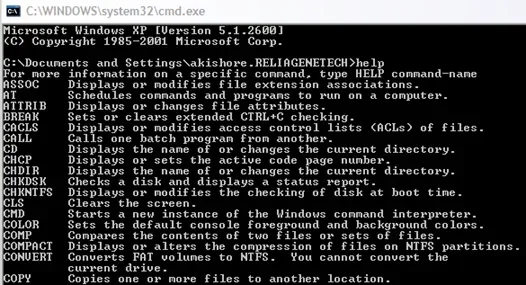
Before you start copying anything, it helps to understand what you’re working with. DOS, or Disk Operating System, is a simple command-line interface. It doesn’t have the graphical windows and menus you’re used to today. Instead, you type commands directly into a text-based screen called the DOS prompt.
This might sound old-fashioned, but it’s incredibly efficient. Every operation in DOS relies on text commands. When you copy files from DOS, you’re telling the system exactly where to find a file and where to put the copy. There’s no hidden magic happening behind the scenes. You’re in full control of your file transfer process.
Most people encounter DOS today when dealing with older computers, retro gaming setups, or legacy business systems. Some users run DOS inside a program called DOSBox, which emulates the old environment on modern hardware. Whatever your situation, the commands work the same way. Understanding this environment is the first step toward safe file copying.
What Is the DOS Prompt?
The DOS prompt looks something like this: C:\>. The letter before the colon tells you which drive you’re currently working on. The backslash means you’re at the root level of that drive. From here, you can navigate to any folder and run any command.
Getting comfortable with the DOS prompt is essential. You’ll use it constantly when copying files. Think of it as the control center for everything you do. Once you understand how to read it, the rest becomes much easier.
The Basic COPY Command
The COPY command is the most fundamental tool for copying files from DOS. It lets you duplicate a single file from one location to another. The syntax is simple, and you can use it in just a few seconds once you memorize the format.
How the COPY Command Works
Here’s the basic structure of the COPY command:
COPY source destination
Let’s break this down with a real example. Imagine you have a file called REPORT.TXT on drive C, and you want to copy it to a floppy disk on drive A. You would type:
COPY C:\REPORT.TXT A:\
That’s it. DOS reads the file from the source path, creates an identical copy at the destination, and confirms the operation. The original file stays exactly where it is. Nothing gets deleted or changed during this process.
Copying Multiple Files at Once
You can also copy more than one file at a time. Just list the files separated by a plus sign. For example:
COPY C:\FILE1.TXT+C:\FILE2.TXT A:\
This copies both files to the floppy disk. It’s a quick way to transfer files from DOS without running the command multiple times. However, be careful with this approach. If you make a typo in the file names, the command won’t work.
Quick Tips for Using COPY
- Always double-check the file path before pressing Enter.
- Use the DIR command to list files in a directory first.
- Include the file extension (.TXT, .DOC, etc.) every time.
- Verify the copy by checking the destination after the operation.
- Use wildcards like . carefully to avoid copying unintended files.
Using XCOPY for Folders and Subfolders
The COPY command works great for individual files. But what if you need to copy an entire folder with all its subfolders? That’s where the XCOPY command comes in. XCOPY is a more powerful version of COPY designed for bulk file copying from DOS.
Why XCOPY Matters
XCOPY preserves the directory structure of your files. This means it copies not just the files themselves, but also the folders they live in. This is critical when you’re backing up an entire project or migrating data from an old system.
Here’s a basic XCOPY example:
XCOPY C:\MYFOLDER A:\BACKUP\ /E /I
Let’s look at what those extra switches mean:
- /E copies all subdirectories, including empty ones.
- /I tells DOS the destination is a folder, not a single file.
These switches make XCOPY much more reliable for complete data preservation. Without them, you might miss important files tucked away in subfolders.
XCOPY Switches You Should Know
XCOPY has several useful switches that give you more control over the file copying process:
- /S copies directories and subdirectories (but not empty ones).
- /C continues copying even if errors occur.
- /V verifies each file after copying to ensure accuracy.
- /H copies hidden and system files that are normally skipped.
- /Y suppresses the confirmation prompt for overwriting files.
The /V switch is especially important when you want to avoid data loss. It checks every copied file against the original. If something doesn’t match, DOS alerts you immediately. This is one of the best ways to ensure safe file transfer from DOS.
Common XCOPY Mistakes to Avoid
Even experienced users sometimes make mistakes with XCOPY. Here are the most common ones:
- Forgetting the /E switch when you need to copy empty folders.
- Not including the /I switch, which causes errors when the destination doesn’t exist yet.
- Using forward slashes instead of backslashes in paths (DOS requires backslashes).
- Overwriting files without meaning to — always double-check the destination path.
- Ignoring error messages — if XCOPY reports a problem, stop and fix it before continuing.
Copying Entire Disks with DISKCOPY
Sometimes you need to copy an entire disk, not just individual files. The DISKCOPY command handles this job perfectly. It creates an exact duplicate of a floppy disk, byte for byte.
When to Use DISKCOPY
DISKCOPY is ideal when you want a complete disk backup from DOS. It copies every track and sector on the disk, including the boot sector and hidden system files. This makes it different from COPY and XCOPY, which only handle files and folders.
The basic syntax is simple:
DISKCOPY A: A:
This command copies the contents of drive A to another disk in drive A. If you have two floppy drives, you can use:
DISKCOPY A: B:
DOS will prompt you to insert the source disk, then the destination disk. It works through each step automatically. The result is a perfect clone of the original disk.
Limitations of DISKCOPY
DISKCOPY has some important limitations you should know about. It only works with floppy disks of the same size and format. You can’t use it to copy from a floppy to a hard drive directly. And it’s not practical for large amounts of data.
For most file management in DOS situations, XCOPY or COPY will serve you better. Reserve DISKCOPY for when you specifically need a full disk image. Understanding when to use each tool is part of mastering DOS file operations.
Best Practices to Avoid Data Loss
The biggest concern when copying files from DOS is losing data. The good news is that following a few simple practices virtually eliminates this risk. Let’s walk through the most important ones.
Always Back Up First
Before you do anything, make a backup of your source files. This is the single most important rule in data preservation. If something goes wrong during the copy process, you’ll have the original files safely stored elsewhere.
You don’t need fancy backup software for this. Simply copy the files to a different location using the COPY command. Even copying to another directory on the same drive provides a safety net. The key is having a fallback if anything unexpected happens.
Verify File Attributes Before Copying
DOS files can have different attributes, including hidden, read-only, and system. These attributes affect how COPY and XCOPY handle files. By default, these special files might not get copied unless you use the right switches.
Use the ATTRIB command to check file attributes before copying. For example:
ATTRIB C:\MYFILE.TXT
This shows you whether the file is hidden, read-only, or archived. If a file is hidden, add the /H switch to XCOPY to make sure it gets copied. Ignoring file attributes is one of the top reasons people lose data during DOS file transfers.
Check the Destination Path Carefully
One of the most common errors is typing the wrong destination path. If you accidentally point XCOPY to the wrong folder, you might overwrite important files without realizing it. Always type the destination path slowly and carefully.
A good habit is to use the DIR command at the destination before you start copying. This confirms that the target folder exists and shows you what’s already there. Taking this small step can save you from a major data loss headache.
Use the /V Switch for Verification
We mentioned the /V switch earlier, but it deserves its own emphasis. When you add /V to your XCOPY command, DOS verifies every file after copying it. This means it compares the copied file to the original and confirms they match.
This is the best way to ensure no data loss during file copying from DOS. It takes a little longer, but the peace of mind is absolutely worth it. Make /V a habit every time you copy important files.
Keep Your DOS Environment Clean
A cluttered DOS environment leads to mistakes. Keep your directories organized and your file names consistent. Avoid using spaces in file names — DOS works best with short, simple names like MYFILE.TXT.
Also, make sure you have enough free space on the destination drive before starting a large copy operation. Running out of disk space mid-copy can corrupt files and cause data loss. A quick check with the DIR command at the destination saves a lot of trouble.
Copying Files from DOS on Modern Systems
You might be wondering how to copy files from DOS if you don’t have an old computer lying around. The good news is that modern tools make this entirely possible. You don’t need vintage hardware to work with DOS files anymore.
Using DOSBox
DOSBox is a free emulator that runs DOS programs on modern computers. It creates a virtual DOS environment inside Windows, macOS, or Linux. You can access your real files from within DOSBox and use all the standard COPY and XCOPY commands.
To copy files using DOSBox, you first mount a folder from your modern system as a DOS drive. For example:
MOUNT C C:\MYFILES
This makes your C:\MYFILES folder appear as the C: drive inside DOSBox. From there, you can use all the DOS commands we’ve covered to copy files safely. It’s a fantastic way to bridge the gap between old and new.
Creating a DOS Boot Disk
Another approach is to create a DOS boot disk. You can use a USB drive or a floppy disk with a minimal DOS installation. Boot from this disk, and you’ll have full access to the COPY, XCOPY, and DISKCOPY commands.
Boot disks are especially useful when your main operating system won’t start. They give you a clean, independent environment for file recovery and copying. Just remember to keep your boot disk updated and store it somewhere safe.
Transferring Files Between DOS and Modern Systems
If you need to move files from a DOS system to a modern computer, a few methods work well:
- USB flash drives with DOS support — some USB drives work in DOS environments.
- Network sharing — if both systems are on the same network, you can use DOS network commands.
- CD or DVD burning — copy files to a CD from DOS and read them on a modern computer.
- DOSBox with shared folders — mount a modern folder in DOSBox and transfer files directly.
Each method has its pros and cons. Choose the one that fits your situation best. The goal is always the same: safe, reliable file copying without any data loss.
Troubleshooting Common Copy Errors
Even when you follow all the best practices, you might run into errors. DOS is old software, and it sometimes throws curveballs. Here’s how to handle the most common issues.
“File Not Found” Errors
This error means DOS can’t locate the source file you specified. Check the file name for typos, and make sure you’re in the correct directory. Use the DIR command to list files and confirm the exact file name. DOS file names are case-insensitive, but spelling must be exact.
“Insufficient Disk Space” Errors
This happens when the destination drive doesn’t have enough room for the files you’re copying. Free up space by deleting unnecessary files from the destination, or choose a larger destination drive. You can also use the DIR /W command to see how much space is available.
“Access Denied” Errors
Access denied usually means the file has a read-only attribute or is locked by another process. Use the ATTRIB command to remove the read-only attribute before copying. For example:
ATTRIB -R C:\MYFILE.TXT
This removes the read-only flag and allows you to copy the file normally. Always restore the attribute after copying if you need to keep it.
Files Get Corrupted During Copy
If files come out corrupted on the destination, the problem is usually a bad disk or interrupted copy process. Always use the /V switch with XCOPY to verify files. If you’re using floppy disks, try a different disk — old floppies degrade over time and develop bad sectors.
Expert Insights on Legacy File Management
Working with DOS file systems requires a slightly different mindset than modern computing. Experts who work with legacy systems emphasize patience and verification. Rushing through a file copy operation in DOS is the fastest way to make mistakes.
One professional tip is to keep a log of your copy operations. Write down the source paths, destination paths, and any switches you used. This sounds old-fashioned, but it saves enormous time when troubleshooting. If something goes wrong, your log helps you pinpoint exactly what happened.
Another insight from experienced users is to always test your copy process with non-critical files first. Run a few practice copies before handling important documents. This builds confidence and helps you catch any issues before they affect real data. Think of it as a rehearsal before the main performance.
The community around legacy computing and DOS is surprisingly active today. Online forums and user groups share tips, scripts, and tools for working with old systems. Don’t hesitate to reach out to these communities when you hit a wall. There’s a wealth of knowledge from people who’ve been doing this for decades.
Key Takeaways
- The COPY command is your go-to tool: It’s the simplest way to move files within DOS.
- XCOPY handles folders and subfolders: Use it when you need to copy entire directory structures.
- Always verify your files after copying: This ensures zero data loss and peace of mind.
- Use a boot disk or DOSBox for modern systems: These tools make legacy file copying accessible today.
- Check file attributes before copying: Hidden and read-only files need special attention.
- Back up first, always: A quick backup before any file transfer protects your data.
- Understand the destination path: Getting the destination wrong is the most common mistake.
Conclusion
Copying files from DOS is a practical skill that remains relevant today. Whether you’re rescuing old documents, working with retro software, or managing legacy systems, the methods in this guide will serve you well. The COPY command handles simple file transfers, XCOPY tackles entire folder structures, and DISKCOPY creates perfect disk duplicates.
The most important lesson is this: prevention beats recovery every time. Back up your files first, verify your paths, check file attributes, and always use the verification switches. These habits ensure that you never lose data during a DOS file copy operation.
Modern tools like DOSBox and boot disks have made it easier than ever to work with DOS environments. You don’t need a vintage computer to access these powerful file management techniques. With the knowledge you’ve gained from this guide, you’re ready to handle any file copying task from DOS with confidence. Start practicing these methods today, and you’ll never worry about losing important files again.
Frequently Asked Questions
Can I copy files from DOS to a USB flash drive?
Yes, but it depends on your DOS version and hardware. Older DOS versions don’t natively support USB drives. You may need a DOS-compatible USB driver or use DOSBox to mount a USB folder. Check your specific setup before attempting the transfer.
What is the difference between COPY and XCOPY in DOS?
COPY handles individual files and simple operations. XCOPY is designed for copying entire folders, including subdirectories and hidden files. Use XCOPY when you need to preserve the full directory structure during your file transfer from DOS.
Will copying files from DOS overwrite existing files?
Yes, by default COPY and XCOPY will overwrite files with the same name at the destination. You can add the /Y switch to XCOPY to suppress the overwrite confirmation prompt, or omit it to get a prompt every time.
How do I verify that my copied files are intact?
Use the /V switch with XCOPY to verify each file after copying. You can also manually compare file sizes between the source and destination using the DIR command to ensure nothing was lost or corrupted.
Can I copy files from DOS on a Windows 10 or 11 computer?
Yes, you can use DOSBox to create a virtual DOS environment on modern Windows systems. Install DOSBox, mount a folder from your computer, and use all standard DOS commands to copy files without any compatibility issues.
What should I do if a file won’t copy from DOS?
First, check the file name for typos and confirm the file exists using the DIR command. Then check the file attributes with ATTRIB — hidden or read-only files may need special handling. Finally, ensure the destination has enough free space and is accessible.