Can I Connect HDMI To My Mac A Complete Step Guide
Yes, you can connect HDMI to your Mac, but the method depends on your Mac model and port type. Whether you use a MacBook Pro, MacBook Air, or a desktop Mac, this guide walks you through every step. You will learn which HDMI adapters work, how to set up your display, and how to fix common problems.
So, can I connect HDMI to my Mac? The short answer is yes. But the full answer depends on which Mac you own, what ports it has, and the right adapter to use. Many people buy a new monitor or TV and assume they can just plug in an HDMI cable and go. That is not always the case with Mac computers.
This guide will walk you through everything you need to know. You will learn which Mac models support HDMI directly, which ones need an adapter, and how to set up your external display step by step. I will also share tips to fix common problems and get the best picture quality every time. Whether you want to connect your Mac to a TV for movie night or add a second monitor for work, this guide has you covered.
Connecting an HDMI cable to a Mac is simpler than most people think. Once you have the right adapter, the process takes less than a minute. Let us dive in and get your external display up and running.
Key Takeaways
- Most Macs need an adapter: Newer Macs use USB-C or Thunderbolt ports, so you need a USB-C to HDMI adapter or cable to connect an external display.
- Check your Mac model first: Some older Macs have full-size HDMI ports built in, while newer models require additional accessories for HDMI output.
- Setting up your display is simple: Once connected, macOS automatically detects your external monitor and lets you mirror or extend your screen with just a few clicks.
- Troubleshooting is straightforward: Most HDMI connection issues on a Mac can be fixed by checking cable connections, restarting the system, or updating display settings.
- Use quality adapters for best results: Cheap adapters can cause signal loss, flickering, or no display at all. Investing in a reliable adapter saves time and frustration.
- Explore more Mac accessories: If you want to enhance your overall tech setup, check out our guide on 10 Gadgets To Make Moms Life Easier for helpful ideas.
📑 Table of Contents
- Understanding HDMI and Mac Compatibility
- What You Need to Connect HDMI to Your Mac
- Step-by-Step Guide to Connecting HDMI to Your Mac
- Setting Up Your Display After Connection
- Troubleshooting Common HDMI Connection Issues
- Expert Tips for Best HDMI Performance on Mac
- Can I Connect HDMI to My Mac: Final Thoughts
Understanding HDMI and Mac Compatibility
Before you buy any cables or adapters, it helps to understand how HDMI works with Mac computers. Not all Macs are built the same way, and the port type changes from model to model. Knowing what your Mac has inside makes the whole process much easier.
The good news is that almost every Mac can connect to an HDMI display. The difference is in how you make that connection. Some Macs have a full-size HDMI port ready to go. Others use USB-C or Thunderbolt ports and need a small adapter to bridge the gap.
Which Mac Models Have Built-In HDMI Ports?
Apple has changed its Mac designs many times over the years. Here is a quick look at which models come with HDMI ports already built in:
- MacBook Pro 15-inch (2016 and earlier): These older models have a full-size HDMI port on the side.
- iMacs (most models): Apple desktop computers often include HDMI ports for easy connection to external displays.
- Mac Mini (various years): Some Mac Mini models include HDMI ports, but newer ones use USB-C.
- Mac Studio and Mac Pro: These powerful desktop Macs support HDMI through built-in ports or adapters.
If your Mac has a full-size HDMI port, you can skip the adapter entirely. Just plug in a standard HDMI cable and you are good to go. This makes the process incredibly simple.
The Role of USB-C and Thunderbolt in HDMI Connections
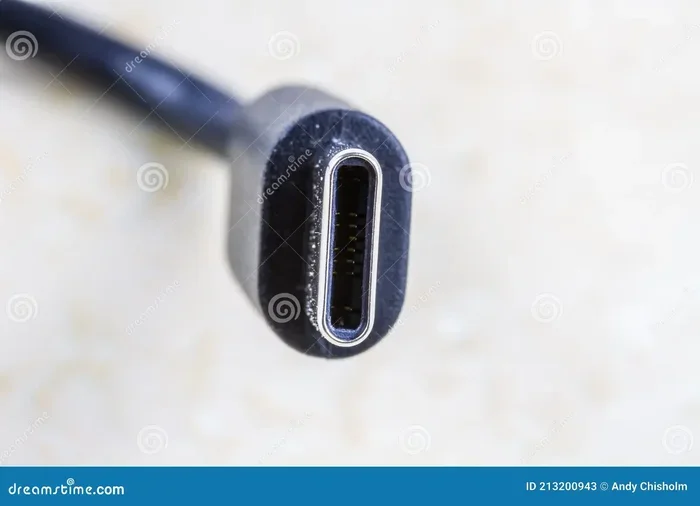
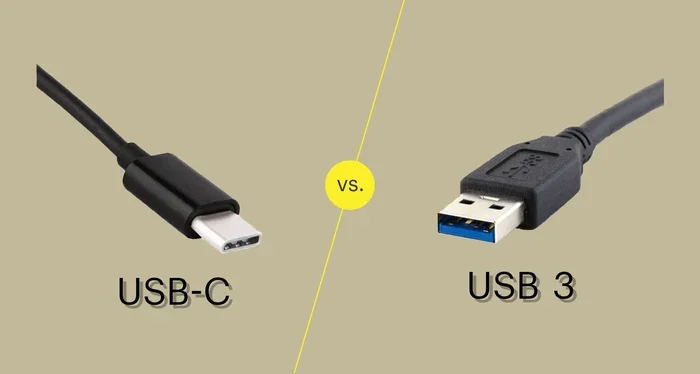
Most newer Macs use USB-C or Thunderbolt ports instead of HDMI. These ports are smaller and more versatile, but they do not accept a standard HDMI cable directly. You need a converter to make the connection work.
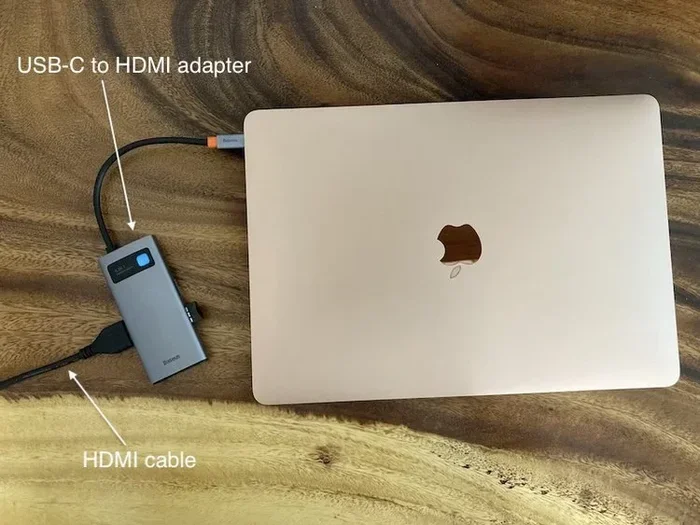
A USB-C to HDMI adapter is the most common solution. It plugs into your Mac’s USB-C port on one side and has an HDMI port on the other side. You then connect a regular HDMI cable from the adapter to your monitor or TV.
Thunderbolt 3 and Thunderbolt 4 ports also support video output. They use the same USB-C connector, so any USB-C to HDMI adapter works with them. This gives you a lot of flexibility when choosing your setup.
If you are not sure which port your Mac has, check the model number on the bottom of your laptop or in the Apple menu under About This Mac. Apple lists all the ports on every Mac model on its support page.
What You Need to Connect HDMI to Your Mac
Now that you understand your Mac’s ports, let us talk about what you actually need to buy. The right cables and adapters make all the difference in getting a clean, reliable connection.
HDMI Cables You Should Know About
Not all HDMI cables are the same. Here is a quick breakdown of the most common types you will encounter:
- Standard HDMI Cable: Works for most basic setups. Supports 1080p resolution at 60Hz. Great for everyday use.
- High-Speed HDMI Cable: Supports higher resolutions like 4K at 60Hz. Best for modern monitors and TVs.
- Premium High-Speed HDMI Cable: Certified for 4K and even 8K video. These cables have better shielding and faster data transfer.
- Ultra High-Speed HDMI Cable: The newest standard. Supports 8K and even 10K resolution. Overkill for most Mac setups but future-proof.
For most Mac users, a standard or high-speed HDMI cable is more than enough. You do not need to spend extra on the newest cable types unless you are using a 4K or 8K display.
Choosing the Right Adapter for Your Mac
Choosing the right adapter is the most important part of this process. A bad adapter can cause flickering, no signal, or poor image quality. Here are the most popular options:
- Apple USB-C to HDMI Adapter: This is Apple’s own adapter. It works perfectly with all Macs that have USB-C ports. It costs a bit more, but it is reliable and well-built.
- Third-Party USB-C to HDMI Adapters: Brands like Belkin, Anker, and Cable Matters make great adapters at lower prices. Look for ones that support 4K resolution.
- USB-C Hub with HDMI: These hubs add multiple ports to your Mac, including HDMI, USB-A, and SD card slots. Great if you need more connectivity options.
- Thunderbolt to HDMI Adapter: Works with Thunderbolt 3 and 4 ports. Offers the same functionality as a USB-C to HDMI adapter.
When shopping for an adapter, always check the specifications. Make sure it supports the resolution and refresh rate you need. A cheap adapter that only supports 1080p will not work well with a 4K monitor.
If you are looking for more ways to upgrade your workspace, you might enjoy our guide on 10 Gadgets To Make Moms Life Easier, which features helpful accessories that work great with Mac setups too.
Step-by-Step Guide to Connecting HDMI to Your Mac
Now for the part you have been waiting for. Here is the exact process to connect an HDMI cable to your Mac. Follow these steps and you will have your external display working in just a few minutes.
Step 1: Check Your Mac Model and Ports
Start by identifying your Mac model and the ports it has. Click the Apple logo in the top-left corner of your screen and select About This Mac. The overview page shows your Mac model, chip, and memory.
Next, look at the sides of your Mac. Count the ports. If you see a small oval-shaped USB-C port or a Thunderbolt symbol, you need an adapter. If you see a wide, flat HDMI port, you can skip to Step 3.
Step 2: Get the Right Adapter or Cable
Based on what you found in Step 1, purchase the right adapter. If your Mac has USB-C, buy a USB-C to HDMI adapter. If you want a cleaner setup, you can also get a USB-C hub that includes an HDMI port.
At the same time, grab an HDMI cable that matches your display needs. For a 4K monitor, use a high-speed or premium high-speed HDMI cable. For a standard 1080p TV, a basic HDMI cable works fine.
Step 3: Connect the Adapter and Cable
Plug the USB-C to HDMI adapter into your Mac’s USB-C port. It should fit snugly with no wobbling. Then connect one end of the HDMI cable to the adapter and the other end to your external display or TV.
Make sure both connections are firm. A loose connection is the number one cause of no-signal issues. If the adapter feels loose, try a different adapter or a different USB-C port on your Mac.
Step 4: Power On and Select the Input
Turn on your external display or TV. Use your remote or the buttons on the monitor to select the correct HDMI input. Most TVs and monitors have multiple HDMI ports labeled HDMI 1, HDMI 2, and so on. Select the port where you plugged in the cable.
Your Mac should automatically detect the external display. You may see a brief flash on the screen as the connection is established. If nothing appears, do not worry. Move on to the next step.
Step 5: Configure Display Settings
Open System Settings (or System Preferences on older Macs) and click Displays. Your Mac will show both your built-in display and the external monitor.
From here, you can choose how you want your screens to work:
- Mirror Display: Shows the same image on both your Mac screen and the external display. Great for presentations or watching movies.
- Extend Display: Uses the external monitor as a second screen. You can drag windows and apps between the two displays for more workspace.
You can also adjust the resolution, brightness, and arrangement of your displays in this same settings panel. Drag the display boxes to match the physical layout of your screens on your desk.
If you have an iPhone and manage numbers or contacts there, you might also find it useful to learn about adding prefixes to numbers on iPhone, which helps you organize your device data more efficiently across your Apple ecosystem.
Setting Up Your Display After Connection
Once your HDMI connection is live, you may want to fine-tune the display settings. Getting the right setup makes a huge difference in how your Mac feels during daily use.
Start by checking the resolution. Go to System Settings, then Displays. Your Mac will suggest the best resolution for your external monitor. This is almost always the recommended option. Stick with it unless you have a specific reason to change it.
Next, adjust the refresh rate if your monitor supports it. Some external displays offer 120Hz or 144Hz refresh rates for smoother motion. You can find this option in the Display settings under the external monitor name.
If you are using your Mac with a TV, you may also want to adjust the TV’s picture settings. Most modern TVs have game mode or PC mode options that reduce input lag and improve image clarity. Switching to one of these modes can make a noticeable difference.
Arranging Multiple Displays
When you extend your desktop across multiple screens, the arrangement matters. In the Displays settings, you will see rectangles representing each screen. Drag them to match the physical layout on your desk.
This ensures that when you move your mouse from one screen to the other, it flows naturally in the right direction. If the screens are not aligned correctly, your cursor will jump unexpectedly, which can be frustrating during work.
You can also set one display as the primary display. The primary display is where your Dock and menu bar appear by default. To change this, go to System Settings, Displays, and select the display you want as primary. Check the box that says “Show this display as the primary display.”
Troubleshooting Common HDMI Connection Issues
Even with the right equipment, you might run into problems. HDMI connections on a Mac are generally reliable, but occasional issues do pop up. Here are the most common problems and how to fix them.
No Signal on the External Display
If your external monitor shows no signal, start with the basics. Unplug the HDMI cable from both ends and plug it back in firmly. Check that the adapter is fully seated in the Mac’s USB-C port.
Next, try a different HDMI cable. Cables can fail, especially if they are bent or damaged. If you have a spare cable, swap it out and see if that fixes the problem.
You can also try a different USB-C port on your Mac if it has more than one. Sometimes a specific port may not work properly with a particular adapter.
Flickering or Distorted Image
A flickering screen usually means the cable or adapter is not handling the signal properly. Try lowering the resolution on your external display to see if the flickering stops.
If lowering the resolution helps, your cable or adapter may not support the higher resolution. Upgrade to a high-speed HDMI cable and a better-quality adapter to fix this issue.
Also check for loose connections. Even a slightly wobbly HDMI connection can cause flickering. Make sure every cable is pushed in fully and securely.
Audio Not Working Through HDMI
Sometimes the video works but the sound does not come through the external display. This is a common issue and easy to fix.
Go to System Settings, then Sound. Under the Output tab, select your external display or HDMI monitor. The audio should route through the HDMI connection immediately.
If your external display does not appear in the Sound settings, try disconnecting and reconnecting the HDMI cable. macOS should detect the audio output once the connection is re-established.
Display Not Recognized After Sleep
Some Mac users report that their external HDMI display is not recognized after waking the Mac from sleep mode. This can happen with USB-C to HDMI adapters.
The easiest fix is to disconnect and reconnect the HDMI cable after waking. You can also try restarting your Mac if the issue persists. Keeping your macOS up to date helps prevent this problem, as Apple regularly fixes display-related bugs in system updates.
Expert Tips for Best HDMI Performance on Mac
Here are some pro tips to get the most out of your HDMI connection on a Mac. These small tweaks can make a big difference in your daily experience.
- Use certified cables and adapters: Look for cables and adapters that are certified by HDMI Licensing or made by reputable brands. Cheap knockoff adapters often cause problems.
- Keep your macOS updated: Apple regularly improves display support and fixes bugs in new updates. Always run the latest version of macOS.
- Avoid long HDMI cables: Try to keep your HDMI cable under 6 feet for the best signal quality. Longer cables can lose signal strength, especially at higher resolutions.
- Use a docking station for complex setups: If you connect multiple devices to your Mac, a USB-C docking station with HDMI output gives you a clean, organized setup.
- Check your display’s HDMI version: Older TVs and monitors may only support HDMI 1.4, which limits resolution and refresh rate. Newer HDMI 2.0 or 2.1 displays support 4K and higher refresh rates.
- Close the laptop lid for a desktop setup: If you use your Mac with an external display as a desktop, you can close the laptop lid. Go to Energy Saver settings and enable “Disable automatic sleep when the display is off.”
These tips come from years of experience helping people set up their Mac displays. Follow them and you will have a smooth, hassle-free HDMI connection every time.
Can I Connect HDMI to My Mac: Final Thoughts
So, can I connect HDMI to my Mac? Absolutely. Whether your Mac has a built-in HDMI port or uses USB-C, there is a simple way to connect an external display. All you need is the right adapter and a standard HDMI cable.
The process is quick, and the results are worth it. An external monitor gives you more screen space for work, a bigger display for movies, or a second screen for creative projects. Once you set it up, you will wonder how you ever managed without it.
Remember to check your Mac model, get the right adapter, and follow the step-by-step guide above. If you run into any issues, the troubleshooting section has you covered. With the right setup, your Mac and HDMI display will work together seamlessly.
Now go ahead and connect that external monitor. Your productivity and entertainment will thank you for it.
Frequently Asked Questions
Can I connect HDMI directly to a MacBook Air?
Most MacBook Air models do not have a built-in HDMI port. You will need a USB-C to HDMI adapter or a USB-C hub with HDMI output. Once you have the right adapter, connecting an external display is quick and easy.
Why is my Mac not detecting the HDMI display?
This is usually caused by a loose cable connection, a faulty adapter, or an incompatible cable. Try unplugging and replugging all connections firmly. If that does not work, try a different HDMI cable or adapter to isolate the problem.
Can I use HDMI to connect my Mac to a TV?
Yes, you can connect your Mac to a TV using HDMI. You will need a USB-C to HDMI adapter if your Mac uses USB-C ports. Once connected, select the correct HDMI input on your TV and your Mac screen will appear on the TV.
Does HDMI to Mac support 4K resolution?
Yes, HDMI supports 4K resolution, but you need the right equipment. Use a high-speed HDMI cable and a USB-C to HDMI adapter that supports 4K output. Check the specifications of both your adapter and cable to confirm 4K support.
Can I connect multiple monitors to my Mac using HDMI?
Yes, you can connect multiple external monitors to a Mac using HDMI adapters. However, the number of external displays your Mac supports depends on your specific model and chip. Check Apple’s support page for your Mac model to confirm the maximum number of external displays.
What is the difference between USB-C and Thunderbolt for HDMI connections?
USB-C and Thunderbolt 3/4 use the same physical connector. Both support video output through HDMI adapters. Thunderbolt offers faster data transfer speeds, but for basic HDMI video output, a standard USB-C to HDMI adapter works perfectly with both port types.
=== CONCLUSION ===
Connecting HDMI to your Mac is easier than you think. With the right adapter and HDMI cable, you can extend your screen, mirror your display, or connect your Mac to a TV in just a few minutes. This guide covered everything from checking your Mac’s ports to setting up display preferences and troubleshooting common issues.
Remember that every Mac model is slightly different, so always double-check your ports before buying accessories. A quality adapter makes all the difference in getting a clear, stable connection. Follow the steps in this guide, and you will be enjoying your external display in no time.
Now that you know exactly how to connect HDMI to your Mac, it is time to take action. Grab your adapter, plug in your monitor, and enjoy the bigger screen experience. Your Mac is ready to go.