Can I Connect A USB Stick To My iPhone And Transfer Files
Yes, you can connect a USB stick to your iPhone using the right adapter and a few simple steps. This guide covers iPhone USB connectivity, compatible adapters, file transfer methods, and troubleshooting tips. You will learn exactly what gear you need, how to move photos and documents, and how to avoid common mistakes.
Have you ever sat down with your iPhone full of photos and videos and thought, “I need more space”? Maybe you want to back up important files or share a big folder with a friend. The idea of plugging in a USB stick seems simple enough. But can you actually connect a USB stick to your iPhone and transfer files? The short answer is yes. But the process is not always as plug-and-play as you might hope.
Connecting a USB stick to an iPhone requires the right adapter, a compatible drive, and a basic understanding of how iOS handles external storage. This guide walks you through everything you need to know. We will cover adapters, file formats, step-by-step transfer methods, and common problems you might run into. Whether you have an older iPhone with a Lightning port or a newer model with USB-C, this article has you covered.
Let us dive in and make iPhone USB connectivity easy to understand. No tech degree required.
Key Takeaways
- You can connect a USB stick to your iPhone with a Lightning or USB-C adapter depending on your model.
- The Apple Lightning to USB 3 Camera Adapter is the most reliable option for file transfers.
- The native Files app on iPhone handles most external storage devices without extra software.
- USB OTG support varies by iPhone model, so always check compatibility before buying.
- Formatting your USB stick as exFAT or FAT32 ensures smooth iPhone recognition.
- Wireless alternatives like iCloud and AirDrop exist if you prefer not to use a physical drive.
📑 Table of Contents
- How USB Sticks Connect to iPhones
- What You Need to Get Started
- Step-by-Step Guide to Transferring Files
- Compatible USB Sticks for iPhone
- Common Problems and How to Fix Them
- Tips for Managing Files on Your iPhone
- Should You Use a USB Stick or Go Wireless?
- Quick Tips for Success
- Expert Insights
- Key Takeaways
How USB Sticks Connect to iPhones
Your iPhone does not have a standard USB port. That is the first thing most people learn when they try this. Instead, iPhones use either a Lightning connector or a USB-C port depending on the model. This means you need an adapter to bridge the gap between your USB stick and your phone.
The good news is Apple and many third-party manufacturers make these adapters. They let you plug a regular USB flash drive into your iPhone and access files just like you would on a computer. The process uses Apple’s native iOS file management system, which is built into every iPhone running a recent version of iOS.
Lightning vs USB-C: Which iPhone Do You Have?
This is the most important question before you buy anything. If you have an iPhone 14 or older model, your phone uses a Lightning port. If you have an iPhone 15 or newer, it uses a USB-C port. The adapter you need depends entirely on this.
For Lightning iPhones, you need a Lightning to USB adapter. For USB-C iPhones, you can often use a direct USB-C to USB adapter or even plug a USB-C flash drive right in. The newer iPhones make this process much simpler because USB-C is a universal standard.
What You Need to Get Started
Before you start plugging things in, you need a few items. The setup is simple, but missing one piece can leave you frustrated. Here is what you need for successful iPhone file transfer with a USB stick.
The Right Adapter
The most reliable adapter is the Apple Lightning to USB 3 Camera Adapter. It costs around $49 and works with most USB flash drives. Apple designed this adapter specifically for photographers, but it works perfectly for general file transfers too.
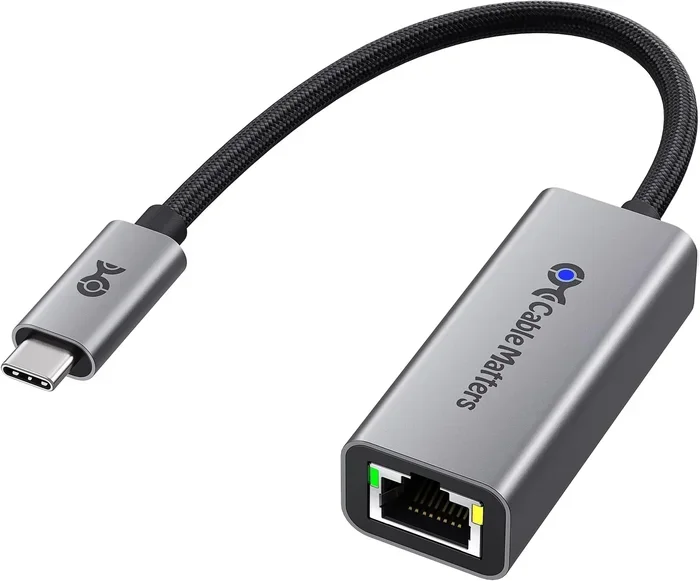
For USB-C iPhone models, you can use a USB-C to USB adapter or a USB-C hub with a USB-A port. These are widely available and often cheaper than Apple’s official adapter.
A Compatible USB Flash Drive
Not all USB sticks work well with iPhones. You want a drive that is formatted correctly and has enough power output. Some USB sticks draw too much power and will not work when plugged into an iPhone. Look for drives labeled “iPhone compatible” or “iOS compatible” from brands like SanDisk, Samsung, or Kingston.
Many of these drives come with their own app that simplifies the transfer process. They often include a Lightning or USB-C connector built right into the drive, so you do not need a separate adapter.
A Charged iPhone
This is an easy one to forget. Connecting a USB stick to your iPhone can drain your battery faster, especially if you are transferring large files. Make sure your phone has at least 50% charge before you start. Better yet, plug your iPhone into a charger while you transfer files.
Step-by-Step Guide to Transferring Files
Now that you have your adapter and USB stick ready, let us walk through the actual process. This method works for most iPhones and most USB flash drives.
Step 1: Plug In Your Adapter
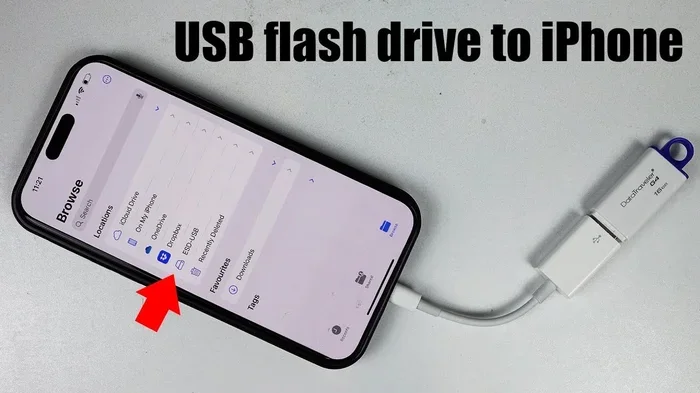
Connect the adapter to your iPhone’s charging port. If you are using the Apple Lightning to USB 3 Camera Adapter, plug the Lightning end into your iPhone first. Then connect your USB stick to the USB-A port on the adapter.
If you have a USB-C iPhone, you can plug the USB stick directly into the adapter or into the phone itself if the drive has a USB-C connector.
Step 2: Open the Files App
The Files app on iPhone is your gateway to external storage. Apple built this app to handle local files, cloud storage, and external drives all in one place. It should open automatically when you connect the USB stick. If it does not, open it manually from your home screen.
Tap the “Browse” tab at the bottom of the screen. You should see your USB drive listed under “Locations.” Tap on it to see all the files stored on the drive.
Step 3: Select and Transfer Files
Tap “Select” in the top right corner of the Files app. Now you can tap individual files to choose them. You can select photos, videos, documents, PDFs, and more. Once you have selected your files, tap the “Copy” button at the bottom.
Navigate to where you want to save the files on your iPhone. You can choose “On My iPhone” and pick a folder. Tap “Paste” and your files will start copying over.
Step 4: Eject Safely
Before you unplug anything, make sure the transfer is complete. You can tap the “Eject” icon next to your USB drive in the Files app. Once it says the drive is disconnected, you can safely remove the adapter and USB stick.
Compatible USB Sticks for iPhone
Not every USB flash drive plays nice with iPhones. The issue usually comes down to power draw and file format. Here is what you need to know about USB stick compatibility with iPhones.
Drives That Work Best
Drives designed for Apple devices are your safest bet. The SanDisk iXpand Flash Drive is one of the most popular options. It has a Lightning connector built in, so you do not need a separate adapter. The Samsung FIT Plus is another great choice, especially for USB-C iPhone models.
These drives often come with companion apps that make managing files easier. They also draw less power than standard USB sticks, which means they work reliably with iPhones.
File Format Matters
This is where many people run into trouble. Your USB stick needs to be formatted in a way that iPhone can read. The best formats for iPhone compatibility are exFAT and FAT32. iPhones cannot read NTFS drives, which is the default format for Windows computers.
If your USB stick is formatted as NTFS, you will need to reformat it. You can do this on a Windows PC or Mac before connecting it to your iPhone. Just remember that reformatting erases all data on the drive, so back up your files first.
Common Problems and How to Fix Them
Even with the right gear, things do not always go smoothly. Here are the most common issues people face when connecting a USB stick to their iPhone, along with fixes.
The iPhone Does Not Recognize the USB Stick
This is the number one complaint. If your iPhone does not see the drive, the first thing to check is the adapter connection. Unplug everything and plug it back in firmly. Sometimes the adapter needs a moment to be recognized.
Next, check the file format of the USB stick. If it is formatted as NTFS or exFAT with a large partition size, the iPhone may struggle. Try reformatting to FAT32 for the best results. Also, make sure your iPhone is running the latest version of iOS, as older software can cause compatibility issues.
Files Will Not Transfer or Copy
If the drive shows up but files will not copy, it could be a space issue. Check how much storage your iPhone has available. You also need enough free space on the USB stick for the transfer to work properly.
Some file types may not be supported by the Files app. Photos and videos usually transfer without issues. But certain proprietary document formats might not open directly. In those cases, you may need to download the right app to view the file after transferring it.
The USB Stick Drains Your iPhone Battery
External drives can pull power from your iPhone, especially during large transfers. This is normal, but it can be annoying if your phone dies quickly. The fix is simple: keep your iPhone plugged into a power source while transferring files.
You can also reduce the number of files you transfer at one time. Instead of moving your entire drive in one go, break it into smaller batches. This puts less strain on both your iPhone and the USB stick.
Adapter Feels Loose or Keeps Disconnecting
A loose connection can interrupt transfers and cause errors. Make sure the adapter is fully inserted into the iPhone port. Dust or lint in the charging port can also cause connection problems. Use a soft brush or compressed air to clean it out gently.
If you are using a third-party adapter and experiencing issues, try the Apple official adapter instead. Third-party adapters vary widely in quality, and some simply do not maintain a stable connection.
Tips for Managing Files on Your iPhone
Once you know how to connect a USB stick to your iPhone, you can start keeping your files organized. Good file management saves you time and keeps your phone running smoothly.
Use the Files app to create folders for different types of content. You might have one folder for photos, another for documents, and another for videos. This makes it easy to find what you need later. You can also use adding prefixes to numbers on iPhone as a simple naming trick to keep files in a specific order when browsing through folders.
Set up automatic backups to iCloud so your files are safe even if you lose your phone. You can also use AirDrop to send files between your iPhone and other Apple devices without needing a USB stick at all. For people who carry multiple devices, these wireless options are often more convenient than dealing with cables and adapters.
If you are looking for more ways to simplify your digital life, check out 10 gadgets to make moms life easier for some great accessory recommendations that pair well with iPhone file management.
When working with spreadsheets or documents that you transfer from a USB stick, you may occasionally run into formatting issues. For example, if you are editing a file and a line will not delete in Microsoft Excel, it is usually a formatting or hidden character problem rather than a transfer issue.
Should You Use a USB Stick or Go Wireless?
Now that you know how to connect a USB stick to your iPhone, you might wonder if there is a better way. Wireless options have come a long way, and they might be all you need.
iCloud is Apple’s built-in cloud storage solution. It syncs your files across all your Apple devices automatically. You get 5 GB free, and paid plans start at $0.99 per month for 50 GB. This is great for documents, photos, and small files.
AirDrop lets you send files between iPhones, iPads, and Macs instantly. It uses Bluetooth and Wi-Fi, so there are no cables or adapters needed. The transfer speed is fast, and the setup is effortless.
Google Drive and Dropbox are excellent alternatives if you use multiple platforms. They work with both iPhone and Android, so you can share files with anyone regardless of their device.
That said, a USB stick still has real advantages. It gives you physical control over your files. You do not need an internet connection to access them. And for large files like video projects or full photo libraries, a USB stick is often faster and more reliable than uploading and downloading through the cloud.
Think of it this way. Wireless options are perfect for everyday convenience. A USB stick is your best friend when you need to move big files quickly or when you are working offline. Many people actually use both methods depending on the situation.
Quick Tips for Success
- Always format your USB stick as exFAT or FAT32 before using it with your iPhone.
- Buy drives that are specifically labeled as iPhone or iOS compatible for the best experience.
- Keep your iPhone updated to the latest iOS version for the best external storage support.
- Use the official Apple adapter if you run into connection issues with third-party options.
- Transfer files in smaller batches to avoid battery drain and connection drops.
- Clean your iPhone’s charging port regularly to ensure a solid connection with adapters.
Expert Insights
According to Apple’s support documentation, iPhones running iOS 13 or later fully support external drives through the Files app. This was a game-changer when it launched because earlier iOS versions had very limited external storage support.
Tech reviewers consistently recommend the Apple Lightning to USB 3 Camera Adapter as the most reliable option. Third-party adapters work well too, but they can be hit or miss depending on the brand. If you are buying a USB stick specifically for iPhone use, drives with built-in connectors save you the hassle of buying a separate adapter.
One thing many experts emphasize is the importance of iPhone storage expansion through external drives. As photo and video resolutions increase, even the largest iPhone storage options fill up quickly. A reliable USB stick gives you a practical and affordable way to expand your effective storage without upgrading to a higher-cost iPhone model.
Key Takeaways
- You can connect a USB stick to your iPhone using a Lightning or USB-C adapter depending on your model.
- The Apple Lightning to USB 3 Camera Adapter is the most reliable option for file transfers.
- The native Files app on iPhone handles most external storage devices without extra software.
- USB OTG support varies by iPhone model, so always check compatibility before buying.
- Formatting your USB stick as exFAT or FAT32 ensures smooth iPhone recognition.
- Wireless alternatives like iCloud and AirDrop exist if you prefer not to use a physical drive.
Frequently Asked Questions
Can I plug any USB stick directly into my iPhone?
No, you cannot plug a standard USB stick directly into an iPhone. You need an adapter that matches your iPhone’s port. For Lightning iPhones, use a Lightning to USB adapter. For USB-C iPhones, use a USB-C to USB adapter or a USB-C flash drive.
Do I need special software to transfer files from a USB stick to my iPhone?
No special software is required. The native Files app on iPhone handles external drives automatically. Just plug in your USB stick, open the Files app, and copy files to your iPhone. Some drives come with companion apps that offer extra features, but they are optional.
What file formats does iPhone support from a USB stick?
iPhones support common formats like JPEG, PNG, MP4, MOV, PDF, DOCX, and XLSX. The drive itself must be formatted as exFAT or FAT32 for the iPhone to read it. NTFS-formatted drives will not work without third-party software.
Why does my iPhone say “No Supported Devices” when I plug in a USB stick?
This usually means the USB stick is not formatted correctly or the adapter is not compatible. Try reformatting the drive to FAT32 or exFAT. Also make sure your adapter is fully seated in the iPhone port and that your iPhone is running the latest iOS version.
Can I use a USB stick to expand my iPhone’s storage permanently?
Not permanently in the traditional sense. You can use a USB stick to store and transfer files, but you cannot run apps or store system files on external drives. Think of it as portable storage for file management rather than a permanent storage upgrade.
Is it safe to eject a USB stick from my iPhone the same way I do on a computer?
Yes, and you should always do it. Open the Files app, tap the eject icon next to the USB drive name, and wait for it to say disconnected before pulling the adapter out. This prevents file corruption and ensures your transferred files are fully saved.
=== CONCLUSION ===
So, can you connect a USB stick to your iPhone and transfer files? Absolutely. With the right Lightning to USB adapter or a USB-C flash drive, you can move photos, videos, documents, and more between your iPhone and external storage. The process is straightforward once you have the right gear and know the steps.
Remember to format your USB stick correctly, use the Files app for easy management, and always eject the drive safely when you are done. These small habits will save you from headaches and keep your files safe.
Whether you use a USB stick for backup, file sharing, or freeing up space on your iPhone, it is a simple and affordable solution. You do not need to be a tech expert to make it work. Just follow the steps in this guide, and you will be transferring files like a pro in no time.
Start with a compatible drive and adapter, test it with a few files, and build from there. Once you see how easy it is, you will wonder how you ever managed without this handy iPhone accessory. Your iPhone and your USB stick are a great team once you get them talking to each other.