How Do I Lock Cells To Scroll In Excel Step By Step
Locking cells to scroll in Excel is a game-changer for anyone working with large spreadsheets. When you freeze or lock cells, your headers and key data stay visible while you scroll through rows and columns. This guide walks you through every method, from basic freeze panes to advanced techniques, so you can navigate any Excel worksheet like a pro.
Have you ever been working on a huge Excel spreadsheet and lost track of your headers? You scroll down a few hundred rows and suddenly you forget what Column A or Row 1 was supposed to represent. It happens to the best of us. The good news is that locking cells to scroll in Excel solves this problem completely. You can keep important rows and columns visible no matter how far you scroll. This article breaks down every method step by step so you can work smarter, not harder.
Whether you are a student managing a grade book, a small business owner tracking inventory, or a data analyst building complex models, locking cells while scrolling is an essential Excel skill. It keeps your reference points in place and reduces errors. In this guide, you will learn the exact steps for freezing panes, locking specific cells, using keyboard shortcuts, and avoiding common pitfalls. Let us dive right in.
Key Takeaways
- Freeze Panes is the primary tool for locking rows and columns while scrolling in Excel.
- You can lock specific cells using the Protect Sheet feature to prevent edits while allowing scrolling.
- Keyboard shortcuts save time and make cell locking faster and more efficient.
- Splitting the worksheet offers an alternative way to view different sections simultaneously.
- Common mistakes include freezing the wrong cell, so always select the correct anchor point first.
- Productivity tools like gadgets can complement your Excel workflow for better time management.
📑 Table of Contents
- What Does It Mean to Lock Cells When Scrolling in Excel?
- How to Freeze Panes in Excel: The Core Method
- How to Lock Specific Cells While Scrolling
- Keyboard Shortcuts for Faster Cell Locking
- Splitting the Worksheet for Advanced Navigation
- Common Mistakes When Locking Cells in Excel
- How to Lock Cells to Scroll in Excel on Different Devices
- Combining Cell Locking with Other Excel Features
- Key Takeaways
- Conclusion
What Does It Mean to Lock Cells When Scrolling in Excel?
When people talk about locking cells to scroll in Excel, they usually mean one of two things. The first is freezing rows or columns so they stay visible on your screen while you scroll through the rest of the data. The second is protecting specific cells so they cannot be edited, even though you can still scroll through the worksheet.
Both techniques serve different purposes. Freezing panes is purely a visual navigation tool. It does not prevent anyone from editing the frozen cells. Protecting cells, on the other hand, locks them from changes while still allowing you to scroll through the sheet freely. Understanding this difference is important because it determines which method you should use.
For most users, the freeze panes feature is what they need. It is built right into Excel and takes just a few clicks to set up. Let us look at how it works in detail.
How to Freeze Panes in Excel: The Core Method
Freezing panes is the most direct way to lock cells while scrolling in Excel. When you freeze a row or column, it stays fixed at the top or left side of your screen. Everything else scrolls normally. This is incredibly useful when you have a header row that you need to reference constantly.
Step 1: Open Your Excel Worksheet
Start by opening the spreadsheet you want to work with. Make sure your data is organized clearly. Identify the rows and columns you want to keep visible. For example, if Row 1 contains your column headers, you will want to freeze everything above Row 2.
Step 2: Select the Correct Cell
This is the step most people get wrong. To freeze rows and columns, you need to select the cell that is just below and to the right of the area you want to lock. For instance, if you want to freeze Row 1 and Column A, click on cell B2. This tells Excel to freeze everything above and to the left of your selected cell.
Step 3: Go to the View Tab
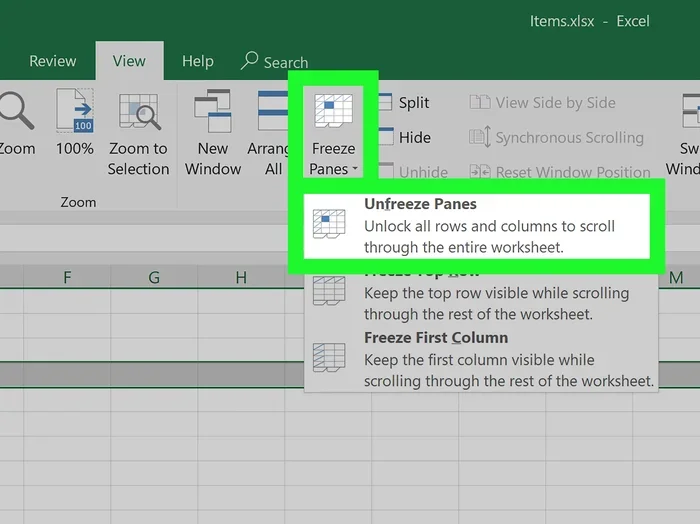
Click on the View tab at the top of the Excel ribbon. You will see a section called “Window” with a button labeled “Freeze Panes.” Click on it to reveal three options:
- Freeze Panes — Locks the rows above and columns to the left of your selected cell.
- Freeze Top Row — Locks only the first row of your worksheet.
- Freeze First Column — Locks only the first column of your worksheet.
Step 4: Click Freeze Panes
After selecting the right option, you will see a thin gray line appear on your spreadsheet. This line marks the boundary between the frozen and scrollable areas. Scroll down or to the right to test it. Your frozen rows and columns should remain fixed on screen.
Step 5: Unfreeze When You Are Done
When you no longer need the frozen panes, go back to the View tab and click “Unfreeze Panes.” Your worksheet will return to normal scrolling behavior. It is just as simple as that.
Quick Tips for Freezing Panes
- Use Ctrl+Z to undo if you freeze the wrong area.
- You can freeze multiple rows and columns at the same time by selecting the right anchor cell.
- The gray line will not appear in printouts, so it does not affect your final document.
- For large datasets, consider using productivity tools and gadgets that boost efficiency alongside your Excel skills.
How to Lock Specific Cells While Scrolling
Sometimes you need more than just visual freezing. You may want to prevent edits to certain cells while still allowing yourself and others to scroll through the entire worksheet. Excel has a built-in feature for this called “Protect Sheet.”
Step 1: Select the Cells You Want to Lock
By default, all cells in Excel are locked. However, the lock does not take effect until you enable sheet protection. First, select the cells you want to keep editable. Right-click and choose “Format Cells.” Go to the Protection tab and uncheck “Locked.”
Step 2: Protect the Sheet
Now go to the Review tab and click “Protect Sheet.” You will be prompted to enter a password. This is optional but recommended. Choose what actions users can still perform, such as selecting cells, sorting, or filtering. Click OK to apply the protection.
Step 3: Test Your Locked Cells
Try editing a locked cell. Excel will display a warning message telling you that the cell is protected. Scroll through the sheet freely — the locked cells stay in place, and you can navigate without any issues.
This method is perfect for template creation and shared workbooks where you want to control which cells can be modified.
Keyboard Shortcuts for Faster Cell Locking
If you work in Excel regularly, keyboard shortcuts will save you a ton of time. Instead of navigating through menus, you can lock and unlock frozen panes with a few quick keystrokes.
- Alt + W + F + F — Toggles Freeze Panes on and off.
- Alt + W + F + R — Freezes the top row only.
- Alt + W + F + C — Freezes the first column only.
- Ctrl + Home — Jumps back to cell A1 instantly.
- Ctrl + Arrow Keys — Moves quickly to the edge of your data range.
Memorizing even two or three of these shortcuts can dramatically speed up your workflow. Practice them until they become second nature. Over time, you will wonder how you ever managed without them.
Splitting the Worksheet for Advanced Navigation
Another powerful technique is splitting your worksheet into separate sections. This is different from freezing panes, but it achieves a similar goal. When you split a worksheet, you create two or four independent scrollable areas within the same window.
To split a worksheet, go to the View tab and click “Split.” You will see split bars appear at the current cursor position. Drag them to where you want the division. Each section scrolls independently, so you can view distant parts of your spreadsheet side by side.
This technique is especially useful when you need to compare data across different sections of the same worksheet. It pairs well with frozen panes for maximum navigation control.
When to Use Split vs. Freeze Panes
Here is a quick comparison to help you decide which method to use:
- Freeze Panes — Best for keeping headers visible while scrolling through long lists.
- Split Worksheet — Best for viewing and comparing two distant areas of the same sheet simultaneously.
- Protect Sheet — Best for preventing accidental edits while allowing free navigation.
You can also combine these methods. Freeze your headers, split the view, and protect key cells all at the same time. Excel gives you the flexibility to build the exact setup that works for your data.
Common Mistakes When Locking Cells in Excel
Even experienced Excel users make mistakes when trying to lock cells to scroll. Here are the most common errors and how to avoid them.
Mistake 1: Selecting the Wrong Anchor Cell
The biggest mistake is selecting the wrong cell before freezing panes. If you want to freeze Row 1, you must select cell A2 before clicking Freeze Panes. If you select any other cell, the freeze will not work as expected. Always double-check your selection first.
Mistake 2: Forgetting to Unprotect Sheets
If you protect a sheet and forget the password, you will not be able to edit any cells until you unprotect it. Always keep your passwords in a safe place. If you forget, you can still unprotect the sheet through the Review tab, but you will lose the protection on all cells.
Mistake 3: Freezing Too Many Rows or Columns
It is tempting to freeze everything at once, but this can make your spreadsheet harder to navigate. Only freeze the rows and columns you actually reference while scrolling. Keep it minimal for the best user experience.
Mistake 4: Ignoring Print Settings
Frozen panes do not affect printing, but split worksheets sometimes cause confusion when printing. Always check your print preview before sharing a split worksheet with others.
Expert Insight
Professional spreadsheet designers recommend a simple rule of thumb: freeze only what you look at while scrolling. Most users only need the first one or two rows and the first column locked. Anything beyond that adds clutter without real benefit. Keep your frozen areas clean and purposeful.
How to Lock Cells to Scroll in Excel on Different Devices
Excel is available on desktops, laptops, tablets, and even smartphones. The good news is that freezing panes works across all platforms. However, the interface varies slightly depending on the device you are using.
On Desktop (Windows and Mac)
The freeze panes feature works exactly the same on both Windows and Mac. Use the View tab to access Freeze Panes, Freeze Top Row, and Freeze First Column. Keyboard shortcuts also work consistently across platforms.
On Mobile Devices
The Excel mobile app supports freezing the top row and first column, but it does not support the full Freeze Panes feature. If you need more advanced freezing on mobile, consider editing your spreadsheet on a desktop first and then viewing it on your tablet or phone.
On the Web Version (Excel Online)
Excel Online has limited support for freezing panes. You can freeze the top row, but advanced freeze options are not yet available in the browser version. For full functionality, use the desktop app or a browser on a larger screen.
No matter which device you use, the core concept remains the same. Keep your headers visible, protect your key data, and navigate your spreadsheet with confidence.
Combining Cell Locking with Other Excel Features
Locking cells to scroll becomes even more powerful when you combine it with other Excel features. Here are some advanced combinations to try.
Freeze Panes with Conditional Formatting
When your frozen rows contain conditional formatting rules, those rules stay active as you scroll. This means your color-coded data remains visually consistent throughout the worksheet. It is a great way to highlight trends while keeping your reference rows in place.
Protect Sheet with Filtering
You can protect a sheet and still allow users to filter data. In the Protect Sheet dialog, check the “Use AutoFilter” option. This lets people sort and filter without editing locked cells. It is ideal for shared dashboards and reporting templates.
Freeze Panes with Data Validation
If you have dropdown lists or input rules in your frozen rows, those continue to work after freezing. Users can still select from dropdown menus in the header rows while scrolling through the data below. This keeps your data entry clean and controlled.
For busy professionals juggling multiple tools, consider exploring helpful productivity resources like gadgets designed to simplify daily tasks and boost overall efficiency. Combining smart Excel habits with the right tools creates a powerful productivity system.
Key Takeaways
- Freeze Panes is the primary tool for locking rows and columns while scrolling in Excel.
- You can lock specific cells using the Protect Sheet feature to prevent edits while allowing scrolling.
- Keyboard shortcuts save time and make cell locking faster and more efficient.
- Splitting the worksheet offers an alternative way to view different sections simultaneously.
- Common mistakes include freezing the wrong cell, so always select the correct anchor point first.
- Device compatibility varies, so check which freezing features are available on your platform.
- Combining freezing with conditional formatting, filters, and data validation creates a more powerful spreadsheet.
Conclusion
Locking cells to scroll in Excel is one of the simplest yet most impactful skills you can learn. Whether you use Freeze Panes to keep headers visible, Protect Sheet to prevent unwanted edits, or Split Worksheet for side-by-side comparisons, each method gives you more control over your data. The steps are straightforward, and the results are immediate.
Start by practicing the basic freeze panes technique on a sample spreadsheet. Once you feel comfortable, explore the more advanced methods like cell protection and worksheet splitting. Before long, navigating large Excel files will feel effortless. Remember to use keyboard shortcuts to speed up your workflow and avoid the common mistakes outlined in this guide.
Excel is a tool that grows with you. The more you master its features, the more productive you become. So go ahead, open your next spreadsheet, and lock those cells. Your future self will thank you every time you scroll through clean, organized data without losing your place.
Frequently Asked Questions
What is the difference between freezing panes and protecting cells in Excel?
Freezing panes is a visual feature that keeps certain rows and columns visible while you scroll. It does not prevent anyone from editing those cells. Protecting cells, on the other hand, locks them from being changed. You can use both features together for maximum control over your spreadsheet.
Can I lock cells to scroll in Excel Online?
Excel Online supports freezing the top row, but it does not offer the full Freeze Panes feature. For complete functionality, use the desktop version of Excel. You can set up frozen panes on desktop and then view the file in Excel Online.
How do I unfreeze panes in Excel?
Go to the View tab and click “Unfreeze Panes.” This removes all frozen rows and columns from your worksheet. Your spreadsheet will return to normal scrolling behavior immediately.
Can I lock individual cells without freezing entire rows or columns?
Yes. Use the Protect Sheet feature to lock specific cells. First, unlock the cells you want to remain editable, then enable sheet protection. This prevents changes to locked cells while still allowing you to scroll freely through the worksheet.
What keyboard shortcut freezes the top row in Excel?
On Windows, press Alt + W + F + R to freeze the top row. On Mac, use the View menu to access the same option. Keyboard shortcuts make the process much faster than navigating through the ribbon.
Does freezing panes affect how my spreadsheet prints?
No. Frozen panes only affect what you see on screen. They do not appear in printouts or PDF exports. Your printed document will look exactly the same whether or not you have frozen panes enabled.
=== META TITLE ===
How Do I Lock Cells To Scroll In Excel
=== SEO TITLE ===
How Do I Lock Cells To Scroll In Excel Step By Step
=== URL SLUG ===
how-do-i-lock-cells-to-scroll-in-excel