Deleted History Mac Time Machine Recovery Made Easy
Deleted History Mac Time Machine recovery is simpler than most users think. Time Machine creates automatic local snapshots and backups that let you restore lost browsing history, file history, and more on your Mac. This guide walks you through every method, tip, and trick to bring back your deleted data with confidence.
Key Takeaways
- Time Machine is your best friend: It automatically backs up your Mac and keeps deleted history recoverable.
- Local snapshots save the day: Even without an external drive, macOS keeps hidden backups you can use.
- Browser history is separate from system history: You may need different methods for each type of recovery.
- Act fast: The sooner you try recovery, the better your chances of success.
- Prevent future loss: Simple settings tweaks keep your Time Machine running smoothly.
- Third-party tools can help: When Time Machine falls short, other apps fill the gap.
📑 Table of Contents
- What Is Deleted History Mac Time Machine Recovery?
- How Time Machine Works on Mac
- Recovering Deleted Browser History Using Time Machine
- Recovering Deleted File History and Finder Activity
- Common Mistakes That Prevent Successful Recovery
- Tips to Prevent Future History Loss
- When Time Machine Is Not Enough: Alternative Recovery Methods
- Key Takeaways
- Conclusion
What Is Deleted History Mac Time Machine Recovery?
Have you ever accidentally deleted browsing history on your Mac and panicked? You are not alone. Many Mac users face this frustrating situation every day. The good news is that Deleted History Mac Time Machine recovery offers a reliable way to get that data back.
Time Machine is Apple’s built-in backup tool. It runs automatically in the background. It saves copies of your files, system settings, and even browsing data at regular intervals. When something gets deleted, Time Machine keeps a record of it. This means you can travel back in time and restore what you lost.
But here is the thing many people miss. Time Machine does more than just back up files. It also keeps local snapshots. These snapshots live on your Mac’s startup disk. They capture the state of your system at different points in time. Even if you do not have an external backup drive connected, these local snapshots can still help you recover deleted history.
In this article, we will walk you through every method. We will cover browser history recovery, file history restoration, and troubleshooting tips. By the end, you will know exactly how to use Deleted History Mac Time Machine tools to get your data back.
How Time Machine Works on Mac
Before you dive into recovery, it helps to understand how Time Machine actually works. Think of it like a time-lapse camera for your Mac. Every hour, it takes a snapshot of your system. It saves changes to files, settings, and even app data. Over time, it builds a detailed history of your Mac’s activity.
Here is a quick look at how the process works:
- Automatic hourly backups: Time Machine creates a new snapshot every hour when your Mac is awake.
- Daily backups: It takes a deeper snapshot each day to capture broader changes.
- Weekly backups: Older snapshots are cleaned up, but key weekly backups are kept.
- Local snapshots: Even without an external drive, macOS stores temporary local backups on your startup disk.
These snapshots include more than just documents. They can contain browser data, cache files, and system logs. This is why Deleted History Mac Time Machine recovery works so well. The backup system captures a wide range of data types that users often forget exist.
Setting Up Time Machine Correctly
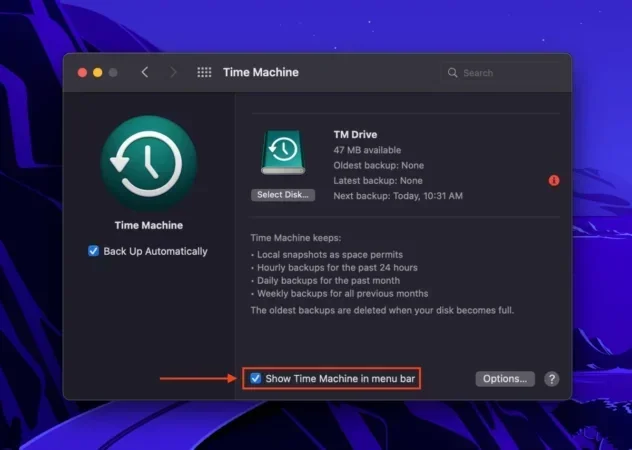
If you have not set up Time Machine yet, now is the time. Open System Settings and click on General. Then select Time Machine. Choose an external drive to use as your backup destination. Turn the feature on, and let it run.
Here are a few quick tips to make sure your setup is solid:
- Use a dedicated external drive for Time Machine backups.
- Keep the drive connected whenever possible.
- Make sure you have enough storage space on the drive.
- Check that Time Machine is running by looking at the menu bar icon.
A proper setup means your deleted history Mac Time Machine recovery options stay wide open. You never know when you will need to go back and find something you accidentally removed.
Recovering Deleted Browser History Using Time Machine
Browser history is one of the most common things people accidentally delete. Maybe you hit a wrong keyboard shortcut. Perhaps a browser update cleared your data unexpectedly. Whatever the reason, Time Machine can often help you get it back.
The process works differently depending on which browser you use. Safari, Chrome, and Firefox each store history in different locations. But Time Machine can reach all of them. Let us walk through the steps.
Recovering Safari History
Safari stores its history file in a specific folder on your Mac. To restore it using Time Machine, follow these steps:
- Open Finder and navigate to the Library folder. You can do this by clicking Go in the menu bar and holding the Option key.
- Go to Safari and look for the History.db file.
- Right-click the file and select Get Info.
- Note the file location so you can find it in Time Machine later.
- Open Time Machine from the menu bar.
- Navigate to the folder where the History.db file lives.
- Find a previous version of the file before you deleted the history.
- Click Restore to bring the old version back.
This method works because Time Machine keeps copies of the Safari history database. Even after you delete browsing records, the old database file often remains in a snapshot.
Recovering Chrome History
Chrome stores its history in a different location. The file is called “History” and lives inside the Chrome user data folder. The recovery process is similar:
- Open Finder and go to the Library folder.
- Navigate to Application Support and then Google Chrome.
- Find the Default folder and locate the History file.
- Use Time Machine to browse to a previous version of this file.
- Restore the file to recover your Chrome browsing history.
One thing to keep in mind. Chrome sometimes creates lock files that can interfere with restoration. If you run into issues, close Chrome completely before restoring the file. This simple step solves many problems with deleted history Mac Time Machine recovery.
Recovering Firefox History
Firefox stores its history in a places.sqlite file. You can find this inside the Firefox profile folder. The steps are similar to the ones above. Open Time Machine, navigate to the profile folder, and restore the places.sqlite file from a previous snapshot.
Each browser has its quirks. But the core idea stays the same. Time Machine backs up these history files regularly. When you need them back, the snapshots are there waiting for you.
Recovering Deleted File History and Finder Activity
Browser history is not the only thing you can recover. Time Machine also keeps track of file activity on your Mac. This includes documents you opened, files you moved, and folders you deleted. If you need to restore any of this, the process is straightforward.
Using Time Machine to Restore Deleted Files
Here is how you restore deleted files using Time Machine:
- Open Time Machine from the menu bar.
- Click Enter Time Machine to browse through snapshots.
- Navigate to the folder where the deleted file used to live.
- Look for the file in the snapshot from before it was deleted.
- Select the file and click Restore.
This works for documents, photos, downloads, and almost any file type. Time Machine keeps multiple versions of files too. So if you accidentally edited something and want the old version back, you can do that as well.
Restoring Finder Search History
Finder keeps a record of your recent searches. If you cleared this and want it back, Time Machine can help. The search history lives in a plist file within your user Library. Navigate to that file in Time Machine and restore a previous version.
Many users do not realize this is possible. But it is a great example of how deleted history Mac Time Machine recovery goes far beyond just browser data. Your entire Mac activity trail is preserved in those snapshots.
Common Mistakes That Prevent Successful Recovery
Recovery is not always smooth sailing. Many people run into problems because of simple mistakes. Here are the most common ones to avoid.
Waiting Too Long to Attempt Recovery
Time Machine overwrites old snapshots to save space. The longer you wait, the more likely your deleted data gets replaced by new backups. If you realize you deleted something important, try recovery immediately. The sooner, the better.
Not Having Enough Backup Storage
If your Time Machine drive is full, older backups get deleted first. This means your recovery options shrink over time. Make sure you have enough storage on your backup drive. A good rule of thumb is to use a drive at least twice the size of your Mac’s storage.
Restoring the Wrong File Version
Time Machine shows you many versions of the same file. It can be tempting to pick the wrong one. Always check the date and time of each snapshot before you restore. Pick the version from before you deleted the history.
Ignoring Local Snapshots
Many users do not know about local snapshots. These are temporary backups stored on your Mac’s own disk. Even without an external drive, local snapshots can save your day. Check for them in Time Machine before giving up on recovery.
Tips to Prevent Future History Loss
Recovery is great. But prevention is even better. Here are some simple habits that keep your data safe.
- Keep Time Machine running at all times. Connect your backup drive regularly and let it do its job.
- Enable local snapshots. This is on by default, but double-check your Time Machine settings to confirm.
- Use multiple backup methods. Combine Time Machine with cloud storage for extra protection.
- Avoid clearing browser history unless necessary. If you need to clear it, make sure you have a recent backup first.
- Review your Time Machine backups occasionally. Browse through old snapshots to understand what is being saved.
These small steps make a huge difference. They ensure that deleted history Mac Time Machine recovery is always an option, not a desperate last resort.
When Time Machine Is Not Enough: Alternative Recovery Methods
Sometimes Time Machine does not have the snapshot you need. Maybe the local snapshots got cleared. Or perhaps the deletion happened before Time Machine started running. In these cases, you still have options.
Using Third-Party Recovery Software
Several Mac recovery tools can scan your hard drive for deleted files. Apps like Disk Drill, EaseUS Data Recovery, and Stellar Data Recovery specialize in finding data that standard tools miss. These programs work by searching the raw data on your disk for traces of deleted files.
Here is what to look for in a recovery tool:
- Mac-specific compatibility.
- Support for APFS and HFS+ file systems.
- Preview features so you can see files before recovering them.
- A good reputation and positive user reviews.
These tools work best when you stop using the Mac as soon as you realize data is lost. Every new file you save could overwrite the deleted data. So act quickly.
Checking Browser Built-In History Sync
If you use Chrome or Firefox with a synced account, your history might live on their servers. Log in to your account on another device or the web portal. Check if the deleted history is still there. This is a quick and easy fix that many people overlook.
Contacting Apple Support
If nothing else works, Apple Support can help. They have access to advanced diagnostic tools. They may be able to recover data that standard methods cannot reach. It is always worth a call if your deleted history matters a lot.
Key Takeaways
- Time Machine is your best friend: It automatically backs up your Mac and keeps deleted history recoverable.
- Local snapshots save the day: Even without an external drive, macOS keeps hidden backups you can use.
- Browser history is separate from system history: You may need different methods for each type of recovery.
- Act fast: The sooner you try recovery, the better your chances of success.
- Prevent future loss: Simple settings tweaks keep your Time Machine running smoothly.
- Third-party tools can help: When Time Machine falls short, other apps fill the gap.
Conclusion
Losing your browsing history or file history on a Mac can feel like a disaster. But with Deleted History Mac Time Machine recovery, you have a powerful safety net. Time Machine’s automatic backups and local snapshots mean your data is almost never truly gone. You just need to know where to look.
We covered a lot of ground in this guide. From understanding how Time Machine works to recovering Safari, Chrome, and Firefox history, you now have the tools you need. We also explored common mistakes to avoid and tips to prevent future data loss. And for those tough situations where Time Machine falls short, we looked at alternative recovery methods.
The most important takeaway is this: act quickly and stay calm. Do not keep saving new files to your Mac if you need to recover deleted data. Open Time Machine, find the right snapshot, and restore what you need. With a little patience, your deleted history is almost always within reach.
Start setting up or checking your Time Machine backups today. A few minutes of preparation now can save you hours of stress later. Your Mac’s backup system is one of its best features. Use it wisely, and you will never have to worry about lost data again.
Frequently Asked Questions
Can I recover deleted browser history without Time Machine?
Yes, you can. If you use a browser that syncs with a cloud account, your history may still exist on their servers. You can also try third-party recovery software that scans your Mac’s disk for traces of deleted data. However, Time Machine remains the most reliable built-in method for this type of recovery.
How far back does Time Machine keep local snapshots?
Local snapshots are temporary and depend on available disk space. macOS typically keeps them for up to 24 hours or until disk space runs low. For longer-term recovery, you need an external Time Machine backup drive connected regularly.
Why can’t I find my deleted history in Time Machine?
This can happen for a few reasons. The snapshot may have been overwritten by newer backups. Local snapshots might have been cleared. Or the deletion may have happened before Time Machine started running. In these cases, try third-party recovery tools or check your browser’s cloud sync history.
Is it safe to restore files from Time Machine?
Absolutely. Time Machine creates exact copies of your files at specific points in time. Restoring from these snapshots is completely safe and will not harm your current data. Just make sure you are restoring the correct file version from the right date.
How do I check if local snapshots are enabled on my Mac?
Go to System Settings, click General, and then select Time Machine. Look for the option related to local snapshots. It is usually enabled by default on Macs running macOS Sierra or later. You can also check for existing snapshots by opening Time Machine and browsing without an external drive connected.
What should I do first when I realize I deleted important history?
Stop using your Mac for any heavy tasks right away. Avoid saving new files or installing apps. Then open Time Machine immediately and start browsing for the snapshot that contains the data you need. Speed is critical because new data can overwrite the space where deleted files are stored.