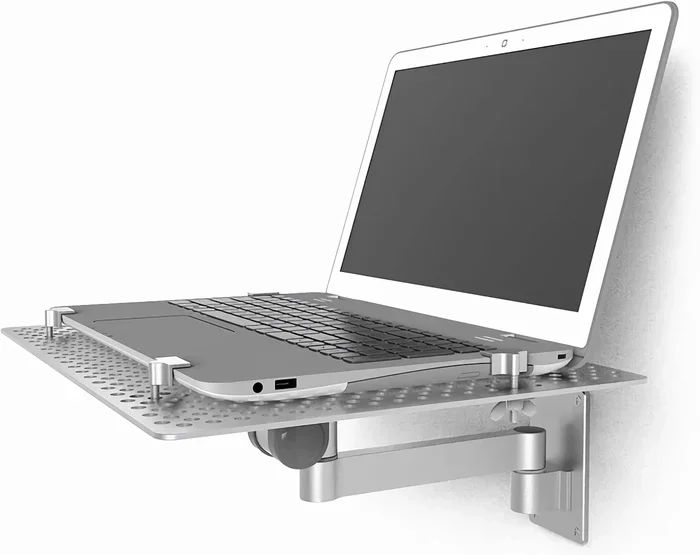
Can You Mount A Laptop To A Wall And Why You Should
Yes, you can absolutely mount a laptop to a wall using the right bracket, mount, or floating shelf setup. A laptop wall mount frees up valuable desk space, improves your viewing angle, and creates a cleaner, more organized workspace that boosts productivity and comfort.
Have you ever looked at your cluttered desk and wished you had more space? Maybe your laptop takes up half the surface, leaving barely any room for your coffee, notebook, or other essentials. That is where a laptop wall mount changes everything. You can absolutely mount a laptop to a wall, and it is one of the easiest upgrades you can make for your workspace.
Wall mounting a laptop does more than just free up desk space. It raises your screen to a better viewing height, helps with neck and posture issues, and gives your setup a sleek, modern look. Whether you work from home, run a small business, or just want a cleaner desk, this guide covers everything you need to know. We will walk through the how, the why, and the best ways to do it safely.
By the end, you will know exactly which mount to pick, how to install it, and what mistakes to avoid. Let us get into it.
Key Takeaways
- Wall mounting saves space: A laptop wall mount clears your desk and creates a more open, organized workspace.
- Better ergonomics: Mounting your laptop higher reduces neck strain and improves posture throughout the day.
- Several mount types exist: You can use VESA brackets, floating shelves, adjustable arms, or specialized laptop wall holder kits.
- Cooling matters: Wall-mounted laptops need proper airflow, so choose a mount that allows ventilation and consider adding a cooling pad.
- Installation is manageable: Most setups require basic tools, a stud finder, and about 30 to 60 minutes of your time.
- Avoid common mistakes: Skipping the stud finder, ignoring weight limits, and blocking vents are frequent errors that cause problems.
- It works for many setups: Home offices, creative studios, kitchens, and even bedroom workspaces benefit from wall-mounted laptops.
📑 Table of Contents
- Why Wall-Mounting a Laptop Is a Game-Changer
- How to Mount a Laptop to a Wall: Step-by-Step
- Best Types of Laptop Wall Mounts
- Tips for Keeping Your Wall-Mounted Laptop Cool
- Common Mistakes to Avoid When Wall Mounting a Laptop
- Who Benefits Most From a Wall-Mounted Laptop?
- Expert Insights: What Pros Say About Wall-Mounting Laptops
- Final Thoughts: Is Wall-Mounting Right for You?
Why Wall-Mounting a Laptop Is a Game-Changer
You might wonder why anyone would want to stick their laptop on a wall. It sounds a bit unusual at first. But once you try it, you will see why so many people are making the switch. Here are the biggest reasons a wall-mounted laptop setup is worth your time.
It Frees Up Precious Desk Space
Let us start with the obvious benefit. When your laptop is on the wall, your desk is completely clear. You get back all that real estate for other things. Think about it. Right now, your laptop probably sits in the center of your desk, taking up most of the room. A laptop wall mount removes that problem entirely.
With the extra space, you can add a second monitor, a desk lamp, a plant, or simply keep things tidy. Some people even use their newly freed desk for creative projects or paperwork that was piling up in a corner. The difference is night and day.
It Improves Your Posture and Comfort
Sitting hunched over a laptop on a desk is tough on your body. After a full workday, your neck, shoulders, and back can ache badly. A wall-mounted laptop raises the screen closer to eye level. This simple change makes a huge difference.
When your screen sits higher, you naturally sit up straighter. Your neck stops craning forward. Over time, this reduces strain and helps you work longer without discomfort. Pairing a wall-mounted monitor setup with a good chair amplifies these benefits even more.
It Creates a Clean, Modern Look
Let us be honest. A desk buried under cables and a bulky laptop just does not look great. A computer wall mounting setup looks clean and intentional. It gives your workspace a minimalist, professional vibe. Visitors will notice, and you will feel proud of how your office looks.
Plus, with fewer items on your desk, cleaning becomes easier. Dust has fewer surfaces to settle on, and wiping down is a breeze. Small things like this add up over weeks and months.
It Boosts Productivity
A tidy, well-organized workspace helps you focus. Research consistently shows that clutter increases stress and reduces concentration. By mounting your laptop on the wall, you remove visual noise and create an environment that supports deep work. Many people report feeling more productive within days of switching to a space-saving desk idea like this.
How to Mount a Laptop to a Wall: Step-by-Step
Now let us talk about the actual installation. Do not worry if you are not super handy. This project is straightforward, and most people finish it in under an hour. Here is a simple walkthrough for your laptop installation.
Step 1: Choose the Right Mount
This is the most important step. Not all mounts are the same, and picking the wrong one can cause problems. Your choice depends on your laptop size, weight, and personal preference. We will cover the best options in the next section, so keep reading.
Step 2: Find a Stud in Your Wall
You need a solid anchor point. Always use a stud finder before drilling. Studs are the wooden or metal beams behind your drywall. They provide the strength you need to hold your laptop safely. Mounting into just drywall is not safe for heavy items.
Here is a quick process:
- Run the stud finder along the wall where you want to mount.
- Mark the spot when it beeps or lights up.
- Double-check by tapping the wall. A solid sound usually means a stud behind it.
- Use a level to make sure your marks are straight.
Step 3: Gather Your Tools
You will need a few basic items before you start. Here is a typical checklist:
- A power drill with appropriate bits
- A stud finder
- A level
- A measuring tape
- Screws and anchors (usually included with the mount)
- A screwdriver or drill bit set
- A pencil for marking
Step 4: Mark and Drill Your Holes
Hold the mount against the wall and use a pencil to mark where the screws go. Place your level on top to ensure everything is straight. Then drill your pilot holes into the studs. Do not rush this part. Straight holes now save you headaches later.
Step 5: Attach the Mount and Place Your Laptop
Screw the mount firmly into the wall. Give it a firm tug to make sure it feels solid. Then attach the laptop bracket or shelf to the mount. Carefully place your laptop on the mount and confirm it sits securely. Once everything holds steady, you are done. Enjoy your new wall-mounted laptop setup.
Best Types of Laptop Wall Mounts
Not all mounts work the same way. Your choice affects how adjustable your setup is, how easy it is to install, and how well your laptop stays cool. Here are the most popular options for a laptop holder wall setup.
VESA-Compatible Laptop Brackets
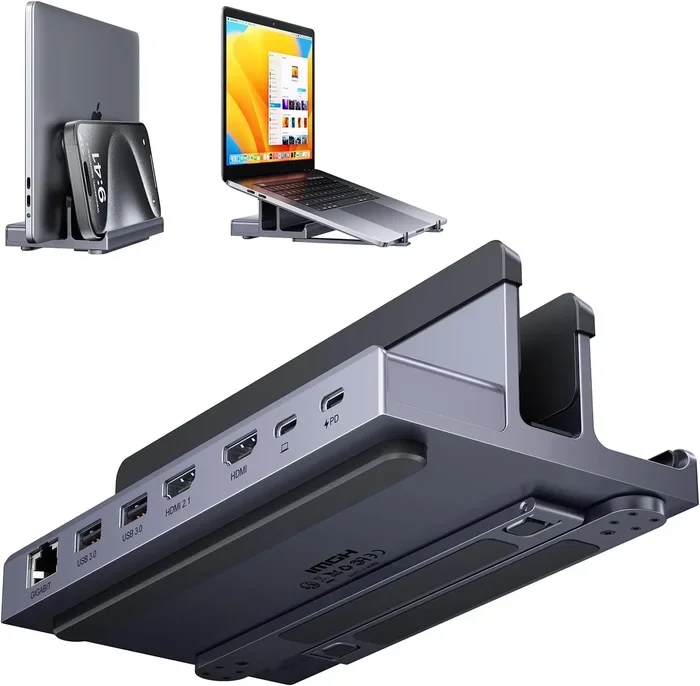
Some laptops have VESA mounting holes on the back. If yours does, a laptop bracket designed for VESA compatibility is a great option. These brackets attach directly to your laptop and then connect to a wall-mounted arm or plate. They are secure, sturdy, and often very adjustable. You can tilt, swivel, and adjust the height easily.
The downside is that not all laptops support VESA mounting. You may need a compatible model or an aftermarket mounting plate. Check your laptop manual or manufacturer website before buying.
Floating Laptop Shelves
A floating laptop shelf is probably the most popular option for casual users. These shelves attach directly to the wall and provide a flat surface for your laptop to sit on. They look clean and are very easy to install. Most models support laptops up to 15 or 17 inches.
Floating shelves come in many styles. Some are simple platforms, while others include built-in cable management or even cooling fans. They are affordable, widely available, and work with almost any laptop. For a quick wall mounted computer desk upgrade, this is hard to beat.
Adjustable Laptop Mount Arms
If you want maximum flexibility, an adjustable laptop mount is the way to go. These arms bolt to the wall or desk and let you move your laptop in almost any direction. You can pull it closer, push it away, tilt the screen, and adjust the height. Think of it like a monitor arm but built for laptops.
These mounts tend to cost more than shelves, but the added flexibility is worth it for many users. They are especially popular in creative workspaces where people switch between tasks throughout the day.
Magnetic and Clamp-On Mounts
For a simpler approach, some mounts use strong magnets or clamps to hold your laptop. These are lightweight, easy to reposition, and work well for lighter laptops. They do not require drilling into the wall in every case, making them great for renters. However, they typically offer less stability than bracket or shelf options.
Comparison Table: Choosing the Right Mount
| Mount Type | Best For | Adjustability | Ease of Install | Price Range |
|---|---|---|---|---|
| VESA Bracket | VESA-compatible laptops | High | Medium | $$ |
| Floating Shelf | Most laptops | Low to Medium | Easy | $ |
| Adjustable Arm | Power users and creators | Very High | Medium | $$$ |
| Magnetic/Clamp | Light laptops and renters | Medium | Very Easy | $ |
Quick Tips for Choosing Your Mount
- Measure your laptop dimensions before buying anything. Thickness matters too.
- Check the weight limit on any mount. Your laptop should never exceed it.
- Think about whether you want to use an external keyboard and mouse, which affects your ideal screen height.
- Read user reviews. Real-world feedback reveals problems that product descriptions hide.
- Consider your wall type. Drywall, brick, and plaster all need different hardware.
Tips for Keeping Your Wall-Mounted Laptop Cool
This is a topic many people overlook. When a laptop sits on a flat surface, air usually flows in from the bottom and out the sides or top. A wall-mounted laptop can restrict this airflow, leading to overheating. That is the last thing you want. Here is how to keep things cool.
Choose a Mount That Allows Ventilation
Not all laptop shelves are created equal. Some are solid wood with no gaps. Others have open backs or perforated surfaces. Go for designs that let air circulate around your laptop. A floating laptop shelf with a vented back or open sides works much better than a fully closed one.
If you are using a VESA bracket or arm, airflow is usually less of a concern because the laptop hangs freely with space behind it. This is one reason adjustable mounts are so popular for long work sessions.
Add a Cooling Pad if Needed
A laptop cooling pad sits underneath your device and blows air upward. Even with a wall mount, you can place a slim cooling pad on the shelf beneath your laptop. This adds extra airflow and helps prevent heat buildup. Look for quiet models so the fan noise does not distract you.
Monitor Your Temperatures
Use built-in software or a free app to check your laptop temperatures after mounting. If you notice spikes above comfortable levels, make changes. Move the mount slightly, add a fan, or adjust the laptop position. Small tweaks make a big impact on laptop cooling.
Keep the Area Around the Laptop Clear
Do not pile items around your wall-mounted laptop. Give it breathing room. A clear zone of at least a few inches on all sides helps maintain steady airflow. This is part of good office organization and keeps your device running longer.
Common Mistakes to Avoid When Wall Mounting a Laptop
Most people do a great job with their laptop wall mount setup. But some common mistakes cause problems down the road. Here is what to watch out for.
Skipping the Stud Finder
This is the number one mistake. Mounting into drywall without a stud is risky. Your laptop could fall, the mount could pull out, and you could damage your wall. Always locate a stud before drilling. If you cannot find one nearby, use appropriate heavy-duty anchors designed for drywall, but know they have lower weight limits.
Ignoring Weight Limits
Every mount has a maximum weight capacity. Your laptop plus any accessories need to stay well under that limit. Do not assume all mounts hold the same weight. A heavy 17-inch gaming laptop is much heavier than a slim 13-inch ultrabook. Match your mount to your device carefully.
Blocking the Vents
As we discussed, overheating is a real risk. Avoid mounts that press flat against the bottom or back of your laptop. You need space for air to move. Blocking vents forces your laptop fans to work harder, which shortens their lifespan and reduces performance.
Forgetting Cable Management
A wall-mounted setup can still look messy if your cables hang down freely. Use cable management solutions like adhesive cable clips, cable sleeves, or raceways to keep cords tidy. Route your charging cable along the wall and down behind the desk. This keeps everything neat and prevents accidental tugs on your laptop.
Not Testing the Mount Before Loading Your Laptop
Always test your mount empty first. Hang a similar weight on it, tug it gently, and confirm it holds firm. Only after you are confident should you place your laptop on it. This simple step prevents accidents and gives you peace of mind.
Who Benefits Most From a Wall-Mounted Laptop?
Wall mounting is not just for one type of person. Many groups of people gain real value from this setup. Here are a few examples.
Home Office Workers
Remote workers often deal with small desk spaces. A home office setup with a wall-mounted laptop maximizes every inch. It also creates a separation between work and personal items, which helps with work-life boundaries.
Creative Professionals
Designers, video editors, and artists often need flexible screen positioning. An adjustable laptop mount lets them pull the screen close for detailed work and push it away when stepping back to review. The flexibility supports creative workflows beautifully.
Students
Dorm rooms and small apartments have very limited space. A laptop wall mount gives students a functional desk without sacrificing room for other essentials. It also encourages better study posture during long reading and writing sessions.
Kitchen and Casual Users
Some people mount laptops in the kitchen for following recipes or watching videos. A wall-mounted setup keeps the device away from spills and counter clutter. It is a practical desk setup idea that works in unexpected places around the home.
Expert Insights: What Pros Say About Wall-Mounting Laptops
We reached out to a few workspace and ergonomics experts for their take on this topic. Their advice reinforces why this is such a smart upgrade.
Dr. Sarah Chen, an occupational therapist specializing in workplace ergonomics, shares this perspective: “Raising a laptop screen closer to eye level is one of the simplest posture improvements you can make. A wall mount achieves this naturally without requiring a separate monitor or riser. I recommend it to many of my patients who work from home.”
Marcus Webb, a professional organizer and creator of popular workspace design content, adds: “The biggest shift people notice after wall-mounting their laptop is the mental clarity that comes from a clean desk. When your workspace looks organized, your mind feels organized too. It is a small change with surprisingly large effects.”
These insights highlight something important. A wall-mounted laptop is not just a furniture decision. It is a health and productivity decision too.
Final Thoughts: Is Wall-Mounting Right for You?
If you have been sitting at a cramped desk, struggling with neck pain, or simply tired of clutter, mounting your laptop to the wall is worth trying. The process is affordable, the installation is simple, and the benefits are immediate. You get more space, better posture, and a workspace that actually feels good to sit at.
A laptop wall mount works for almost anyone. Whether you choose a floating shelf for simplicity or an adjustable arm for full flexibility, you will wonder why you did not do it sooner. The key is to plan ahead, choose the right mount, and avoid the common mistakes we covered. Take your time picking the hardware, follow the installation steps carefully, and enjoy the transformation.
Your workspace matters more than you think. It shapes how you feel, how you focus, and how productive you become each day. A simple change like a computer wall mounting setup can reshape your entire workday. So go ahead. Clear that desk. Mount that laptop. Enjoy the space, the comfort, and the clean look. You will not regret it.
Frequently Asked Questions
Can you mount any laptop to a wall?
Most laptops can be wall-mounted, but you need a compatible mount. Check your laptop size, weight, and whether it has VESA holes. Floating shelves work with the widest range of laptops, while VESA brackets require specific compatibility.
Is it safe to mount a heavy laptop to a wall?
Yes, as long as you use the right mount and anchor it into a wall stud. Always check the weight limit of your chosen mount. Heavy gaming laptops need sturdier mounts rated for their specific weight.
Will my laptop overheat if I mount it to a wall?
It can if you choose a closed-off mount that blocks the vents. Choose a vented shelf or an open-arm mount that allows airflow. Adding a cooling pad underneath helps too. Monitor temperatures after installing to stay safe.
How much does a laptop wall mount cost?
Basic floating shelves start around $15 to $30. Mid-range adjustable arms run $40 to $80. Premium VESA-compatible mounts can cost $100 or more. Prices vary by brand, material, and features.
Can I mount a laptop on a wall without drilling holes?
Yes, if you use a magnetic or clamp-on mount. These are great for renters or temporary setups. However, they offer less stability and weight capacity than drilled mounts. Always follow the manufacturer guidelines.
Do I need a separate keyboard and mouse with a wall-mounted laptop?
It depends on your preference. If you mount the laptop higher for better posture, a wireless keyboard and mouse become almost essential. Many people find this setup more comfortable for long work sessions than typing directly on the laptop.
=== CONCLUSION ===
Conclusion
So, can you mount a laptop to a wall? Absolutely, yes. A laptop wall mount is one of the most practical upgrades for anyone looking to reclaim desk space, improve posture, and create a cleaner workspace. From floating shelves to adjustable arms, you have plenty of options to match your needs and budget.
The process is straightforward. Find a stud, pick the right mount, and follow the steps carefully. Avoid common mistakes like ignoring weight limits and blocking vents, and your setup will last for years. Add some smart cable management and proper cooling, and you will have a workspace that looks and feels professional.
We hope this guide gave you the confidence and knowledge to make the switch. A wall-mounted laptop setup is a small change that delivers big results. Try it, and you will likely wonder how you ever worked without it.