Can I Put A Projector On A Shelf Everything You Need To Know
Yes, you can put a projector on a shelf, but doing it right matters for image quality, cooling, and safety. This guide covers everything from choosing the right shelf to avoiding overheating and achieving the perfect projector placement for your home theater setup.
Can I Put A Projector On A Shelf? The short answer is yes. But the full answer is a lot more interesting. Setting up a projector on a shelf is one of the most popular ways to build a home theater without breaking the bank or drilling holes in your walls. Whether you live in a rental apartment or just want a quick setup, shelf placement offers flexibility and simplicity.
However, there are important things you need to know. From ventilation to projector throw distance, the way you place your projector on a shelf can make or break your viewing experience. In this guide, we will walk you through everything step by step. You will learn how to pick the right shelf, position your projector correctly, manage cables, and avoid common mistakes that cause blurry images or overheating.
By the end of this article, you will have all the knowledge you need to set up a stunning projector shelf arrangement in any room. Let us get into it.
Key Takeaways
- Shelf placement works well for projectors when you follow key rules for height, ventilation, and stability.
- Choose a sturdy shelf that can handle your projector weight and has enough space for airflow.
- Positioning and angle are critical for a distortion-free image on your screen.
- Cable management keeps your setup clean and prevents tripping hazards.
- Overheating is a real risk if your shelf blocks vents or sits in a confined space.
- Compare shelf vs. ceiling mount options to find the best fit for your room.
- Follow expert tips to get cinema-quality results from a simple shelf setup.
📑 Table of Contents
Why Shelf Placement Works for Projectors
Many people assume projectors belong on the ceiling. And ceiling mounts do have their advantages. But a projector on a shelf can work just as well when done correctly. The key is understanding why shelf placement makes sense and when it is the best option for your space.
The Benefits of Using a Shelf
There are several real advantages to placing your projector on a shelf instead of mounting it on the ceiling.
- Easy setup: No drilling required. You simply place the projector on a flat surface and you are ready to go.
- Portability: You can move the projector and shelf to different rooms whenever you want.
- Lower cost: Shelves are affordable, and you probably already have one in your home.
- Simple maintenance: Accessing your projector for cleaning or lamp replacement is much easier on a shelf.
- Flexibility: You can adjust the height or angle by simply moving the projector to a different spot on the shelf.
These benefits make shelf placement a great choice for casual movie nights, gaming sessions, or anyone who wants a quick projector setup without a complicated installation process.
When a Shelf Makes the Most Sense
Not every room is ideal for a ceiling mount. Here are some situations where a projector shelf setup shines.
- You are renting and cannot make permanent changes to the walls or ceiling.
- Your room has low ceilings that make ceiling mounting impractical.
- You want a temporary setup for backyard movie nights or parties.
- Your projector is used in multiple rooms and needs to be moved frequently.
- You are on a tight budget and want to avoid expensive mounting hardware.
In all of these cases, a sturdy shelf gives you a solid, reliable base for your projector without any permanent modifications to your space.
How to Choose the Right Shelf for Your Projector
Picking the right shelf might seem simple, but there are a few important details you should not overlook. The wrong shelf can cause stability issues, poor airflow, or even damage to your projector over time.
Shelf Material and Weight Capacity
Projectors come in different sizes and weights. A lightweight mini projector might weigh just a few pounds, while a larger home theater model can weigh 15 pounds or more. Your shelf needs to handle that weight comfortably.
- Wood shelves: Solid wood is strong and stable. It absorbs vibrations well, which helps keep your image steady.
- Glass shelves: Glass looks sleek but can vibrate easily. It is not the best choice for heavier projectors.
- Metal shelves: Metal is durable and sturdy, but make sure it has a flat surface so the projector does not slide.
- Floating shelves: These look clean and modern but check the weight rating carefully before placing a projector on one.
Always check the weight capacity of the shelf and compare it to your projector weight. A good rule of thumb is to choose a shelf rated for at least twice the weight of your projector. This gives you a safety margin and ensures long-term stability.
Size and Space Requirements
Your projector needs more than just a flat surface. It needs breathing room. Here is what to keep in mind when measuring your shelf space.
- Projector dimensions: Measure the length, width, and height of your projector. The shelf should be at least a few inches larger on all sides.
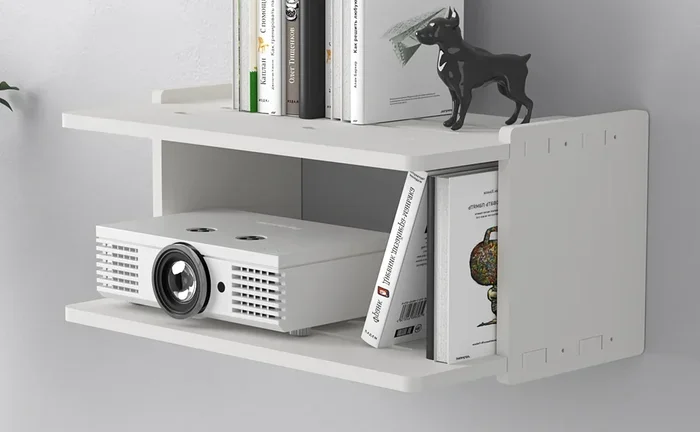
- Ventilation gaps: Leave at least 3 to 5 inches of space around the projector vents. This allows proper airflow and prevents projector overheating.
- Throw distance: Make sure the shelf is far enough from the screen to achieve the correct projector throw distance for your model.
- Cable space: Plan for space behind the shelf to route cables neatly without blocking vents.
Taking accurate measurements before you buy or choose a shelf will save you a lot of headaches later. A cramped setup leads to poor performance and potential damage to your equipment.
Setting Up Your Projector on a Shelf
Now that you have the right shelf, it is time to set everything up. Proper positioning is the difference between a crisp, clear image and a blurry, distorted one. Let us walk through the setup process step by step.
Positioning and Angle
The way you place your projector on the shelf directly affects the image quality on your screen. Here are the key positioning tips.
- Center the projector: Place it directly in front of the screen, not at an angle. This minimizes keystone distortion.
- Eye-level placement: If possible, position the projector at or near eye level when seated. This reduces the need for vertical keystone correction.
- Use a projector shelf bracket: These small brackets attach to the shelf and hold the projector securely at the perfect angle.
- Check the throw ratio: Refer to your projector manual to find the ideal distance between the projector and the screen.
Many modern projectors come with keystone correction, which lets you adjust the image digitally. However, relying too much on keystone correction can reduce image sharpness. The best approach is to get the physical positioning as close to perfect as possible before using digital adjustments.
Cable Management Tips
Nothing ruins a clean home theater look like a rat’s nest of cables hanging off the shelf. Here is how to keep things tidy and safe.
- Use a cable management box: These boxes sit on the shelf or behind it and hide power cords and HDMI cables.
- Route cables through the wall: If you are willing to do a little DIY, cable raceways behind the shelf keep wires completely hidden.
- Use velcro ties: Bundle cables together with velcro straps instead of zip ties. Velcro is reusable and gentle on cables.
- Leave slack: Do not pull cables too tight. Leave enough slack so you can move the projector for cleaning or adjustment.
- Label your cables: A simple label maker helps you identify which cable goes where, making troubleshooting much faster.
Good cable management does more than look nice. It also prevents cables from blocking your projector vents, which is a common cause of projector overheating on shelves.
Ventilation and Cooling Concerns
This is the most important section of the entire guide. A projector on a shelf can overheat if you do not pay attention to airflow. Overheating leads to dim images, color problems, and eventually permanent damage to your projector.
Why Airflow Matters So Much
Projectors generate a lot of heat during operation. They rely on internal fans to pull cool air in and push hot air out. When you place a projector on a shelf, you can accidentally block these airflow paths.
Here is what happens when airflow is restricted:
- The projector lamp works harder and burns out faster.
- Image brightness drops over time.
- The projector shuts down unexpectedly during use.
- Internal components degrade faster, shortening the overall lifespan.
None of these outcomes are good. The good news is that preventing overheating on a shelf is straightforward when you follow a few simple rules.
Common Overheating Mistakes to Avoid
- Enclosed cabinets: Never place your projector inside a closed cabinet on a shelf. Even a cabinet with a back panel traps heat and restricts airflow.
- Tight spaces: Do not wedge the projector between two objects on the shelf. Leave open space on all sides.
- Fabric covers: Do not place a cloth or decorative cover over the projector while it is running.
- Wall-mounted shelves without backing: Open-back shelves allow air to circulate behind the projector, which is ideal.
- Ignoring dust: Dust accumulates on projector vents over time. Clean them regularly with compressed air to maintain proper airflow.
If you follow these guidelines, your projector will stay cool and perform at its best for years. Projector cooling is one of the most overlooked aspects of shelf placement, and getting it right makes a huge difference.
Shelf vs. Ceiling Mount: Which Is Better?
So you are weighing your options. Should you go with a projector on a shelf or invest in a ceiling mount? Both approaches have their strengths. Let us break it down so you can make the best decision for your setup.
Head-to-Head Comparison
| Feature | Shelf Placement | Ceiling Mount |
|---|---|---|
| Installation cost | Low (just a shelf) | Medium to high (mounting hardware) |
| Setup time | Minutes | 30 minutes to 1 hour |
| Portability | Very easy to move | Permanent installation |
| Image quality | Good with proper positioning | Excellent, optimal angle |
| Ventilation | Good if spaced properly | Excellent, open air all around |
| Best for | Renters, temporary setups, small rooms | Dedicated home theaters, permanent setups |
| Cable management | Easier to access and manage | Requires more planning and routing |
| Aesthetics | Visible equipment on shelf | Clean, hidden, ceiling-mounted look |
Which Option Should You Choose?
If you want a fast, affordable, and flexible setup, a projector shelf arrangement is hard to beat. It is perfect for casual viewing, gaming, and anyone who wants to keep things simple. Ceiling mounting is better if you want the absolute best image quality and a permanent, polished home theater installation.
Many people start with a shelf setup and eventually upgrade to a ceiling mount once they are committed to a dedicated viewing room. There is no wrong choice here. It all depends on your needs, budget, and living situation.
Expert Tips for the Best Projector Shelf Setup
After helping hundreds of readers set up their home theaters, we have gathered a collection of proven tips that make a real difference. Here is what the experts recommend.
Quick Tips for Success
- Use a projector cooling pad: These small pads sit under the projector and boost airflow. They are especially helpful on enclosed shelves.
- Place the shelf away from direct sunlight: Sunlight hitting the projector can cause overheating and wash out the image.
- Test your setup before the movie: Run the projector for 15 minutes before a movie night to check for any overheating or fan noise issues.
- Use a spirit level: A small bubble level on top of the projector ensures it is perfectly balanced for the best image alignment.
- Consider a short throw projector: These projectors work well on shelves in smaller rooms because they produce a large image from a short distance.
Common Mistakes That Ruin Shelf Setups
Avoid these mistakes, and your projector shelf experience will be smooth and enjoyable.
- Placing the shelf too close to the wall: This blocks rear ventilation and traps heat. Pull the shelf out at least 6 inches from the wall.
- Ignoring vibration: Shelves placed on unstable furniture can cause image shake. Use a heavy, solid shelf on a sturdy table or stand.
- Forgetting about ambient light: A shelf setup in a bright room will look washed out. Consider blackout curtains or a projector screen with high gain.
- Overloading the shelf: Do not stack books, speakers, and the projector all on the same small shelf. Give the projector its own dedicated space.
- Skipping the manual: Every projector has specific placement requirements. Reading the manual takes 10 minutes and can prevent costly mistakes.
These expert insights come from real-world experience and will help you avoid the most common pitfalls that people encounter when setting up a projector on a shelf. Take them seriously, and your home theater will perform at a much higher level.
Final Thoughts on Projector Shelf Placement
So, can I put a projector on a shelf? Absolutely. A projector shelf setup is one of the most practical and affordable ways to enjoy big-screen entertainment at home. Whether you are in a rental apartment, a dorm room, or just looking for a simple solution, shelf placement delivers great results when you follow the right guidelines.
Remember the key points. Choose a sturdy shelf with proper weight capacity. Leave enough space for ventilation. Position the projector at the right angle and distance. Manage your cables neatly. And always prioritize airflow to prevent overheating.
With these tips in mind, you are fully equipped to create a fantastic projector shelf arrangement that delivers a cinematic experience in any room. The best part is that you do not need expensive equipment or technical skills. A little planning and attention to detail go a long way. Now go set up your projector and enjoy the show.
Frequently Asked Questions
Can any projector be placed on a shelf?
Most projectors can be placed on a shelf as long as the shelf is sturdy enough to support the weight. Check your projector manual for specific placement guidelines. Some compact and short throw projectors are especially well-suited for shelf setups because they do not require a lot of space or distance from the screen.
How much space should be around a projector on a shelf?
Leave at least 3 to 5 inches of open space on all sides of the projector, especially around the vents. This airflow gap prevents overheating and helps your projector run quietly and efficiently. Never place the projector inside a closed cabinet or against a wall with no breathing room.
Will a projector on a shelf produce a good image quality?
Yes, a projector on a shelf can produce excellent image quality when positioned correctly. The key is to center the projector in front of the screen, minimize keystone distortion, and ensure the throw distance matches your projector specifications. Using a projector bracket or shelf mount helps maintain the ideal angle for a sharp, clear picture.
What is the best type of shelf for a projector?
A solid wood shelf or a sturdy floating shelf with a high weight capacity works best. Avoid glass shelves for heavier projectors because they can vibrate and cause image instability. Open-back shelves are ideal because they allow air to circulate behind the projector, which improves cooling and prevents overheating.
Can I use a projector shelf in a bedroom?
Yes, a bedroom projector shelf setup is very popular. Use a small shelf on a nightstand or a dedicated media console. Keep the projector away from direct sunlight and bedding that could block vents. A short throw projector works especially well in bedrooms because it can produce a large image even when placed close to the wall or screen.
How do I prevent my projector from overheating on a shelf?
To prevent overheating, ensure there is plenty of space around the projector for airflow. Clean the vents regularly with compressed air. Avoid enclosing the projector in cabinets or placing it near heat sources. You can also use a small projector cooling pad for extra ventilation. If your projector has a filter, clean or replace it according to the manufacturer’s instructions.