How Do I Set Up A School Email On An Iphone Step By Step
Setting up your school email on an iPhone is easier than you think. This step-by-step guide walks you through the entire process using the native Mail app or Microsoft Outlook. You will learn how to enter your school login credentials, configure email server settings, and fix common setup problems quickly.
Key Takeaways
- Two easy methods: You can set up your school email using the native iPhone Mail app or the Microsoft Outlook app.
- Gather your credentials first: Have your school email address, password, and server settings ready before you begin.
- Common issues are fixable: Most setup problems relate to server settings, two-factor authentication, or outdated iOS software.
- Push notifications keep you connected: Enabling email sync and push notifications ensures you never miss an important message.
- Contact your school IT team: When self-troubleshooting fails, your school IT department can provide exact server settings and support.
- Extra tips boost productivity: Setting up email signatures, calendar integration, and contact sync makes your school email far more useful.
📑 Table of Contents
- How Do I Set Up A School Email On An Iphone Step By Step
- What You Need Before You Start
- Method One: Setting Up School Email Using the Native Mail App
- Method Two: Setting Up School Email Using Microsoft Outlook
- Common Setup Problems and How to Fix Them
- Tips to Get the Most Out of Your School Email on iPhone
- When to Contact Your School IT Department
- Comparison: Native Mail App vs Microsoft Outlook
- Key Takeaways
- Conclusion
How Do I Set Up A School Email On An Iphone Step By Step
Getting your school email working on your iPhone is one of the most useful things you can do as a student. Whether you need to check announcements, submit assignments, or communicate with professors, having your school email on iPhone keeps you connected 24/7. The good news is that the entire process is straightforward and takes only a few minutes.
In this guide, we walk you through every single step. We cover both the native Mail app and the Microsoft Outlook app. You will also find practical tips, common mistakes to avoid, and troubleshooting advice. By the end, your school email setup on iPhone will be complete and working perfectly.
Why Setting Up School Email on Your iPhone Matters
Most schools now use email as their primary communication tool. Professors send deadlines through email. Clubs share updates. Registration portals notify you of important dates. If you do not check your school email regularly, you risk missing critical information. Having your school email configured on iPhone means you always stay in the loop.
Beyond notifications, a mobile email setup lets you attach files, join virtual meetings, and access your calendar. It is not just about reading messages. It is about staying organized and productive throughout the school year.
What You Need Before You Start
Before you begin the school email setup on iPhone, gather a few essentials. Having everything ready saves time and prevents frustration. Here is what you need:
- Your school email address: This is usually your student ID followed by your school domain, like [email protected].
- Your school email password: Make sure you know your current password. If you have not logged in recently, you may need to reset it first.
- Your school email server settings: Some schools require specific IMAP or Exchange settings. Check your school IT website for these details.
- A stable Wi-Fi connection: You need internet access to complete the setup process.
- An updated iPhone: Make sure your iOS is up to date for the best compatibility.
If you are unsure about your server settings, do not worry. We will cover how to find them later in this guide. The native Mail app can often auto-detect settings, which makes the iOS email setup process smoother for most students.
Method One: Setting Up School Email Using the Native Mail App
The iPhone Mail app is the default email client on every iOS device. It works with most school email systems, including Gmail, Outlook, and custom school domains. This method is the fastest way to get your email running.
Step-by-Step Instructions for the Mail App
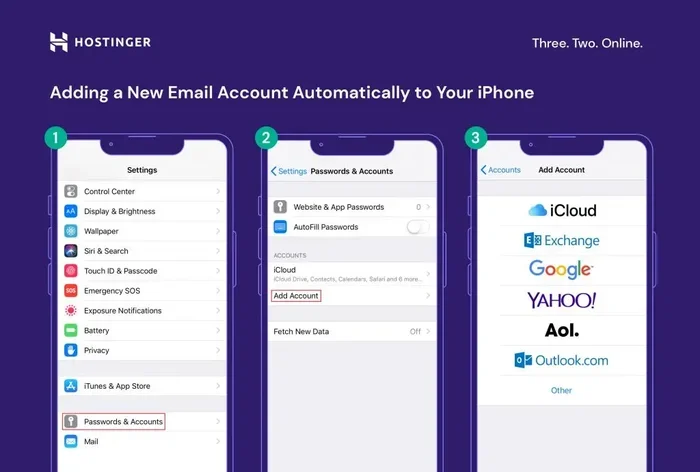
- Open the Settings app on your iPhone. Scroll down and tap Mail.
- Tap Accounts, then select Add Account.
- Choose your email provider. If your school uses Gmail, tap Google. If it uses Outlook or Exchange, tap Microsoft Exchange. For other domains, tap Other.
- Enter your school email address and tap Next.
- Type in your password and tap Sign In.
- Wait for verification. Your iPhone will check the server settings. This usually takes a few seconds.
- Select what you want to sync. You can choose Mail, Contacts, Calendars, and Notes. Tap Save.
That is it. Your school email should now appear in your Mail app. Open the app to see your inbox. You will receive push notifications for new messages if you enabled them during setup.
What If Auto-Setup Does Not Work?
Sometimes the iPhone cannot auto-detect your school email settings. This happens with custom school domains or older email systems. When this occurs, you need to enter the IMAP email settings manually. Here is what to do:
- Go to Settings, then Mail, then Accounts, then Add Account.
- Tap Other at the bottom of the provider list.
- Tap Add Mail Account.
- Enter your name, school email address, password, and a description.
- Tap Next and then select IMAP or POP.
- Enter your incoming and outgoing mail server details. These are provided by your school IT department.
- Tap Save and test the connection.
Finding the correct server settings can be tricky. Visit your school IT portal or email your school IT department for the exact email server settings for your institution. Most schools list these on their student support page.
Method Two: Setting Up School Email Using Microsoft Outlook
Many schools use Microsoft 365 or Exchange for their email systems. In these cases, the Outlook app offers a better experience. It provides calendar integration, file attachments, and a cleaner interface. The Microsoft Outlook mobile app is free and available on the App Store.
How to Set Up Outlook for School Email
- Download Microsoft Outlook from the App Store if you have not already.
- Open the app and tap Get Started.
- Enter your school email address and tap Continue.
- Type in your password and tap Sign In.
- Allow permissions when prompted. Outlook needs access to contacts and calendars for full functionality.
- Wait for sync. Your mailbox, calendar, and contacts will load automatically.
The Outlook app handles email calendar integration beautifully. You can view assignment deadlines, meeting invites, and exam schedules all in one place. This makes it a top choice for students who manage busy schedules.
Why Outlook May Be Better Than the Native Mail App
There are several reasons students prefer Outlook over the default Mail app:
- Better calendar support: Outlook syncs your school calendar seamlessly.
- Easier file sharing: You can attach OneDrive files directly from the app.
- Focused inbox: Outlook separates important emails from less critical ones.
- Push notifications: Outlook delivers real-time email alerts reliably.
- Cleaner interface: The design is optimized for mobile screens.
If your school uses Microsoft 365, Outlook is almost always the better choice for mailbox access mobile. It is purpose-built for school and work email systems.
Common Setup Problems and How to Fix Them
Even with clear instructions, things do not always go smoothly. Here are the most common issues students face when setting up school email on iPhone, along with practical fixes.
Incorrect Password Errors
This is the most frequent problem. Double-check that you are using your school email password and not your personal account password. If you recently changed your password, update it in your iPhone settings. Go to Settings, then Mail, then Accounts, and tap your school email account. Select Account and update the password field.
Server Settings Not Found
If your iPhone cannot find the server, you need to enter the settings manually. Contact your school IT department and ask for the incoming and outgoing mail server addresses, port numbers, and security types. These details are essential for a successful school email setup on iPhone when auto-detection fails.
Two-Factor Authentication Issues
Many schools now use two-factor authentication for security. This means you need a verification code in addition to your password. When prompted, check your phone or alternate email for the code. If you do not receive the code, make sure your school email account has your current phone number listed.
Emails Not Syncing or Sending
If your email sync is broken, try these steps:
- Turn off Mail for the account, then turn it back on.
- Check your Wi-Fi or cellular data connection.
- Go to Settings, then Mail, then Accounts, and tap Fetch New Data. Make sure Push is enabled.
- Restart your iPhone and try again.
For email sync issues that persist, deleting the account and re-adding it often resolves the problem. Go to Settings, then Mail, then Accounts, tap your school account, and select Delete Account. Then repeat the setup process from the beginning.
Email App Keeps Crashing
If the Mail app or Outlook crashes frequently, update your iOS and the app itself. Go to Settings, then General, then Software Update. Also check the App Store for updates to your email app. Clearing the app cache by offloading and reinstalling the app can also help.
Tips to Get the Most Out of Your School Email on iPhone
Once your school email configuration on iPhone is complete, a few extra steps will make the experience much better. These tips help you stay organized and professional.
Set Up an Email Signature
A proper email signature adds a professional touch. Go to Settings, then Mail, then Signature. Type in your name, student ID, and any other relevant details. Now every email you send includes this information automatically.
Enable Push Notifications
Push notifications ensure you see new emails immediately. Go to Settings, then Notifications, then Mail. Make sure Allow Notifications is turned on. You can also choose alert styles and sounds that work for you.
Organize Your Inbox with Folders
School email inboxes get cluttered fast. Create folders for different classes, clubs, and projects. In the Mail app, tap Edit, then New Mailbox. Name each folder and drag messages into them. This keeps your email organization clean and manageable.
Use Your School Calendar
If your school email is connected to a calendar, take full advantage of it. Add assignment deadlines, exam dates, and meeting times. Set reminders so you never miss a due date. Calendar integration is one of the biggest benefits of having your school email on your phone.
Keep Your Email App Updated
Regular updates fix bugs and improve performance. Check the App Store weekly for updates to both the Mail and Outlook apps. An up-to-date app ensures smooth email troubleshooting iPhone and fewer setup problems down the road.
Quick Tips
- Always use Wi-Fi when setting up email to avoid data usage.
- Write down your school email credentials in a secure note on your phone.
- Enable dark mode in your email app for easier nighttime reading.
- Set a custom alert tone for your school email so you can distinguish it from personal messages.
- Back up important emails by exporting them periodically.
When to Contact Your School IT Department
Sometimes self-troubleshooting is not enough. If you have tried all the steps above and your school email setup on iPhone still does not work, it is time to reach out to your school IT department. They have access to backend systems and can see issues from their end.
Before you contact them, prepare the following information:
- Your school email address
- A description of the problem
- Any error messages you see on screen
- The iPhone model and iOS version you are using
Most schools offer IT support through a help desk portal, email, or phone. Many also have walk-in hours for in-person help. Do not hesitate to use these resources. The school IT department exists to help students, and setting up email is one of their most common support requests.
Comparison: Native Mail App vs Microsoft Outlook
| Feature | Native Mail App | Microsoft Outlook |
|---|---|---|
| Setup Speed | Fast auto-detect for most schools | Fast for Microsoft 365 schools |
| Calendar Integration | Basic | Full calendar with reminders |
| File Attachments | Standard | OneDrive integration |
| Interface | Simple and clean | Feature-rich and modern |
| Push Notifications | Yes | Yes |
| Best For | Quick setup and basic use | Microsoft-based school systems |
Choose the method that fits your school system best. If your school uses Google Workspace, the native Mail app works great. If your school uses Microsoft 365, Outlook is the clear winner. Both apps deliver reliable email app settings for students.
Key Takeaways
- Two easy methods: You can set up your school email using the native Mail app or the Microsoft Outlook app.
- Gather your credentials first: Have your school email address, password, and server settings ready before you begin.
- Common issues are fixable: Most setup problems relate to server settings, two-factor authentication, or outdated iOS software.
- Push notifications keep you connected: Enabling email sync and push notifications ensures you never miss an important message.
- Contact your school IT team: When self-troubleshooting fails, your school IT department can provide exact server settings and support.
- Extra tips boost productivity: Setting up email signatures, calendar integration, and contact sync makes your school email far more useful.
Conclusion
Setting up your school email on iPhone is a simple process that pays off all semester long. Whether you use the native Mail app or the Microsoft Outlook app, the steps are clear and manageable. You just need your school credentials, a stable internet connection, and a few minutes of your time.
Remember to keep your app updated, enable push notifications, and organize your inbox with folders. These small habits make a big difference in how effectively you manage school communication. If you run into any issues, your school IT department is always there to help.
Now that you know exactly how to set up and manage your school email on your iPhone, you are ready to stay connected, organized, and on top of your academic life. Start the setup today and enjoy the convenience of having your school email right at your fingertips.
Frequently Asked Questions
Can I set up multiple school email accounts on my iPhone?
Yes, you can add multiple school email accounts to your iPhone. Simply repeat the setup process for each account. The Mail app and Outlook app both support multiple accounts. This is helpful if you have separate emails for different classes or programs.
What should I do if I forget my school email password?
Most schools have a password reset portal on their student website. You can usually reset your password using your student ID or a linked personal email. If the self-service option does not work, contact your school IT help desk for assistance with password reset school email issues.
Do I need a special app to check my school email on iPhone?
No, the native Mail app works for most school email systems. However, if your school uses Microsoft 365 or Exchange, the Outlook app provides a better experience with calendar integration and focused inbox features. Both apps are free on the App Store.
Why is my school email not sending or receiving messages after setup?
This is usually caused by incorrect server settings or a weak internet connection. Double-check your IMAP or Exchange settings with your school IT department. Also make sure Wi-Fi or cellular data is active. Restarting your iPhone often resolves temporary email sync issues.
Is it safe to store my school email password on my iPhone?
Yes, Apple uses strong encryption to store passwords in the Keychain. The iOS keychain is one of the most secure password storage systems available. Make sure you use a strong, unique password for your school email and enable two-factor authentication for extra protection.
Can I access my school email offline on my iPhone?
Yes, you can access previously synced emails offline. Go to Settings, then Mail, then Accounts, and tap Fetch New Data. Enable Offline Access or set Mail to download recent messages. This is useful during flights or in areas with poor connectivity.
=== CONCLUSION ===
Setting up your school email on iPhone does not have to be complicated. Follow the steps in this guide, choose the method that works best for your school system, and you will be up and running in minutes. Keep your credentials secure, stay on top of updates, and do not hesitate to reach out to your school IT team when you need help. A properly configured school email on your iPhone is one of the simplest yet most powerful tools for student success.